Transcription of 10024651 - res.cloudinary.com
1 Installation guide INSTRUCCIONES DE INSTALACI N View Installation Video - Scan QR code with a mobile device Voir Vid o d'installation - Balayer QR code avec un dispositif mobile Ver video de instalaci n - Escanear c digo QR con un dispositivo mobil TO BE REMOVED FOR USE BY THE OCCUPANT - RETIRER DE L'UNIT AVANT L'UTILISATION - RETIRE DE LA UNIDAD ANTES DE USAR. 10024651 . These guidelines are recommended by MAAX bath Inc. (here- MAAX bath Inc. (en adelante MAAX ) recomienda las siguientes after MAAX ) for the proper installation of their products. instrucciones para la correcta instalaci n de su producto. Antes de A careful review of these procedures (and any referenced publica- comenzar, es importante leer detenidamente estos procedimientos tions) before starting is important in avoiding unnecessary problems (y todas las publicaciones a las que se haga referencia), para evi- resulting in an improper assembly or installation.
2 Tar problemas innecesarios que puedan resultar en un montaje o instalaci n incorrectos. 10024651 . 3232/3636. Model | Mod le | Modelo 142018 / 142019 / 142024 / 142025. Base only | Base seulement | Base solamente 142020 / 142021 / 142022 / 142023. 142026 / 142027 / 142028 / 142029. Side walls | Murs lat rales | Muros laterales 142054. Back wall | Mur arri re | Muro posterior 142062 / 142063. 3448/3060/3460. Model | Mod le | Modelo 142030 / 142031 / 142036 Base only | Base seulement | Base solamente 142037 / 142042 / 142043 142032 / 142033 / 142034 / 142035 / 142038 / 142039. 142040 / 142041 / 142044 / 142045 / 142046 / 142047. Side walls | Murs lat rales | Muros laterales 142048 / 142057.
3 Back wall | Mur arri re | Muro posterior 142061 / 142064. 2954/3060/3260. Model | Mod le | Modelo Bathtub only | Bagnoire seulement | Ba era solamente 142000 / 142001 / 142006 / 142007 142002 / 142003 / 142008 / 142009 / 142010 / 142011 /. 142012 / 142013 142014 / 142015 / 142016 / 142017. Side walls | Murs lat rales | Muros laterales 142048 / 142051. Back wall | Mur arri re | Muro posterior 142061. installation guide 3. INSTRUCCIONES DE INSTALACI N. Special Notes to Installer Notas Especiales para el Instalador It is the sole responsibility of the installer to determine, prior to Es responsabilidad exclusiva del instalador, antes de realizar la insta- the installation, the requirements necessary for compliance with laci n, determinar cu les son los requisitos necesarios para cumplir all codes involving the unit or the installation.
4 Con todos los c digos aplicables a la unidad o a la instalaci n. All paperwork packaged with the unit and any associated options Toda la documentaci n que se incluya en el paquete de la unidad or accessories should be saved and presented to the homeowner o de las opciones o accesorios de la misma, se deber conservar upon completion of the installation. y entregar al propietario una vez completada la instalaci n. All published unit dimensions are for reference only. Any critical Las dimensiones de la unidad que se encuentran publicadas sir- measurements required for installation should be taken directly ven solamente de referencia. Toda dimensi n cr tica necesaria from the unit being installed.
5 Para la instalaci n deber tomarse directamente de la unidad a instalar! Any independent changes made to the unit (or to any options and accessories supplied with the unit) beyond those required for Cualquier cambio independiente que se realice a la unidad (o a normal installation can void all warranties. (Refer to the Limited cualquier opci n o accesorio proporcionado con la unidad) m s Warranty on page 11 for further information.) all de los cambios necesarios para la instalaci n normal podr . invalidar todas las garant as. (Para m s informaci n, consultar las garant as.). Inspection guidelines A careful check of the unit should be conducted upon receipt. Notify your supplier immediately if any questions or problems are encoun- Instrucciones para la Inspecci n tered during this process.
6 Una vez recibida la unidad, se deber realizar una inspecci n cui- dadosa de la misma. Si surgen cuestiones o problemas durante DO NOT INSTALL ANY UNIT WITHOUT FIRST ADDRESSING este proceso, notifique inmediatamente a su proveedor. ANY QUESTIONS THAT ARISE DURING THE INSPECTION! NO INSTALE NINGUNA UNIDAD SIN ANTES RESOLVER LAS. Basic Module Check CUESTIONES QUE SURJAN DURANTE LA INSPECCI N! Check unit drain for match to bathroom drain location. Check for unit surface damage. Inspecci n B sica del M dulo Check wall section(s) and base for color match. Comprobar que el desag e de la unidad coincida con la ubi- Check for proper options and accessories. caci n del desag e del ba o.
7 Comprobar que la superficie de la unidad no est da ada. Options/Accessories Check Comprobar que el color de la base sea el mismo que el de los An individual check list is included with the assembly and installa- paneles murales. tion guidelines of factory authorized options. Refer to listed publica- Comprobar que las opciones y los accesorios sean adecuados. tions for further information before continuing. Inspecci n de Opciones y/o Accesorios Junto con las instrucciones de montaje e instalaci n de las opcio- nes aprobadas por el fabricante, se incluye una lista de control indivi-dual. Para obtener mayor informaci n antes de continuar, consulte las publicaciones a las que se hace referencia.
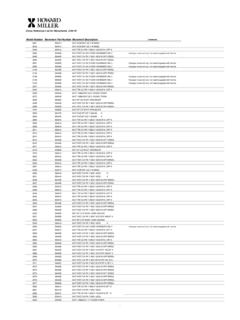
8 10024651 . installation guide 4. INSTRUCCIONES DE INSTALACI N. Figure 1 - Unit Data and Dimensional Guidelines Figura 1 - Datos de la Unidad y Gu a de Dimensiones (Tolerance: +0/ -3/8 inch) (Tolerancia : +0/ -3 /8 de pulgada). Profundidad de Empotrado de la Unidad Profundidad M nima del Recinto Centrado del Drain Center Drain Desag e Cut-Out Minimum Alcove Depth Finished Unit Depth E. Unit Rough-In Depth Unidad Terminada Profundidad de la Abertura para Desag e B C. 5". Fixture Blocks D. Drain Center Bloques Centrado del Desag e de Fijaci n A. Alcove Length / Unit Length Largo del Recinto / Largo de la Unidad C. Finished Unit Depth Profundidad de la Unidad Terminada Drain Cut-Out Abertura para Desag e 8".
9 31 1/2". 30". With Seat Model No Seat | Sans Si ge | Sin Asiento Avec Si ge Mod le Con Asiento Modelo A B C D E D. 82 " KDS 3232 32" 33" 32" 16" 15 " N/A. KDS 3636 36" 37" 36" 18 " 17 " N/A. KDS 3060 60" 31" 30" 30" 14 " 8 ". KDS 3448 48" 34 " 33 " 24" 14 " 24". 80 1/2". KDS 3460 60" 34 " 33 " 30" 14 " 8 ". KDTS 2954 54" 30" 29" 8 " 13 " N/A. KDTS 3060 60" 31" 30" 8 " 14 " N/A. KDTS 3260 60" 33" 32" 8 " 14 " N/A. Note: All models are available with ABFLR (drain above the floor) option. Nota : Todos los modelos se encuentran disponibles con la opci n de desag e arriba del piso. 10024651 . installation guide 5. INSTRUCCIONES DE INSTALACI N. 12 3/4''. KDS 32321'' KDS 3636 KDS 3060.
10 31. 31 7/8 . 7/8". 14. 143/4 . 3/4" 35 7/8''. 17 1/4'' 59 3/4 . 21 5/8 . 77 5/8 . 5/8" 441/4 . 1/4". 11 5/8''. 80 1/2'' 4 7/8'' 6 3/8 . 10 1/4 . ABFLR 33 . 33". 24. 24 3/8 . 3/8" 77'' 37''. 62 5/8'' 24 3/8'' 31 . 20 7/8 . 1 . 1". 3 . 3". 28 1/2". door opening 30''. Door Opening 3'' 32 1/2'' 1'' 2 3/4 56 1/2 1''. Door Opening door opening 12 3/4"12 1/4''. 12 3/4 1". 12 3/4''. 1'' 12 3/4'' 1''. 80 1/2 61''. 73. 735/8 . 5/8" 80 1/2''. AFR. 80 1/2" AFR. ABFLR. 77" OPTION. 77 ABFLR OPTION 83 1/4''. 62 5/8 . 62 5/8" 73 5/8'' 77'' AFR. ABFLR. OPTION 66 3/8'' 76 1/4''. 62 5/8''. 81 1/8''. 30 . 30". 34 1/2''. 30''. 12 1/4 . 12 1/4" 12 1/4''. 10024651 . installation guide 6. INSTRUCCIONES DE INSTALACI N.