Transcription of 16E09-101
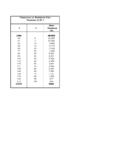
1 CONTENTSB asic Description .. 1 Precautions .. 1 Installation .. 2 Wiring .. 3 User Menu .. 4 Operation .. 5 Specifications .. 7 Troubleshooting .. 16E09-101 Universal Electronic Temperature ControlPART NO. 37-6857 GReplaces 37-6857F1016 INSTALLATION ANDOPERATION INSTRUCTIONSDESCRIPTION The 16E09-101 is a single stage electronic temperature con-trol, with a Nema 1 rated enclosure, and can be used for most applications within the temperature control range of -40 to 220 F, (-40 to 104 C). The control has an SPDT (Single Pole Double Throw) output load control has user options to control differential, anti-short cycle delay, set back, offset, alarms and more. It includes an NTC (Negative Temperature Coefficient) thermistor tempera-ture sensor, and can be used with certain other NTC or PTC (Positive Temperature Coefficient) thermistors that meet the specified resistance vs. temperature specifications. See the tables on page control can fit many applications, which range from refrigeration to heating due to the wide temperature range of the control stated above.
2 Typical applications include walk-in freezers, beverage coolers, supermarket display cases for flowers, produce, meats, convenience store refrigerated cases, food warmers, boiler control, and certain industrial applications. Save these instructions for future use!WARNING! 16E09-101 Optional Accessories / Service Items:Immerson Well ..F89-0286 Replacement ' NTC Remote Sensor ..F136-0114 Well Heat Transfer Compound ..F145-0163 Failure to read and follow all instructions carefully before installing or operating this control could cause personal injury and/or property damage. To prevent electrical shock, personal injury and/or equipment damage, disconnect electric power to system at main fuse or circuit breaker box prior to installation or service. To prevent scald injury, do not use this control to heat water for bathing, washing, hot tub or similar applications. Where failure of this control may result in personal injury and/or property damage, additional alarms or limit controls must be installed.
3 This control is a temperature control and is not to be used as a temperature limit 1 Control Front View and DescriptionFig. 2 Control Dimensions and Mounting InformationFRONT VIEWBOTTOM VIEWRIGHT SIDE VIEWREAR .76 .85 LEFT SIDE The control has a user selection for changing the setpoint to be either the Cut In or the Cut Out setting. The user must be careful to understand how this effects the range in which the control will operate when the differential value is entered. If entered values are incorrect, the control could operate outside the user s intended settings due to set-up error. See section titled "Operation".COOLHEATSW1 COOLHEATSW1 Circuit BoardInside CoverTEMPERATURE UNITS INDICATOR ( F or C)ACTUAL TEMPERTUREAT TEMPERATURE SENSORSETPOINT TEMPERATUREHEATING MODE INDICATOR ( )COOLING MODE INDICATOR ( )BINARY INPUT INDICATORLIT WHEN UNIT IS IN SETBACK MODEREFER TO PAGE 6 STATUS INDICATOR LEDLIT WHEN CONTROLLED LOADIS ENERGIZED (ON).
4 (SEE NOTE)TEMPERATURE UP BUTTONTEMPERATURE DOWN BUTTONMENU BUTTONPRESS TO ENTER MENU MODEREFER TO PAGES 4 & 5SW1 RefrigerationCoolHeatingHeatSwitch SW1 must be set forsystem mode as shown: To prevent electrical shock and/or equipment dam-age, disconnect electric power to system at main fuse or circuit breaker box prior to installation or service. Where failure of this control may result in personal injury and/or property damage, additional alarms or limit controls must be installed. This control is a temperature control and is not to be used as a temperature limit NOTE: Green Status Indicator LED and display backlight operationIt may be observed from time to time that the green status indicator LED and display back-light will briefly turn off during a call for heating or cooling. During this time, the control is performing a self-check lasting up to 15 seconds. This is normal operation of the control and the load power will be maintained3 WIRING Wiring Instruction NotesSwitch SettingsSwitch SW2 must be set for applications as shown:SW2 Line Voltage (Power Stealing)PSLine Voltage (Non Power Stealing)Non PS24 VAC (Non Power Stealing)Non PSFig.
5 4 Line Voltage Application(Non-Power Stealing)SW2 PTCBINGNDALARMNTCPSNCNEUTLINELOAD24 VACTH TRBinary Input(Gold PlatedContacts)NTC*Te mperatureSensorPTC*Te mperatureSensor120 VAC HotNeutral L1L2208/240 VAC Voltage InputLoadNONPSA larm OutputFor optional connectionto customer alarm equipment24 VAC (Block not used)TH - Thermostat HotTR - Thermostat ReturnFig. 5 24 VAC Applications (Non-Power Stealing)SW2 PTCBINGNDALARMNTCPSNCNEUTLINELOAD24 VACTH TRBinary Input(Gold PlatedContacts)Note: Do not use OutputRelay to control Line Voltagewhen using 24 VAC PowerNTC*Te mperatureSensorPTC*Te mperatureSensor24 VAC Class 2 TransformerLoadNONPSA larm OutputFor optional connectionto customer alarm equipment24 VACTH - Thermostat HotTR - Thermostat ReturnNC contactoperates oppositeof load contact* NTC Negative Temperature Coefficient PTC Positive Temperature CoefficientNOTE: Only one sensor (PTC or NTC) may be connected. Sensor must meet specific temperature vs.
6 Resistance VACTH TRAlarm OutputFor optional connectionto customer alarm equipmentBinary Input(Gold PlatedContacts)24 VAC (Block not used)TH - Thermostat HotTR - Thermostat ReturnNTC*Te mperatureSensorPTC*Te mperatureSensorFig. 3 Line Voltage Application(Power Stealing)120 VAC HotNeutral L1L2208/240 VAC Voltage InputLoadPower Stealing Power Stealing is an electronic design within the control that can eliminate the need to connect a neutral line to power the control. The control receives power from the unit it is control-ling. Power Stealing saves time and money by often eliminat-ing the labor to run a neutral wire to the control for power. See compatibility chart below for certain Stealing Compatibility ChartApplicationPower StealingNon-Power StealingLine Voltage, replacing existing control that has a common wireYesYesLine Voltage, with load greater than amps, without Defrost timer or other power interruption circuit, with or without alarmYesYesLine Voltage, with load greater than amps, with Defrost timer of other power interruption circuit, no alarmSee Note 1 YesLine Voltage with load greater than amps, with Defrost timer or other power Interruption circuit, with alarmNoYesLine Voltage with load less than ampsNoYes24 VAC ApplicationNoYesNOTE 1: During defrost or time when load circuit is broke, display will be blank because power has been interrupted to the control.
7 All menu settings and setpoint will be restored when power is returned.(See "Special Note" in "Operation Section" for Alarm)4 USER MENU OPERATION SETTINGS:The control has user Menu settings that will determine how the control operates. The unit is shipped with factory de-fault settings. The user must change any of the settings as required for the application. To reset all settings to factory defaults, press and hold all 3 buttons simultaneously (, , and buttons) for approximately 5 seconds. To view Menu items, press and hold for 5 seconds. The unit will display the first Menu item on the left side of the display. The right side of the display indicates the Menu item settings. To change the setting, momentarily press the or momentary press of the key advances the display to the next Menu item, and continues, till the last menu item is displayed. Pressing the key one more time with the last menu item, (aL) displayed returns the control to the operating MENU Each press of results in forward movement to the next Menu item.
8 If you need to change an item passed , you must repeatedly press , return to the operating mode, then press and hold for 5 seconds to re-enter the Menu mode. Then repeatedly, momentarily press until the desired Menu item is again store any changes made to any Menu items, the Menu must be exited by pressing when the last item is displayed. If no buttons are pressed for ten minutes while in the menu, the control will return to operating mode and any changes that were made will be following table shows the menu items, default settings and optional : The Heat/ Cool switch (SW1) MUST be in the proper position BEFORE setting or to selectCommentsCFTemperature ScaleFC or FSelects temperature display in Fahrenheit or CelsiusdFFDifferential51 to 30 Selects the range between Cut In and Cut Point ModeCoolHeatClCOCO or CICI or COSelects how the set point temperature will operate the load terminal. CI indicates the setpoint temperature will be the Cut In temperature.
9 CO indicates the temperature will be the Cut Out temperature. See Operation Operation FailureCoolHeat100 or 1 NoneCooling - Selects the operation of the Control Load relay in the event of a sensor failure in Cool mode. 1 (default) will cause the load contacts of the relay to close and remain closed if the sensor either opens or shorts. 0 causes the load contacts of the relay to open and remain has no optional selection. Sensor failurein Heating will result in the relay contacts LightOffOn or OffSelects the LCD display light Off or On. With this selected Off, the display light will illuminate any time a keypad button is pressed to provide better viewing in low lighting conditions, and go off after 10 seconds. If On is selected, the display light will be On Short-Cycle DelayCool1 Heat00 to 12 Selects the minimum time (in minutes) that the load contacts will remain open after a cycle before closing again. This will prevent the compressor or other load from being damaged by cycling too soon.
10 A blinking Snowflake or Flame icon indicates that the control has a demand to energize the load, but is waiting for the delay time to elapse. A setting of 0 indicates no time and the feature is disabled. SW1 must be set to the proper position before checking this Front Panel KeypadOffOn or OffWhen selected Off, the keypad can be used as normal. When selected On, prevents unauthorized access to the control settings by locking out all keys. To unlock the control when it is locked, press and hold the Menu key for 5 TemperatureOffset0-4, -3, -2, -1, 0,1, 2, 3, 4 This control is calibrated at the factory, but the sensed" temperature may read different because of mount-ing/installation, or other factors. This item allows the displayed temperature to be shifted the number of degrees set to compensate for this difference5If control is in Cool mode, and Set Point is selected as the Cut Out: TemperatureOperating = Setpoint + DifferentialRange Temperature (plus) Example: This control is a temperature control and is not to be used as a temperature limit control.