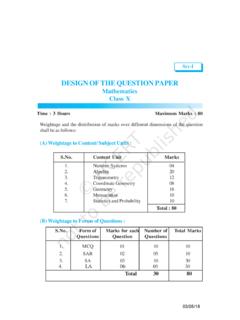
Transcription of -2 BASIC LABORATORY TECHNIQUES T - NCERT
1 UNIT-2. BASIC LABORATORY . TECHNIQUES . T. HE LABORATORY apparatus for carrying out reactions, in general, is made up of glass. It is because glass is resistant to the action of most of the chemicals. Generally, two types of glass are used for making apparatus for LABORATORY work. These are soda-lime glass and borosilicate glass. Soda-lime glass, which is made by heating soda, limestone and silica, softens readily at about 300-400 C in the burner flame. Therefore, on heating glass tubings made of soda-lime glass easily softens and can be bent. Coefficient of expansion of soda glass is very high, therefore on sudden heating and cooling, it may break. To avoid breaking, it should be heated and cooled gradually. Annealing by mild reheating and uniform cooling prevents breakage.
2 Such glass should not be kept on cold surface while it is hot, since sudden cooling may break it. Borosilicate glass does not soften below 700-800 C and requires oxygen- natural gas flame for working. Natural gas mixed with oxygen is burnt to get the oxygen-natural gas flame. Coefficient of expansion of this glass is low and apparatus made of this glass can withstand sudden changes in temperature. Therefore, apparatus used for heating purposes is made from borosilicate glass. On heating, glass apparatus made up of borosilicate glass does not distort. In the following pages you will learn about some of the TECHNIQUES of handling glass tubes and glass rods without injuring yourself. Also, you will learn the TECHNIQUES of using LABORATORY apparatus and equipments.
3 CUTTING OF GLASS TUBE AND GLASS ROD. Material Required Soda-glass tube : 15 cm long Soda-glass rod : 15 cm long Triangular file : One Procedure (i) Place the glass tube or the glass rod on the table and press it with your left hand. BASIC LABORATORY TECHNIQUES . (ii) Keep the lower end of a triangular file with its sharp edge perpendicular to the tube to be marked and pull it towards you to make a single deep scratch on the glass tube or the glass rod at a desired length (Fig. a). (iii) Keep thumbs of your hands on both sides, very close and opposite to the scratch as shown in Fig. b and break the glass tube or rod by applying pressure from your thumbs in a direction away from you (Fig. c). Break the tube/. rod by holding it with a cloth so that hands are not harmed.
4 (iv) If the glass tube does not break, make a deeper scratch at the point marked earlier and make a fresh attempt. (v) Trim any jagged edge by striking with a wire gauge (Fig. a). (vi) Heat the freshly cut edge of the tube gently in the flame to make the edges round and smooth (Fig. b). This is called fire polishing. For fire polishing, first continuously warm the cut end in the Bunsen flame and then rotate it back and forth until the edge is rounded. Too much heating may distort the rounded edge (Fig. c). (a) (b) (c). Fig. : (a) Marking a glass rod or a glass tube (b) Placing the thumbs together opposite to the scratch (c) Breaking the glass rod or glass tube After continuously warming Properly Overheated The cut the cut end in a Bunsen rounded edge end end flame, rotate back and forth after fire until the edges are rounded polishing (a) (b) (c).
5 Fig. : (a) Trimming the jagged edges (b) Rounding the edges (c) Properly and improperly rounded edges 17. LABORATORY MANUAL CHEMISTRY. Precautions (a) Make a single deep scratch at the desired length with one stroke of the file. (b) To avoid injury, carry out the filing and breaking of the glass tube/rod away from the face as far as possible and hold the glass tube / rod with the help of a piece of cloth to avoid injury to hands. Discussion Questions (i) Why does glass not possess a sharp melting point? (ii) Why is it required to round off the freshly cut edges of the glass tube or the glass rod? BENDING OF A GLASS TUBE. Material Required Glass tube : 20-25 cm long Triangular file : One Procedure (i) Cut a tube of desired length with the help of a triangular file as described in section (ii) Place the tube in the hottest zone of Bunsen burner flame and heat that portion from where it is to be bent (Fig.)
6 A). (iii) While heating the tube in the flame keep it rotating slowly until the portion, which is to be bent, becomes red hot and soft and starts bending under its own weight. (Fig. b). (a) (b) (c). Fig. : (a) Heating the tube (b) The tube softens and starts bending under its own weight (c) Making the bend coplanar 18. BASIC LABORATORY TECHNIQUES . (iv) Remove the tube from the flame and bend it slowly at a desired angle by pressing it against a glazed tile to ensure the coplanarity of the bend (Fig. c). Slow process of bending prevents flattening of glass tube (Fig. ). (v) Cool it by placing on a glazed tile (Fig. c). (vi) Bend the tubes at different angles as shown in Fig. Fig. : A glance of proper Fig. : Bend drawn at and improper bends various angles Precautions (a) Avoid heating the glass tube only on one side, rather rotate it while heating.
7 (b) Select a glass tube of appropriate length (nearly 30 cm long) to keep your hands safe from heat. (c) To avoid flattening of the glass tube while bending, carry out the process slowly. Discussion Questions (i) Why should the tube be rotated while heating? (ii) Why is the red-hot tube bent slowly? DRAWING OUT A JET. Material Required Glass tube : 20-25 cm long Triangular file : One Sand paper : As per need 19. LABORATORY MANUAL CHEMISTRY. Procedure (i) Select a glass tube of appropriate diameter for drawing a jet. (ii) Cut the glass tube of desired length with the help of a triangular file. (iii) Heat the tube in the hottest portion of the Bunsen burner flame by holding it at both the ends. (iv) Rotate the tube slowly until the portion, which is kept in the flame, becomes red hot and soft.
8 (v) Remove the tube from the flame and pull the ends apart slowly and smoothly until it becomes narrow in the middle and then stretches into a fine jet as shown in Fig. b. (vi) Cut the tube in the middle (Fig c) and make the jet uniform and smooth by rubbing it with sand paper and by fire polishing. (b). (a). (c). Fig. : (a) Heating the tube to draw a jet (b) Before cutting (c) After cutting Precaution While drawing a jet, pull apart the two ends of the red-hot tube slowly so that it becomes thin uniformly. Discussion Questions (i) What type of glass is preferred for drawing out a jet? (ii) Why is the glass tube of small diameter chosen for drawing out a jet? BORING A CORK. Material Required Rubber corks : As per need Glycerine solution Cork borer set : One (Shelf reagent) : As per need 20.
9 BASIC LABORATORY TECHNIQUES . Procedure (i) Mark the rubber cork on both its sides at the place where a hole is to be drilled (Fig. a). (ii) Choose a borer of diameter slightly smaller in size than that diameter of the tube to be inserted in the hole (Fig. b). (iii) Place the rubber cork on the table with its smaller end in the upward direction as shown in Fig. c. (iv) Hold the cork in position with the left hand and put a suitable borer, lubricated by dipping in water or glycerine, at the place where the hole is to be drilled (Fig. c). By lubricating the borer with water or glycerine a smooth hole is drilled. (v) Now hold and push the borer vertically in the downward direction, and drill the hole by rotating the borer and simultaneously apply the pressure gently.
10 (v) For making two holes in the same cork, keep appropriate distance between the holes and use borers of proper size. (a) (b) (c). Fig. : (a) Marked cork (b) Choosing the borer (c) Boring process Precautions (a) Make a mark on both sides of the cork and select borer of proper size. (b) To obtain a smooth hole, drill half the hole from one side and another half from the other side of the cork. Discussion Questions (i) What is the role of glycerine in the process of boring? (ii) Why should the diameter of the borer be less than the diameter of the tube to be inserted in the hole? 21. LABORATORY MANUAL CHEMISTRY. HEATING SOLUTION IN A TEST TUBE. If a solution contained in a test tube is to be heated on a burner, hold the test tube with the help of a test tube holder at an angle and heat just below the surface of the liquid but not at the bottom (Fig.)