Transcription of 34459 Rev. A - Delta Faucet
1 Complete instructions and familiarize yourself with the illustrations before installation is ! SHUT OFF WATER SUPPLIES BEFORE DISASSEMBLING THE TUB SHOWER !Mark the Rotational Limit Stop RLS (A) with a pen or pencil on the raised rib that aligns with the groove on the brass stop (B).NOTE: after installing the new cartridge, its RLS must be in the same position (if this position provided the correct handle rotation previously).See important information and RLS Adjustment on the back of this sheet (Steps , and ).
2 !Pull off the RLS (A) and note the position of the raised stop (C) on the cap assembly that says hot side . The cartridge must alwaysbe put back in this same position. The raised stop should alwaysbe located on the hot water inlet side so cold water will flow first. For normalinstallations, the raised stop will be on the outside sleeve (D) off. Then, if necessary, slide the sleeve O-Ring (E) toward you until it stops at the raised brass section (F) on the tub/shower body. Do not pull the sleeve O-Ring over the raised brass section.
3 NOTE: when the sleeve is re-installed, it will slide on this SURE WATER SUPPLIES ARE SHUT OFF! the brass bonnet (G). not pry the cartridge out of the body with a the handle on brass stem (H) and rotate counterclockwise while lifting the cartridge out of the two notches on the sides of the CAUTION! Do not twist the Cap and Lower Housing of the New Cartridge to take it they are separated for any reason, be surethey are locked back together by twisting them together until they snap back ! Never take the Lower Housing the cartridge with the raised stop on the cap (C) on the hot water inlet side (see Step 5).
4 The brass bonnet (G). on the outside sleeve (D) (see Step 6). and throw away the black retention plug (not illustrated) from the brass stem (H) at the top of the new for proper installation of the RLS (A) on the new cartridge by following Steps , and (on reverse side). the handle then proceed to Step FLUSH YOUR handle to full on hot and cold mix position. Turn on water supplies. Check for leaks and let supply lines flushfor one minute without moving handle. If you have a showerhead, divert water to it and flush for 30 seconds.
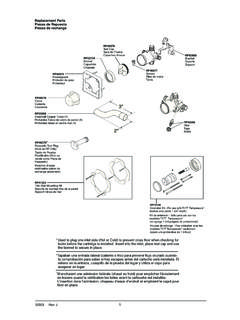
5 This will remove any debris fromthe supply lines that can damage internal parts of the Faucet and create SAFE!After you have finished the repair, turn on tub/shower valve to make sure COLD WATER FLOWS not, see Step 34459 34459 34459 34459 3445934459 34459 34459 34459 34459 34459 HotterColder(E)Sleeve O-Ring(F)Raised BrassSectionLower HousingTub/ShowerBodyNotchCap(H)BrassSte m(B)BrassStopRP19804 Cartridge(C)Raised Stopon CapO-Ring(A)RotationalLimit Stop(RLS)(D)OutsideSleeve(G)BrassBonnetS eats&Springs WARNING!
6 11/17/06 Rev. CAUTION:After installing the new cartridge, remove the RLS (A). If the raised stop (C) on the cap assembly is located on the left (see Step 5)rotate the brass stop (B) to the bottom left so it is positioned below the raised stop (C) as illustrated in the Rotational Limit Stop Adjustmentbox. If the raised stop (C) on the cap assembly is located on the right, rotate the brass stop (B) to the top right so it is positioned above theraised stop (C). IMPORTANT! The first position of the Rotational Limit Stop (RLS) (A) is that position that restricts the rotation of the handle (stem) the mostand is at the maximum counterclockwise setting.
7 According to industry standards, the maximum allowable temperature of the water exitingfrom the valve is 120 F**. This temperature may vary in your local area. The RLS may need to be readjusted manually if either of the inletwater temperatures change. For instance, during the winter, the cold water temperature is colder than it is during the summer, which couldresult in varying outlet temperatures. Typical temperature for a comfortable bath or shower is between 90 -110 ADJUSTING THE ROTATIONAL LIMIT STOP: Let the water run so that cold is as cold as it will get and hot water is as hot as it will get.
8 Place handle back on stem and rotate fullycounterclockwise to the hottest position. Place a thermometer in a plastic tumbler and hold in the water stream. If the water temperature is above 110 -120 F**, the Rotational LimitStop (RLS) (A) must be rotated counterclockwise to decrease temperature. In that case, remove the RLS and replace it one tooth counterclockwise for every 6 F (approximate) reduction in temperature that must be made. Repeat as necessary. MAKE SURE COLD WATER FLOWS FROM THE VALVE FIRST.
9 **MAKE SURE WATER (AT THE HOTTEST FLOW) DOES NOT EXCEED THE TEMPERATURE ALLOWED BY YOUR PLUMBINGCODES (110 OR 120 F).If the water in your area has lime, rust, sand or other contaminants in it, your cartridge will require periodic inspection. To inspect the cartridge, after shutting off the water supplies, turn the handle to the on position before following Steps 2 - 10 to cartridgemust be in the full on position before it is in the off position, this test will not removing the cartridge, shake itvigorously.
10 If there is a rattling sound, it is functional and can be reinstalled following Steps there is no rattle: Rotate the RLS to be sure it is in the on position; Rap the lower housing in the palm of your hand, or Replace the complete cartridge (RP19804).Your tub/shower valve is designed to minimize the effects of outlet water temperature changes due to inlet pressure changes, commonly causedby dishwashers, washing machines, toilets and the like. It may not provide protection from hot water burns when there is a failure of other temperature controlling devices elsewhere in the plumbing system.