Transcription of A Layout Kit for Small Shops - Fine Woodworking
1 22 fine WOODWORKINGou re ready to lay out your new shop:You have the space built, outlets in thewall, lights hung, and a wood supplyready to turn into heirloom pieces for familyand friends. You have most of the machines,benches, and cabinets, with plans to buy orbuild what you don t already own. You can twait to get the shop in working order. Don t rush into the process. The first lay-out is likely to remain in place until youmove again. If any major workflow and dust-collection problems arise, they probablywill just be tolerated. With careful planning,though, you can take advantage of the op-portunity to get the Layout right the first faced this situation recently when Imoved my woodshop from a spacious two-car garage below my office into a smaller10-ft.
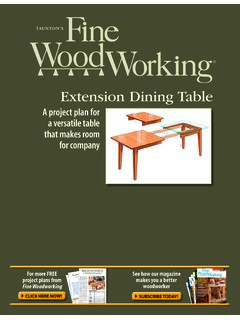
2 By 20-ft. space at home. Because of thisdownsizing, Layout was more importantthan ever. A photocopier is all you needTo plan my shop, I used a modelingprogram on my computer, but youcan use the drawings I created to planan efficient shop on paper. Photocopythe images on the facing page andarrange them on graph paper to createa plan view of your shop. Take the timeto work out the most efficient placementof benches, cabinets, and machines, tak-ing into account infeed and outfeed zonesas well as ducting for dust don t have to go as far as I did, but Ifound it valuable to use three-dimensionalmodeling, which allowed me to plan myshop vertically as well highlighting, for ex-ample, leftover wall space for mountingstorage units, tools, and jigs.
3 If you want to trythe computer program, see the story on p. drawing and paper shuffling were wellworth the time. Woodworking in my smallshop is now efficient and enjoyable. I vebeen able to make large projects such asPhotos: Asa Christiana; drawings: John YurkoShop DesignA Layout kit for Small shopsBY JOHN YURKOA little planning makes a big difference. Bysetting up his shop first on paper, Yurko fit all of his essential hand and power tools into a 10-ft. by20-ft. & Shops 200523 MortiserBandsawTablesawDrill press12-in. planer15-in. planerMiter sawJointerRouter tableDust collectorClamp storageWorkbenchScale: 1 4in. = 1 stationLumber rackUSE THESE TEMPLATES TO ARRANGE YOUR Shops tart by laying out your shop to 1 24scale (or 1 2in.)
4 Equals1 ft.), which should work well on graph paper with a 1 Then photocopy these models of common shopfixtures, enlarging them to 200% (or from 1 48scale to1 24). When cutting them out to arrange them on paper,be sure to include the infeed and outfeed that slight adjustments to adjacent fixturescan bring worksurfaces to the same height,allowing them to share space for infeed and areas representinfeed/outfeed and a king-size bed with few com-promises in workmanship or I learnedI ve seen many Shops that are similar in sizeto mine,and most make serious compro-mises on machines yet still are chokedwith stuff. A typical solution is settling forbench tools or omitting some machines altogether. But I was determined not to set-tle, nor to lose my ability to mill rough lum-ber to custom sizes.
5 When I began to arrange my shop on paper and on the computer screen, I real-ized that, in a Small shop, moving wood iseasier than moving machines. So I ignoredthe idea of setting up the space for work-flow for example, creating adjacent, se-quential zones for lumber storage, roughdimensioning, final dimensioning, joinery,24 fine WOODWORKINGand so on. That workflow concept is moreappropriate for larger or commercial Shops . My first priority was to fit essential ma-chines and fixtures in the space, includinga tablesaw, miter-saw station, drill press,bandsaw, benchtop planer, benchtopdisk/belt sander, compressor, router table,and workbench. My second goal was tokeep them as stationary as possible.
6 It was immediately apparent that the keyto this design challenge would be infeedand outfeed space for each spaces can overlap, but it takescareful planning to make sure nothing getsin the way. Basically, I created a linear outfeed area,which includes the miter-saw station withfolding wings, tablesaw with folding out-feed table, and my large router table, all ina line along the 20-ft. wall and set at theShop Design(continued)You have a few options for planning yourshop space: The first is simply to photo-copy the two-dimensional models providedon p. 23 and use them to create a scalelayout of your shop floor. You also can goto my Web site ( ) and download two-dimensional images of each tool to beused either on paper or on the a third alternative, you can downloadthe same modeling program I used, andcreate three-dimensional plans.
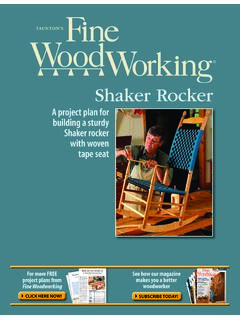
7 The program is called Sketchup (a demo version is available at , which allows 8 hours offree use). The program is easy to learnand use, even for a computer novice. Ifyou download and learn Sketchup, feelfree to go to my Web site and downloadmy 3-D models for your own use, or useSketchup to create your own. By the way, I have used Sketchup todesign every piece of furniture and cabi-netry I ve built over the last few years,even working out joinery details and mak-ing color choices on the computer. And Iknow of many other woodworkers acrossthe country who have discoveredSketchup and put it to good computer modeling for paper-free planning in 3-DGo three-dimensional for the ultimate his own three-dimensional CAD modelsallowed Yurko to plan vertical space as well asfloor space, helping him locate spots for essentiallumber, accessories, shelves, and Woodworking same height.
8 The miter-saw station con-verts easily for use with a mortiser withworkpiece support on both sides and italso accepts a minilathe. I even planned alocation for all of the tools, blades, and jigsused with the tablesaw: on the operatorside, for easy access. Along the opposite long wall are the planer,combination sander, drill press, bandsaw,saw s table must be higher than the adja-cent workbench, I can support largepieces with a shopmade roller supportclamped in the bench s front vise. Pros and cons of a Small shopFor all of my planning, I must admit theresimply was no room in my shop for sometools. I struggled to find a place for mywide jointer and eventually decidedagainst shoehorning it in, instead making afixture for my router table that joints edgesquite well.
9 My scrollsaw, the bulk of mywood supply, and some storage cabinetsdidn t make the cut either. These remain ina nearby room. In many ways it s more enjoyable to workin a Small space. Because most everythingis only a couple of steps away, I m muchless fatigued after an evening of wood-working. The hours I spent planning havealready saved me many hours of preciousshop time. John Yurko is an architect and hobbyistwoodworker in Asheville, , and compressor. Each tool hasdust-collection hookups and storage spaceto keep the relevant tools, bits, blades, andfixtures nearby. The planer is the only toolI have to roll out into the middle of the roomto use, which takes about a minute, includ-ing connecting the dust-collection hose.
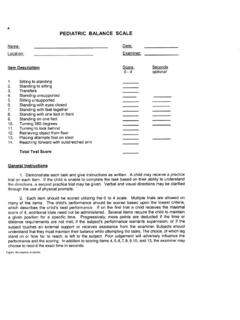
10 Using the three-dimensional models, Ialso realized that even though the band-Shop Design(continued)Everything withinarm s reach. Usingtwo- and three-dimensional CADmodels, Yurkocrafted a bencharea that packs inhand tools, air tools(and a compres-sor), a sharpeningstation. and hard-ware storage.