Transcription of A10
1 A10 Stereo Integrated AmplifierAmplificateur St r o Int gr Stereo-Vollverst rkerAmplificatore Integrato EstereofonicoGe ntegreerde stereoversterkerAmplificatore integrato stereoIntegrerad Stereof rst rkareИнтегрированный стерео усилительOwner s ManualManuel d utilisationBedienungsanleitungManual de InstruccionesGebruikershandleidingManual e di istruzioniInstruktionsbok fl fl2A10 Stereo Integrated Ampli erWARNING: The rear panel power cord connector is the mains power disconnect device. The device must be located in an open area that allows access to the cord unit must be connected to a power supply only of the type and voltage specified on the rear panel. (USA: 120 V/60Hz, EC: 230V/50Hz)Connect the component to the power outlet only with the supplied power supply cable or an exact equivalent.
2 Do not modify the supplied cable. A polarized plug has two blades, with one wider than the other. A grounding plug has two blades plus a third grounding prong. These are provided for your safety. Do not defeat grounding and/or polarization safety provisions. If the supplied plug does not fit your outlet, please consult an electrician for replacement of the obsolete outlet. Do not use extension mains plug is the disconnect of the unit. In order to completely disconnect the unit from the supply mains, remove the main plug from the unit and the AC power outlet. This is the only way to completely remove mains power from the not route the power cord where it will be crushed, pinched, bent, exposed to heat, or damaged in any way. Pay particular attention to the power cord at the plug and where the cord exits the back of the power cord should be unplugged from the wall outlet during a lightning storm or if the unit is to be left unused for a long period of only accessories specified by the only with a cart, stand, rack, bracket or shelf system strong enough to support the unit.
3 Use caution when moving the unit in a stand or rack to avoid injury or damage to the Class 2 wiring for speaker connections to ensure proper installation and minimize the risk of electrical stop using the component and have it inspected and/or serviced by a qualified service agency if: The power supply cord or plug has been damaged. Objects have fallen or liquid has been spilled into the unit. The unit has been exposed to rain. The unit shows signs of improper operation. The unit has been dropped or damaged in any : There are no user serviceable parts inside. Refer all servicing to qualified service : To reduce the risk of fire or electric shock, do not expose the unit to moisture or water. Do not expose the unit to dripping or splashing.
4 Do not place objects filled with liquids, such as vases, on the unit. Do not allow foreign objects to get into the enclosure. If the unit is exposed to moisture, or a foreign object gets into the enclosure, immediately disconnect the power cord from the wall. Take the unit to a qualified service person for inspection and necessary all the instructions before connecting or operating the this manual so you can refer to these safety all warnings and safety information in these instructions and on the product itself. Follow all operating the enclosure only with a dry cloth or a vacuum not use this unit near must allow a minimum 10 cm or 4 inches of unobstructed clearance around the unit. Do not place the unit on a bed, sofa, rug, or similar surface that could block the ventilation openings.
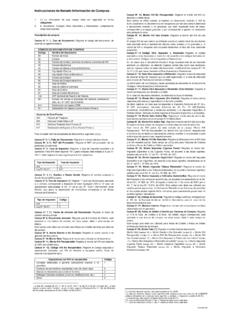
5 If the unit is placed in a bookcase or cabinet, there must be ventilation of the cabinet to allow proper the component away from radiators, heat registers, stoves, or any other appliance that produces products are designed to comply with international directives on the Restriction of Hazardous Substances (RoHS) in electrical and electronic equipment and the disposal of Waste Electrical and Electronic Equipment (WEEE). The crossed wheelie bin symbol indicates compliance and that the products must be appropriately recycled or processed in accordance with these Safety InstructionsThis symbol means that this unit is double insulated. An earth connection is not the unit on a fixed, level surface strong enough to support its weight. Do not place it on a moveable cart that could tip 1 AUX 2 BALANCESOURCETAPEPOWERPHONESMEDIAPLAYERA 10 TREBLEBASSTONEONABA+BSPEAKERSOFF3 Figure 1: Controls and Connections Commandes et branchements Bedienelemente und Anschl sse Controles y Conexiones De bedieningsorganen en de aansluitingen Controlli e collegamenti Kontroller och anslutningar fl PHONOCDTUNERAUX 1 AUX 2 BALANCESOURCETAPEPOWERPHONESMEDIAPLAYERA 10 TREBLEBASSTONEONABA+BSPEAKERSOFF213 4 5 6 7890-=qwertyuio4A10 Stereo Integrated Ampli erFigure 2.
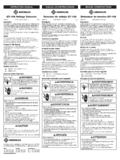
6 Preamp Input and Speaker Output Connections Branchements en entr es et sorties enceintes acoustiques Anschlussdiagramm Conexiones de Entrada al Preamplificador y de Salida a las Cajas Ac sticas De aansluitingen voor de voorversterker en de luidsprekers Collegamenti ingresso preamp ed uscita per diffusori Anslutningar f r f rf rst rkare och h gtalare fl 5 EnglishImportant NotesWhen making connections be sure to: Tur n off all the components in the system before hooking up any components, including loudspeakers. 4 Tur n off all components in the system before changing any of the connections to the is also recommended that you:4 Tur n the volume control of the amplifier all the way down before the amplifier is turned on or off.
7 Remarques importantesPendant les branchements, assurez-vous que : Tous les maillons sont teints avant leur branchement, quels qu ils soient, y compris les enceintes teignez tous les maillons avant de modifier quoi que ce soit au niveau de leurs branchements, quels qu ils est galement recommand de :4 Toujours baissez le niveau sonore via le contr le de volume, avant d allumer ou d teindre l HinweiseAchten Sie beim Herstellen der Verbindungen auf Folgendes:4 Schalten Sie alle Komponenten im System ab, bevor Sie Ger te (einschlie lich Lautsprecher) anschlie Schalten Sie alle Komponenten im System ab, bevor Sie Anschl sse im System ver empfehlen wir, dass4 Sie die Lautst rke herunterdrehen, bevor Sie die Endstufe ein- oder ImportantesCuando realice las conexiones, aseg rese de que:4 Desactiva todos los componentes del equipo, cajas ac sticas incluidas, antes de conectar cualquier nuevo componente en el mismo.
8 Desactiva todos los componentes del equipo antes de cambiar cualquier conexi n del n le recomendamos que: Reduzca el nivel de volumen de su amplificador a cero antes de activarlo o desactivarlo. H l belangrijkBij het maken van de verbindingen: Zorg dat niet alleen de A10, maar de gehele installatie uitstaat, als nog niet alle verbindingen gemaakt zijn. Zorg dat niet alleen de A10, maar de gehele installatie ook uitstaat, als u verbindingen gaat raden u ook aan om de volumeregelaar van de voorversterker geheel dicht te draaien (volkomen naar links) wanneer u uw eindversterker aan- of importantiQuando effettuate i collegamenti assicuratevi di: Spegnere tutti i componenti del sistema prima di collegare qualsiasi componente, inclusi i diffusori.
9 Spegnere tutti i componenti del sistema prima di modificare qualsiasi connessione nel raccomandiamo inoltre di: Portare il volume a zero prima di accendere o spegnere l nk p f ljande n r du g r anslutningar:4 St ng av alla apparater i anl ggningen innan du ansluter nya komponenter eller h St ng av alla apparater i anl ggningen innan du ndrar n gon rekommenderas ocks : Vrid ner volymen p f rf rst rkaren helt och h llet innan f rst rkaren sl s p eller av. Важные замечанияПеред подсоединением:4 Выключите все к омпоненты, включая колонки. Выключите все к омпоненты в вашей системе, прежде чем что-то в ней менять.Рекомендуется также: Вывести громкость усилителя на минимум, перед тем как включать или выключать его.6A10 Stereo Integrated Ampli erAbout RotelOur story began over 50 years ago.
10 Over the decades, we have received hundreds of awards for our products and satisfied hundreds of thousands of people who take their entertainment seriously like was founded by a family whose passionate interest in music led them to manufacture high-fidelity components of uncompromising the years, that passion has remained undiminished and the family goal of providing exceptional value for audiophiles and music lovers, regardless of their budget, is shared by all Rotel employees. Rotel s engineers work as a close team, listening to, and fine tuning, each new product until it reaches their exacting musical standards. They are free to choose components from around the world in order to make that product the best they can. You are likely to find capacitors from the United Kingdom and Germany, semiconductors from Japan or the United States, while toroidal power transformers are manufactured in Rotel s own factory.