Transcription of ABOUT OUR UNITS HEAT REGULATION - Farm …
1 ABOUT OUR UNITS Model 2100 - Still Air Incubator Our unit has a built in Hygrometer, two (2) extra large observation windows (9 by 3 ), extra temperature probe, and state of the art thermostat and circuitry, indicator light, easy quick connects for the Fan Kit (model 3100), ventilation plugs along with built in moisture rings in the bottom of the incubator. This unit holds approximately 45 chicken eggs, 115 quail eggs, 90 pheasant eggs and 41 turkey or duck eggs. 40 Watts / 120 VAC Model 2200 and 4200 - Circulated Air Incubators In addition to the features listed above, these UNITS have an installed Circulating (Forced Air) Fan Kit to help keep a uniform heat temperature inside the unit . Model 3100 - Circulating (Forced) Air Fan Kit Our unit is easily installed inside the Still Air Incubator, Model 2100 to circulate the air temperature not regulate the air temperature.
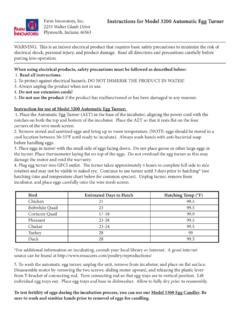
2 The Fan Kit spliced wires simply connect to the two (2) grey connects on the bottom of the circuit board cover. 120 VAC Model 3200 - Automatic Egg Turner (AET) Our Automatic Egg Turner holds 41 large eggs except duck and turkey eggs. This unit is 120 Volt with a small motor used to turn the eggs six (6) times a day. The power supply cord exits through the one notch in the sides of the both TOP and BOTTOM cover. The unit is intended to be placed on top of the metal mesh floor. The AET turns the eggs approximately 30 to each side. This unit fits our Model 2100 and Model 2200. 120 VAC. NOTE: Stop using the Automatic Egg Turner three (3) days before hatching, then remove the eggs from the (AET) and place back onto the metal mesh floor in their natural unsupported position. Place the probe thermometer on top of the eggs for monitoring 100F temperature.
3 HATCHING During incubation, eggs must be turned at least 2-3 times a day at the same time. Turning the eggs by hand is the most demanding and tedious part of the incubation process make sure your hands are sanitized. We recommend marking each egg with a pencil X and O on opposite ends to keep track of the turning. Place the X side up then the O side up at the next turning time. Alternate this procedure each turning cycle until three (3) days before hatching. The eggs must be sanitized before being initially placed in the incubator with any egg disinfectant on the market. Place the eggs on their sides with the small end slightly down. Stop turning the eggs three (3) days before hatching the chicks are positioning themselves for hatching. Our Automatic Egg Turner holds 41 large eggs except duck and turkey.
4 This unit fits our Model 2100 and 2200. We recommend all electrical UNITS to be plugged directly into a certified GFCI grounded outlet. GETTING STARTED WITH YOUR INCUBATOR Remove the incubator from our packaging. You will see that the incubator comes in two parts (top and bottom). The BOTTOM of the incubator is the shorter cover without the two (2) observation windows and power supply cord. The TOP of the incubator is the larger cover with the heating element, thermostat knob, indicator light and two (2) large observation windows and power supply cord. Place the metal screen in the bottom of the BOTTOM cover for egg placement. Please note that both the BOTTOM and TOP cover has a notch on each cover to route the power supply cord when using the Automatic Egg Turner (Model 3200). Plug directly into a surge protector.
5 heat REGULATION Your unit comes with two temperature gauges: A Hygrometer to use as a reference point for relative humidity & temperature, and a probe thermometer for the most accurate temperature reading for hatching. The probe thermometer must be calibrated prior to incubation. Use a thermometer you know to be accurate such as a meat thermometer, and slide the glass probe up or down to match. The ideal temperature for incubation is between 99 and 100 degrees F. Place the probe thermometer in the center of the incubators BOTTOM cover on top of the eggs so you can view the temperature of the unit . Do not allow the glass part of the probe thermometer to lie on the eggs. You may notice a difference in temperature readings between the Hygrometer and Probe Thermometer. This is normal. PLACEMENT OF THE INCUBATOR Your incubator needs to be installed in a room with constant temperature.
6 The incubator is designed to bring your room temperature up to the desired specific temperature for hatching. Avoid drafty areas and direct sunlight. The ideal room temperature is 70 degrees F. +/- 3 degrees F for the Still Air Incubator. Please note the use of our Circulated Air Incubator or our Still Air Incubator with our installed optional Circulating Air Fan Kit (Model 3100) is preferred for rooms with temperatures between 60 degrees F and 80 degrees F. OPERATING THE INCUBATOR GETTING IDEAL heat OF DEGREES F Turn the black control knob, located underneath the Hygrometer on the TOP cover, clockwise until you get the desired internal temperature of degrees F. Once the probe thermometer reads (or your egg species desired temperature), then turn the black control knob counterclockwise until the red indicator light turns off.
7 The red indicator light will turn on and off frequently which is normal to control the desired temperature for your egg species. We suggest running the incubator for 6 to 8 hours prior to putting eggs in to confirm a steady, maintained temperature before starting your project. CONTROLLING THE HUMIDITY AND VENTILATION We suggest adding warm water to the BOTTOM cover moisture slots to give the eggs their natural moisture. Monitor and fill daily the moisture slots with warm water as needed. This will depend on your room humidity level. The Hygrometer should show relative humidity of approximately 55-60% during incubation and then increased to 65% during hatching. Proper ventilation is paramount during embryo development and should increase during the hatching process. We suggest you remove one RED ventilation plug on the TOP cover when the chicks start to hatch.
8 The RED ventilation plugs are located on opposite ends of the two (2) large observation windows. After hatching remove both RED ventilation plugs to help dry the chicks. NOTE: The second RED ventilation plug should be used when using our Fan Kit. EMBRYONIC DEVELOPMENT - CANDLING Use our optional Model 3300 Egg Candler to check development progress of eggs and to identify infertile or dead in shell eggs for removal. HELPFUL HINTS FOR A SUCCESSFUL HATCH Function of the incubator is to bring the room temperature up to the desired hatching temperature Ideal operating temperature is 99 100F. Ideal humidity during incubation is 55-60%, increasing to 65% during hatching Location of the incubator is crucial to a successful hatch Still Air incubator is ideal in room temperatures between 65F 72F Use optional Circulating Air Fan Kit in room temperatures between 60F 80F Need plenty of fresh air and a stable room temperature; basement is perfect Recommend putting paper underneath the incubator in case of water over-flow Always sanitize the unit both before and after hatch using anti-bacteria soap.
9 Keep your hands fully sanitized when touching/turning the eggs Eggs capacity will affect the ventilation in the incubator; needs more oxygen After hatching remove both red ventilation plugs to help dry chicks Eggs should be placed on the metal screen laying on their side with small end slightly down. Do not crowd the eggs. Do not open the incubator the first day after the eggs have been set in place Eggs should be turned at least two to three times a day at the same time Stop turning the eggs 3 days before incubation as the chicks are in position for hatching Mark the eggs with an x and o on opposite ends with a pencil to make sure you have properly turned the eggs. Letter should face up once turned over. Use Egg Candler (Model 3300) to monitor development MAINTENANCE Sanitizing unit & Eggs Carefully wash and sanitize the entire incubator both before and after each hatching the eggs.
10 We recommend using any anti-bacterial soap. You must also sanitize the eggs before putting them in the incubator. There are many egg disinfectants on the market. LIMITED WARRANTY Farm Innovators, Incorporated has carefully inspected, tested, and packaged this unit to insure safe and reliable operation. When you receive your incubator, examine it carefully to determine there is has been no damage that may have occurred in shipment. If damage has occurred, notify the firm from which you purchased the incubator. They will assist you in replacing the unit . The Models 2100, 2200, 3100, 3200, 3300, and 4200 are guaranteed for 30 days, under normal conditions and intended use of service, from the original date of consumer purchase or date stamped on the unit against defects due to materials and the company s workmanship only. The sole obligation shall be to replace the defective unit with a replacement unit .