Transcription of Adding and Formatting Text - LibreOffice
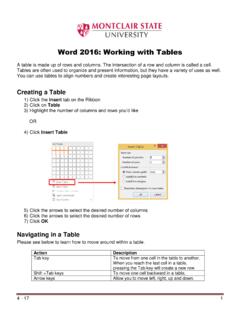
1 Draw GuideChapter 9 Adding and Formatting TextCopyrightThis document is Copyright 2011 2014 by the LibreOffice Documentation Team. Contributors are listed below. You may distribute or modify it under the terms of either the GNU General Public License ( ), version 3 or later, or the Creative Commons Attribution License ( ), version or trademarks within this guide belong to their legitimate Saffron Michele ZarriT. Elliot TurnerJean Hollis WeberLow Song ChuanPeter SchofieldFeedbackPlease direct any comments or suggestions about this document to the Documentation Team s mailing list: Everything you send to a mailing list, including your email address and any other personal information that is written in the message, is publicly archived and cannot be chapter is adapted and updated from Chapter 3 of the Impress Guide. Thecontributors to that chapter are:Nicole CairnsMartin J FoxPeter Hillier-BrookJean Hollis WeberMichele ZarriPublication date and software versionPublished 30 December 2014.
2 Based on LibreOffice for Mac usersSome keystrokes and menu items are different on a Mac from those used in Windows and Linux. The table below gives some common substitutions for the instructions in this chapter. For a more detailed list, see the application or LinuxMac equivalentEffectTools > Options menu selectionLibreOffice > PreferencesAccess setup optionsRight-clickControl+click or right-click depending on computer setupOpen a context menuCtrl (Control) (Command)Used with other keysF5 Shift+ +F5 Open the NavigatorF11 +TOpen the Styles and Formatting windowDocumentation for LibreOffice is available at date and software for Mac the text text a text , resizing and rotating text text text with Draw unformatted pasted special non-breaking spaces and Formatting Formatting bulleted and numbered and customizing a and and Formatting Text3 Inserting text with hyperlink and Formatting Text4 IntroductionWhen text is used in drawings, it is contained in text boxes.
3 This chapter describes how to create, format, use, and delete text. It also discusses the various types of text that can be inserted into a drawing. Finally, it provides information on how to insert special forms of text such as numbered or bulleted lists, tables, fields, and the text toolTo activate the text tool, click the Text icon for horizontal text or the Vertical Text icon for vertical text on the Drawing the Vertical Text icon is not visible, first select the option Show UI elements for East Asian writings in Tools > Options > Language Settings > Languages. Second, right-click in a blank area on the Drawing toolbar and go to Visible Buttons > Vertical Text and the icon will be placed on the the text tool is active, the Text Formatting toolbar (Figure 1) replaces the Line and Filling toolbar at the top of the drawing workspace. Click at the location where you want to position the text and a small text frame appears containing only the the Text icon is selected, you can select font type, font size, and other text properties before you start typing text.
4 As you type the text, the left corner of the status bar indicates that you are in text edit mode and the position of your cursor (Figure 2).Once you have finished typing your text and clicked outside the text frame or selected another tool from the Drawing toolbar, the Text Formatting toolbar is replaced by the default Line and Filling 1: Text Formatting toolbarFigure 2: Text information on the status barUsing text boxesUsing text boxes, you can place text anywhere on your drawing; for example, a caption for a shape; an explanatory note; a title block for the drawing similar to those used in engineering text boxes5 Creating a text box1)Click the Text icon or the Vertical Text icon on the Drawing )Click and drag to draw a text box on the drawing. This sets the width. The height of the text box automatically increases as you type or add )Release the mouse button when you have reached the desired width for your text box. The cursor appears in the text box and the text box, depending on your computer system, has aborder indicating edit )Type or paste your text in the text box.
5 The status bar at the bottom of the drawing workspace indicates that you are in text edit mode and the cursor position within the text )Click outside the text box to deselect , resizing and rotating text boxesYou can move, resize and rotate a text box just like any other object in your drawing. For more information, see Chapter 3 Working with Objects and Object Points. However, before you can move, resize, or rotate a text box, you must make sure the text box is in edit )Click on the text to switch the text box into edit )Move the cursor over the border. The cursor changes shape to the move symbol for your computer setup (for example, a clenched hand).3)When the move symbol appears, click once again on the border and selection handles )To quickly move a text box into a new position, place the cursor on the border (but not on a selection handle), click and drag to move the text box to a new position, then release the mouse button when the text box is in the desired position.
6 A semi-transparent copy of the text box shows where your text box will be placed (Figure 3).Figure 3: Moving a text box5)To quickly resize a text box, move the cursor over one of the selection handles and the cursor changes shape to the resizing symbol for your computer setup (for example, a double-headed arrow). Click and drag the border to a new position to resize the text box, then release the mouse button when the text box reaches the desired size (Figure 4).NoteUse the selection handles at the top and bottom of the text box to resize the text box height. Use the selection handles at the left and right side of the text box to resize thetext box width. Use the corner selection handles to resize the height and width of the text box while maintaining the aspect ratio of the text maintain the aspect ratio of a text box while resizing, press and hold the Shift key, then click and drag. Make sure to release the mouse button before releasing the Shift text boxes6 Figure 4: Resizing a text box6)To quickly rotate a text box, click again on a selection handle to change the shape and color of the selection handles.
7 Click and drag on a corner handle to rotate the test box, thenrelease the mouse button when the text box is at the desired rotation angle. A ghosted outline of the text box being rotated appears and the current angle of rotation is shown in the status bar (Figure 5).Figure 5: Rotating a text boxNoteWhen in rotation mode, the top, bottom, and side handles are not available for use ona text )To accurately control the position, size, and rotation angle of a text box, use the Position and Size dialog (Figure 6) or the Sidebar Position and Size subsection (Figure 7). See Chapter 3 Working with Objects and Object Points on how to use the Position and Size dialog or the Sidebar Position and Size subsection and for information on the options text boxes1)Click on the text to switch the text box into edit )Move the cursor over the hashed border. The cursor changes shape to the move symbol for your computer setup (for example, a clenched hand).3)When the move symbol appears, click once again on the hashed border and selection handles )Press the Delete text boxes7 Figure 6: Position and Size dialogFigure 7: Sidebar Position and Size subsectionUsing text boxes8 Using text with Draw objectsText can be added to most Draw objects.
8 The exceptions are control elements like buttons, list boxes, or 3D objects. An object is not dynamic and does not behave like a text frame. To keep text within the borders of the object, you have to use paragraphs, line breaks, smaller text size, increasing the object size, or a combination of all four add text to an object:1)Select the )Select the Text icon on the Drawing toolbar and a text cursor starts flashing in the center ofthe selected )Start typing your text (Figure 8). The status bar will indicate that you are editing text, as shown in Figure )Alternatively, double-click on an object to enter text editing mode. If double-clicking does not work, then open the Options toolbar and select the Double-click to edit Text 8: Adding text to an objectInserting textPasting textText may be inserted into a text box or object by copying it from another document and pasting it into the text box or object on your drawing. However, pasted text may not match the Formatting of the text that has already been included on your drawing.
9 This may be what you want on some occasions, but in most cases it is better to make sure that text format is consistent throughout your unformatted textIt is good practice to paste text without Formatting and apply the Formatting later so it matches the text already in your drawing or make the text fit within the borders of an )Copy the text you want to use, then move your cursor into position on the )Go to Edit > Paste Special on the main menu bar or use the keyboard shortcut Control+Shift+V or click on the small triangle next on the right of the Paste icon on the Standard )Select Unformatted text from the dialog or context menu that appears. The text will be pasted at the cursor position and formatted to the default paragraph style of the text box or pasted text1)Select the text you have just pasted (see Selecting text on page 12 for more information).Inserting text92)Use the Formatting tools that are available on the Text Formatting toolbar, or go to Format on the main menu bar and select a Formatting tool from the drop-down menu, or right-click on the text and select a Formatting tool from the context )Alternatively, go to Format > Styles and Formatting or press the F11 key to open the Styles and Formatting dialog.
10 See Using styles on page 12 for more special charactersTo insert special characters, such as copyright, math, geometric, monetary symbols, or characters from another language:1)Click on the Text icon and then click in the text where you want to insert the )Go to Insert > Special Character on the main menu bar or right-click and select Special Characters from the context menu to open the Special Characters dialog (Figure 9).3)Alternatively, click on the Special Character icon on the Text Formatting toolbar to open the Special Characters dialog. If this icon is not visible, right-click in an empty area on the toolbar and select Visible Buttons > Special Character from the context menu andthe icon will be placed on the )Select the font and character subset from the Font and Subset options in the Special Characters )Select the character you want to insert. You may have to scroll to find the character you )Click 9: Special Characters dialogNoteCharacters you select will be inserted in the order they were selected, even if you accidentally click on the wrong character.