Transcription of Advanced Excel Macros : Data Validation/Analysis : OneDrive
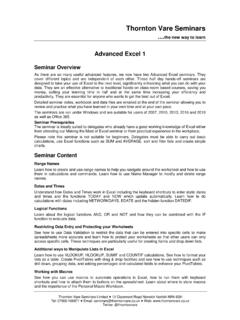
1 Advanced Excel Macros : data Validation/Analysis : OneDrive Macros Macros in Excel are in short, a recording of keystrokes. Beyond simple recording, you can use Macros to automate tasks that you will use over and over. In this exercise, we will find all cells that contain formulas with the understanding that we may use this feature in different spreadsheets or over and over. *From the previous workshop, bring out the Developer Tab from the File-> Options -> Ribbon -> Developer Open the Stocks Spreadsheet Click on Cell B1 In the Developer Tab, click on the Record macro button. Change the macro Name to FindFormulas no spaces Change the Shortcut Key to Cntl + Shift + T (press Shift +T) to add it as a shortcut.
2 For now, keep This Workbook Put in a description on what the macro will do in the Description box. Press OK Go the Home Tab and click on the Find & Select button. Add a color to the cells by clicking on the Paint Bucket button in the Home Tab. Add a color. Go back to the Developer Tab and click Stop Recording. Click anywhere on a blank cell, and all your cells that contain formulas will be highlighted in a color. Undo the cell coloring by pressing Cntl + A and select No Fill from the paint bucket button from the Home Tab. Now on the spreadsheet, press Cntl + Shift + T this will run your macro ! Now try the macro on a Loan spreadsheet.
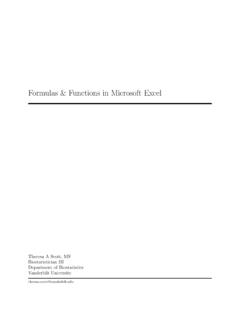
3 It should highlight your cells with formulas. Microsoft Visual Basic for Applications Environment Again, you do not need to know a lot about VBA code, but it is a good idea to at least get familiar with the VBA environment. To quickly get to the VBA environment, you just need to press Alt + F11 or you can Click on the macro button in the Developer Tab. On the left side of the screen, you will see the Project VBAP roject menu that will contain your spreadsheets and Macros . All your Macros are saved in the folder titled: Modules Since we have one macro , you will see Module 1 when you click on the Modules folder. Double click on Module 1 and the VBA code for the macro we created above will appear.
4 The code on the right is code to run the macro to find formulas on a spreadsheet and change the cells to a color. *Any text in green in the code are just comments and they will not affect anything. The instructor will discuss with the code means, but you can always add code to VBA scripts to make the macro more customized. In this example: type Range ( B3 ). Select between End With and End Sub What this is going to do is move your cursor to cell B3 after the macro is run. Press ALT+F11 and run the macro on the Stocks spreadsheet. Your cursor will end up in cell B3 Macros as Buttons There are two ways to create buttons in Excel that will run a macro in the background that will make tasks that much easier to process.
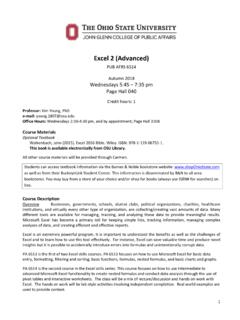
5 In most cases, you will set up buttons when you must send the spreadsheet over to data entry clients so they do not mess up data on your spreadsheet. One method is to create a button from a shape or insert a picture or you can assign a button already made in the Developer Tab. Go back to the Table spreadsheet. Go to the Developer Tab and click on Record macro . macro Name: SortTable Shortcut Key: Ctrl + Shift + Y Click OK. Highlight cells A4-A36, and in the Home Tab, click Sort A-Z Go back to the Developer Tab and click: Stop Recording. Now press the undo button on the top left of the screen to unsort the data . Go to the Insert Tab -> Shapes -> Insert a rectangle In the rectangle, type Sort by Name Right-click in the rectangle and select Assign macro So far, we only have one macro assigned to this worksheet, so click on TableSort and change Marcos In to This Workbook.
6 (Since this macro is designed for this spreadsheet, that is why we are choosing this option) Click Ok. Click outside the button to deselect the object. Now when you move your mouse over the button, it should change to a finger ready to press. Press the button, and it should sort your data . (*You can easily insert a picture and turn that into a button what a macro . Most businesses will do this with a logo.) Excel already has pre-designed buttons that do tasks to help build surveys. In this example, let s create a macro to print a spreadsheet and then create a button to press to quickly print. Go to the Developer Tab -> Record macro . (Name the macro PrintArea with Cntl+Shift+G) Print the spreadsheet like you normally do: File -> Print -> Print.
7 Go back to the Developer Tab -> Stop Recording. Click on the Insert Button in the Developer Tab and Select the Button command. You can draw a button on the spreadsheet just like drawing a shape. When you draw a button, the Assign macro menu will appear. Now we should have two Macros . Click on the PrintArea and click Ok. Now press the button, and it should print the spreadsheet. You can rename the button to Print to add what the button will do. Macros with a Conditional IF Statement Hopefully you remember conditional formulas from the previous workshops. In a nutshell, we just added a condition (true or false statement) to the logic in a formula to get a specific result based on the condition.
8 We can apply the same logic with Macros to set conditions. Go back to the Table spreadsheet. We need to record another macro . One macro accountants use frequently is to create a toggle macro with accounting underlining. Go to the Developer Tab -> Record macro . Highlight cells E3-E35 Go to the Home Tab -> Underline drop down -> Double Underline Go back to the Developer Tab and press Stop Recording. Now we need to create a macro removing the double underline. Go back to the Developer Tab and press Record macro . Name this macro RemoveUnderline and press Shift + D. Highlight cells E3-E35 and press Cntl + U twice to remove the underline. Go back to the Developer Tab and press Stop Recording.
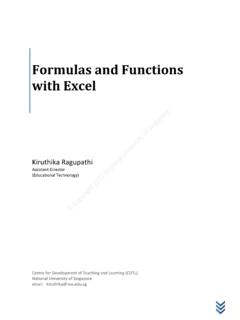
9 Press Alt + F11 to get to the VBA code. The VBA code either went into separate modules or on the same module, depending on if you saved the macro to the worksheet, workbook, or in personal workbook. In this example, it should have been put into Module 1. Either way, you can cut and paste the remove underline code into the module that has the insert underline code. Right now the code should look like this: In the Remove Underline, delete the line = xlUnderlineStyleSingleAccounting Remove the End Sub SubRemove Underline () Remove Underline macro Keyboard Shortcut: Ctrl+Shift+D. If you have any other code, go ahead and delete that out here as well.
10 In the first line type: IF = xlUnderlineStyleDoubleAcconting Then (Press the Enter key and bring the rest of the code together) Under the last Range ( E2 ).Select, type Else and copy and paste the first two lines without the If Then and press Enter: Looks like this: Last, type endif under the last line before End Sub (press the Enter key to apply the new code) The final code should look like: Go back to your spreadsheet by pressing Alt+F11. Now press Ctrl + Shift + F to apply the macro . Press it again, and it should toggle off. Macros with Next and Repeat Actions Next and Repeat macro are great when you repeat tasks within a range. In other words, if you see the same sequence of code in the VBA on a macro , you will want to use the Next and Repeat macro to automate the task(s).