Transcription of An Introduction to Robotics and Java Programming
1 An Introduction to Robotics and java Programming ii Copyright 2005-2007 by RidgeSoft, LLC. All rights reserved. RidgeSoft, RoboJDE and IntelliBrain are trademarks of RidgeSoft, LLC. java and all java -based marks are trademarks or registered trademarks of Sun Microsystems, Inc. in the United States and other countries. All other brand or product names are trademarks of their respective owners. RidgeSoft, LLC PO Box 482 Pleasanton, CA 94566 Revision 2 iii Table of Contents INTRODUCING THE INTELLIBRAIN-BOT EDUCATIONAL ROBOT A HANDS-ON Programming THE CREATING A NEW CONNECTING THE ROBOT TO YOUR RUNNING YOUR FIRST Programming DEBUGGING YOUR MANEUVERING THE DIFFERENTIAL DRIVE Programming SIMPLE COMBINING SIMPLE INTERACTING WITH THE USING TEXT USING USING THE ARITHMETIC USING PUSH LOGICAL OPERATORS AND BOOLEAN TEACHING THE ROBOT NEW SWITCH USING THE 66 PLAYING A USING A UNIVERSAL REMOTE 68 Introduction TO SONAR RANGE USING THE PING))) LINE 91 LINE FOLLOWING A LINE USING ONE 94 FOLLOWING A LINE USING TWO 1 CHAPTER 1 Introducing the IntelliBrain-Bot Throughout this book we will be using the IntelliBrain-Bot Deluxe educational robot to learn about the emerging field of Robotics .
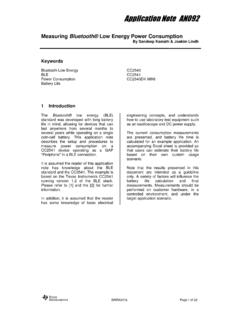
2 The IntelliBrain-Bot educational robot is a pre-designed mobile robot, which will allow us to focus our discussion primarily on Robotics Programming , using the companion java -enabled Robotics software development environment, RoboJDE. Before we get started Programming the robot, lets first take a look at the mechanical and electronics components which make up the IntelliBrain-Bot educational robot. Figure 1-1 - IntelliBrain-Bot Deluxe Educational Robot IntelliBrain 2 Robotics controller Aluminum chassis Drive wheel Servo motor Infrared wheel encoder sensor Infrared line sensor Infrared range sensor Ultrasonic range sensor LCD 2 IntelliBrain-Bot Educational Robot Design IntelliBrain-Bot Educational Robot Design Figure 1-1 shows a fully assembled IntelliBrain-Bot Deluxe educational robot. As you can see in the figure, the robot is made up of the following major parts: IntelliBrain 2 Robotics controller with LCD display aluminum chassis servo motors wheels assorted hardware sensors battery holder (not visible, under chassis) batteries (not visible, under chassis) Mechanics The IntelliBrain-Bot educational robot employs a simple mechanical design.
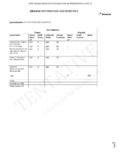
3 An aluminum chassis fabricated from a single piece of sheet metal provides a sturdy central structure for the robot. Two motors mounted on the underside of the chassis drive the two large wheels, enabling the robot to move under its own power. A ball tail wheel supports the back end of the robot. The Robotics controller, sensors, motors, tail wheel and battery holder mount directly on the chassis. Figure 1-2 - IntelliBrain 2 Robotics Controller START STOP RoboJDE Ready Atmel ATmega128 Microcontroller - - 128K flash program memory - 132K RAM - 4K bytes EEPROM java Programmable Thumbwheel COM1 Port - RS-232, baud - Host interface or general purpose - Bluetooth ready (5V pin 9 power) Buzzer 2 Push Buttons Power Switch Battery Power - 4-6 alkaline, NiCd, or NiMH batteries 16x2 LCD Display 8 Servo Ports - 5 with power - 3 signal only COM2 Port - RS-232, baud - CMUcam ready (6V regulated power) 7 Analog / Digital Inputs 5 I2C Ports 13 Digital Inputs/Outputs Infrared Receiver - Sony/Universal TV remote compatible Mounting Holes - IntelliBrain-Bot - Your custom robot - Lego grid compatible 6 Programmable LEDs Wall Brick Power Connector 2 DC Motor Ports Infrared Transmitter Introducing the IntelliBrain-Bot 3 IntelliBrain 2 Robotics Controller The IntelliBrain 2 Robotics controller, depicted in Figure 1-2, is the IntelliBrain-Bot educational robots brain.
4 A java program executing on the IntelliBrain Robotics controller enables the robot to function independently, analyzing input from the robots sensors and by controlling the robots motors to achieve desired results. By creating and loading different programs you can program the robot to perform a wide range of functions. A program can be very simple or quite complex. A program may be as trivial as displaying your name on the LCD screen or as complex as a program that controls a search and rescue robot. Sensor and Motor Ports Sensors and motors connect to the IntelliBrain 2 Robotics controller via input and output ports. As you can see in Figure 1-1 and Figure 1-2, most of these ports consist of connector pins along the front edge (top edge in Figure 1-2) of the controller board. Each port has three or four pins: ground, power and signal pins. The ports are arranged side-by-side across the forward edge of the controllers circuit board.
5 Each port is marked by a label on the controller board, which indicates the type of port and the number of the port. Table 1-1describes the ports available on the IntelliBrain 2 Robotics controller. Table 1-1 - IntelliBrain 2 Robotics Controller Ports Port Type Labels Description Analog A1-A7 Analog ports use an analog to digital converter to read a voltage between 0 and 5 volts and convert it to an integer value between 0 and 1023, where 0 corresponds to 0 volts and 1023 corresponds to 5 volts. Digital IO1-IO13 Digital ports input or output a Boolean (on/off or true/false) signal. When configured as an output, a digital port outputs 0 volts when it is off (false) and 5 volts when it is on (true). When configured as an input, a digital port returns a false value when the signal is low (nearest 0 volts) and true when the signal is high (nearest 5 volts). Servo S1-S8 Servo ports interface directly to hobby servo motors. Servo motors were originally developed for use in model airplanes and, due to their light weight, low cost and simple electronics, are now commonly used in small robots.
6 Motor M1, M2 Motor ports interface directly with conventional DC motors, using pulse width modulation (PWM) to vary the power output by each motor. Serial COM1, COM2 Serial ports interface to more complex sensors such as cameras and Global Positioning System (GPS) devices. By attaching a Bluetooth serial adapter to a serial port the robot can communicate wirelessly to a host computer or other robots. The COM1 port also serves as the connection to a PC when developing a program using the RoboJDE development environment. 4 IntelliBrain-Bot Educational Robot Design Port Type Labels Description I2C I2C I2C (pronounced i-two-c) ports interface to more advanced sensors and effectors such as compass sensors and speech synthesizers. There are five port headers for I2C devices. The I2C ports are not numbered individually because I2C device addressing is controlled in software, not by the physical connection. Infrared transmitter none The infrared transmitter provides a signal an on/off signal that can be detected by the infrared receiver (described below).
7 This can be used for simple communication between robots to signal a Boolean (on/off) value, for example, signaling another robot to stop or go. Human Interface Features In addition to providing the ability to execute a java program and to interface to sensors and motors, the IntelliBrain 2 Robotics controller provides a number of features which make it easy to program the robot to interact with people. Table 1-2 lists these features. Table 1-2 - Human Interface Features Device Description Liquid Crystal Display The Liquid Crystal Display (LCD) screen provides two, sixteen character lines of output. The LCD is useful to directly display sensor readings, providing an easy way to learn about and diagnose problems with sensors. The display is also useful for providing a simple menu-based user interface. Push Button Two push buttons, labeled START and STOP may be used like the buttons on a mouse, allowing a human to indicate choices. By default the buttons start and stop the java program, but your program can use them for other purposes.
8 Thumbwheel The thumbwheel works like a volume control knob on a car stereo. It provides a means for users to vary the setting of an analog value, such as motor speed, or a way to scroll through screens of output on the LCD display. Buzzer The buzzer can be programmed to beep, click or play a tune. Universal remote control receiver The universal remote control receiver allows the program to take input from a universal remote control, giving a human the ability to remotely control the robot or provide a keyboard type input for a more sophisticated human interface. Light Emitting Diodes (LEDs) Seven LEDs provide visual indications to humans. Six of these can be turned on, off or blinked under program control to provide a visual indication to the user. Three of the program controlled LEDs are green and three are red. The left most LED is a power indicator, which illuminates green when power is on. It cannot be controlled by the program. The LEDs are numbered 1 through 6, starting with the LED to the right of the power LED.
9 Introducing the IntelliBrain-Bot 5 Sensors The IntelliBrain-Bot Deluxe educational robot comes with seven sensors described in Table 1-3. Table 1-3 IntelliBrain-Bot Deluxe Educational Robot Sensors Sensor Description Wheel Encoder Sensor (2) Two wheel encoder sensors sense movement of the robots wheels. These sensors use reflected infrared light to sense if a hole or a spoke is in front of the sensor. Line Sensor (2) Two line sensors mounted on the underside of the robot sense the presence of a non-reflective line. These sensors use infrared light to sense the reflectivity of the surface below the robot, allowing it to follow the course of a non-reflective, black line over a highly reflective, white background. Infrared Range Sensor (2) Two infrared range sensors sense the distance to objects between 4 and 30 inches in front of the robot. These sensors measure the angle of reflection of a narrow beam of infrared light to determine the distance to objects within their range.
10 They can be used to detect and avoid obstacles in the robots path. Ultrasonic Range Sensor One ultrasonic range sensor senses the distance to an object between and 118 inches in front of the robot. This sensor measures distance by issuing a brief pulse of high frequency sound, a ping, and precisely measuring the time until the first echo returns. Using speed-of-sound calculations the distance to an object can be precisely determined. This sensor can be used to identify far off objects, walls and hallways. It is also can be used to create an invisible tractor beam, as you will observe later in this lesson. Batteries Chemical energy in the four AA batteries mounted in the battery holder, on the underside of the chassis, provides the energy to power the motors and electronics. A Hands-on Demonstration Now for some fun, lets take a few minutes to see what the IntelliBrain-Bot educational robot can do. Note: Your lab instructor should have loaded the IntelliBrain-Bot demo program into the flash memory of your robot and made sure the batteries are fully charged prior to this exercise.