Transcription of App Note 435: Using Occupancy Sensing Switch withMaestro ...
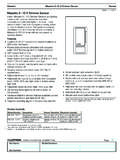
1 Using Occupancy Sensing Switch with Maestro Companion SwitchApplication Note #435 Revision B May 20121 Technical Support LutronR Occupancy & Vacancy motion sensors are passive infrared (PIR) sensors that automatically control lights. These sensors detect the heat from occupants moving within an area to determine when the space is occupied. The sensors then control the lights automatically turning them off or on, providing convenience and increased energy ! Shock Hazard. May result in serious injury or death. Turn off power at circuit breaker before installing the unit. Remove wallplate and Switch mounting screws. Carefully remove Switch from wall leaving all wires attached. Identify Switch type (Single pole, 3-way or 4-way) and tag the COMMON terminal.
2 Single pole (One location) Switch will have insulated wires connected to two screws of the same color plus a green ground screw. See Diagram A 3-way (Two locations) 3-way switches will have insulated wires connected to three screws plus a green ground screw. One of these wires is connected to a screw of a different color (not green) or labeled COMMON. Tag this wire on both switches to identify when removing. See Diagram B 1233A3B!Single PoleA1 Switch controlling 1 LightGroundSame Color Screws 3-wayB2 Switches controlling 1 LightGroundDifferent Color Screw Ta gApplication Note # 4-way (Three or more locations) 4-way switches will have insulated wires connected to four screws plus a green ground screw. Tag either set of two same-color insulated wires that are connected to different-colored screws (on the same side of the Switch ).
3 Follow this procedure for each 4-way Switch . See Diagram C Disconnect wires from the switches removed in step 2. The switches may have two wires attached to the same screw. Tape these two wires together before disconnecting. Connect Occupancy Sensing Switch and Companion SwitchesSingle pole (One location) - Existing Switch will be replaced with an Occupancy Sensing Switch . For models without a neutral (white) wire, (OPS5M, VPS5M, OPS6M2-DV, and VPS6M2-DV) Connect green and bare ground wire on Occupancy Sensing Switch to bare copper or green wire in wallbox. For models with a neutral (white) wire, (OPS6M2N-DV, VPS6M2N-DV) Connect bare ground wire on Occupancy Sensing Switch to bare copper or green wire in wallbox.
4 Connect white wire on Occupancy Sensing Switch to white wire (neutral) in wallbox (OPS6M2N-DV, VPS6M2N-DV) Connect one of the remaining wires removed from Switch to black wire on Occupancy Sensing Switch . Connect remaining wire removed from Switch to the other black wire on Occupancy Sensing Switch . Blue wire is not used in a single-pole circuit. Cap blue TerminalScrew Terminal453C5AC4-way3 or more Switches controlling 1 Color2 Switches will be 3-way, others will be Color ScrewsGroundGreenGroundBareBlackBlackBlu eOccupancy Sensing SwitchNeutralLoadBareGreenBlueBlackBlack LiveGroundWhiteGroundBareBlackBlackBlueO ccupancy Sensing SwitchNeutralLoadBareWhiteBlueBlackBlack LiveGround-OPS5M, -VPS5M, -OPS6M2-DV, and -VPS6M2-DV -OPS6M2N-DV, and -VPS6M2N-DVApplication Note # (Two locations)NOTE.
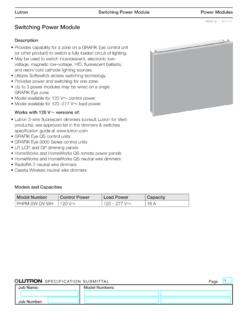
5 120 V~ circuits use MA -AS/ MSC-AS Companion Switches 240 / 277 V~ circuits use MA -AS-277/ MSC-AS-277 Companion Switches Wire the Occupancy Sensing Switch For models without a neutral (white) wire, (OPS5M, VPS5M, OPS6M2-DV, and VPS6M2-DV) Connect green and bare ground wire on Occupancy Sensing Switch to bare copper or green wire in wallbox. For models with a neutral (white) wire, (OPS6M2N-DV, VPS6M2N-DV) Connect bare ground wire on Occupancy Sensing Switch to bare copper or green wire in wallbox. Connect white wire on Occupancy Sensing Switch to white wire (neutral) in wallbox (OPS6M2N-DV, VPS6M2N-DV) Connect tagged wire removed from Switch to one of the black wires on Occupancy Sensing Switch . Connect one of the remaining wires removed from Switch to the other black wire on Occupancy Sensing Switch .
6 Connect remaining wire removed from Switch (note color) to blue wire on Occupancy Sensing Switch . Wire the Companion Switch Connect green ground wire on Companion Switch to bare copper or green wire in wallbox. Connect tagged wire removed from Switch to black screw terminal on Companion Switch . Connect the same color wire connected to the blue wire on Occupancy Sensing Switch (color noted above) to the blue screw terminal on Companion Switch . Connect remaining wire removed from Switch to brass screw terminal on Companion wiring diagrams on next Sensing SwitchBareGroundTagGreen wireBlack screwBrass screwBlue screwCompanion Switch -OPS6M2N-DV, and -VPS6M2N-DV-OPS5M, -VPS5M, -OPS6M2-DV, and -VPS6M2-DVGreenBlueGroundBlackBlackOccup ancy Sensing SwitchBareTagTagApplication Note # Color (120 V~ Companion Switch )BrassBlueBlackWire Color (277 V~ Companion Switch )Black WireBlue WireBlack WireOccupancy SensingSwitch (Wires)
7 Companion SwitchSwitch TypeProduct KeyNeutralBareGreenGreenLine sideLoad sideGround GroundLoadLiveBlueBlackBlackNeutralBareW hiteGreenLine sideLoad sideGround GroundLoadLiveBlueBlackBlack5 BWiring DiagramsNeutralGreenGreenBareLine sideLoad sideGroundGroundLoadBlueBlackBlackLiveNe utralGreenwhiteBareLine sideLoad sideGroundGroundLoadBlueBlackBlackLiveOR ORNOTE: Maximum wire length between the Occupancy Sensing Switch and the Companion Switch (Total blue terminal wire length) is 150 ft (46 m). -OPS6M2N-DV, and -VPS6M2N-DV-OPS5M, -VPS5M, -OPS6M2-DV, and -VPS6M2-DVApplication Note # (Three or more locations)NOTE: The Occupancy Sensing Switch can be installed in any of the locations (choose the location where the sensor will have optimal coverage of the space).
8 The Occupancy Sensing Switch and/or companion switches can replace a 4-way Switch or 3-way Switch (4-way applications typically include both 4-way and 3-way switches). Wire the Occupancy Sensing Switch replacing a 4-way Switch For models without a neutral (white) wire, (OPS5M, VPS5M, OPS6M2-DV, and VPS6M2-DV) Connect green and bare ground wire on Occupancy Sensing Switch to bare copper or green wire in wallbox. For models with a neutral (white) wire, (OPS6M2N-DV, VPS6M2N-DV) Connect bare ground wire on Occupancy Sensing Switch to bare copper or green wire in wallbox. Connect white wire on Occupancy Sensing Switch to white wire (neutral) in wallbox (OPS6M2N-DV, VPS6M2N-DV) Connect both tagged wires (note color) removed from 4-way Switch to blue wire on Occupancy Sensing Switch .
9 Connect one of the remaining wires removed from Switch to one of the black wires on Occupancy Sensing Switch . Connect remaining wire removed from Switch to other black wire on Occupancy Sensing Switch . Wire the Companion Switch replacing a 4-way Switch Connect green wire on Companion Switch to bare copper or green wire in wallbox. Connect both tagged wires (note wire color) removed from 4-way Switch to blue screw terminal on Companion Switch (one wire to screw terminal the other to push-in terminal). Connect one of the remaining wires removed from Switch to black screw terminal on Companion Switch . Connect remaining wire removed from Switch to brass screw terminal on Companion : Repeat for each Companion Switch replacing a 4-way wiring diagrams on page Sensing SwitchGreenGroundBlueBlackBlackBareCompa nion SwitchGroundGreen wireBlack screwBrass screwBlue screwTags5C-OPS5M, -VPS5M, -OPS6M2-DV, and -VPS6M2-DV -OPS6M2N-DV, and -VPS6M2N-DVOccupancy Sensing SwitchWhiteGroundBlueBlackBlackBareAppli cation Note # 4-way (Three or more location control) Wire the Occupancy Sensing Switch replacing a 3-way Switch For models without a neutral (white) wire, (OPS5M, VPS5M, OPS6M2-DV, and VPS6M2-DV) Connect green and bare ground wire on Occupancy Sensing Switch to bare copper or green wire in wallbox.
10 For models with a neutral (white) wire, (OPS6M2N-DV, VPS6M2N-DV) Connect bare ground wire on Occupancy Sensing Switch to bare copper or green wire in wallbox. Connect white wire on Occupancy Sensing Switch to white wire (neutral) in wallbox (OPS6M2N-DV, VPS6M2N-DV) Connect tagged wire removed from Switch to one of the black wires on Occupancy Sensing Switch . Connect same color wire connected to blue screw terminal on Companion Switch that replaced 4-way Switch (color noted above) to blue wire on Occupancy Sensor Switch . Connect remaining wire removed from Switch to the other Black wire on Occupancy Sensing Switch . Wire the Companion Switch (es) replacing a 3-way Switch Connect green ground wire on Companion Switch to bare copper or green wire in wallbox.