Transcription of Arduino For Beginners - Makerspaces.com
1 Arduino For Beginners Learn about Arduino and t he Arduino UNO and how y ou can integrate this board int o y our m akerspace and coding program . Make in teractive m akerspace proj ects while learning to co de and problem solve. More and more makerspaces around the world are looking to add coding and electronics to their maker education programs. One of the best ways to do this is by integrating an Arduino board into makerspace projects and lessons. We ve found that a lot of maker educators haven t taken the plunge into coding or Arduino because they think programming is scary. Because of this, we wanted to make sure this tutorial was written for the absolute beginner with no experience whatsoever. This tutorial is a high level view of all the parts and pieces of the Arduino ecosystem.
2 In future posts, we will take you step by step in creating your first simple Arduino project. What Is Arduino ? Arduino is an open source programmable circuit board that can be integrated into a wide variety of makerspace projects both simple and complex. This board contains a microcontroller which is able to be programmed to sense and control objects in the physical world. By responding to sensors and inputs, the Arduino is able to interact with a large array of outputs such as LEDs, motors and displays. Because of it s flexibility and low cost, Arduino has become a very popular choice for makers and makerspaces looking to create interactive hardware projects. Arduino was introduced back in 2005 in Italy by Massimo Banzi as a way for non-engineers to have access to a low cost, simple tool for creating hardware projects.
3 Since the board is open-source, it is released under a Creative Commons license which allows anyone to produce their own board. If you search the web, you will find there are hundreds of Arduino compatible clones and variations available but the only official boards have Arduino in it s name. In the next section, we re going to discuss a few of the Arduino boards available and how they differ from each other. Types of Arduino Boards Arduino is a great platform for prototyping projects and inventions but can be confusing when having to choose the right board. If you re brand new to this, you might have always thought that there was just one Arduino board and that s it. In reality, there are many variations of the official Arduino boards and then there are hundreds more from competitors who offer clones.
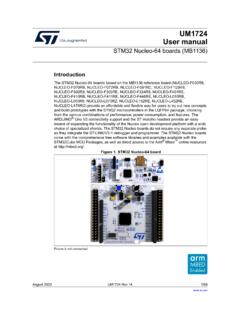
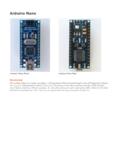
4 But don t worry, we re going to show you which one to start with later on in this tutorial. Below are a few examples of the different types of Arduino boards out there. The boards with the name Arduino on them are the official boards but there are also a lot of really great clones on the market as well. One of the best reasons to buy a clone is the fact they are generally less expensive than their official counterpart. Adafruit and Sparkfun for example, sell variations of the Arduino boards which cost less but still have the same quality of the originals. One word of caution, be careful when buying boards from companies you don t know. Image credit Another factor to consider when choosing a board is the type of project you are looking to do. For example, if you want to create a wearable electronic project, you might want to consider the LilyPad board from Sparkfun.
5 The LilyPad is designed to be easily sewn into e-textiles and wearable projects. If your project has a small form factor, you might want to use the Arduino Pro Mini which has a very small footprint compared to other boards. Check out Sparkfun s Arduino Comparison Guide for a breakdown and comparison of the top boards out there. Next, we re going to focus on our favorite Arduino board which we recommend Beginners start with. Arduino Uno One of the most popular Arduino boards out there is the Arduino Uno. While it was not actually the first board to be released, it remains to be the most actively used and most widely documented on the market. Because of its extreme popularity, the Arduino Uno has a ton of project tutorials and forums around the web that can help you get started or out of a jam.
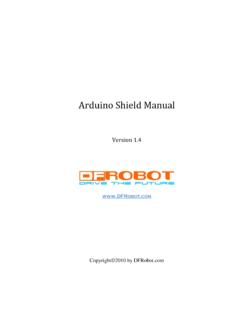
6 We re big fans of the Uno because of it s great features and ease of use. Board Breakdown Here are the components that make up an Arduino board and what each of their functions are. 1. Reset Button This will restart any code that is loaded to the Arduino board 2. AREF Stands for Analog Reference and is used to set an external reference voltage 3. Ground Pin There are a few ground pins on the Arduino and they all work the same 4. Digital Input/Output Pins 0-13 can be used for digital input or output 5. PWM The pins marked with the (~) symbol can simulate analog output 6. USB Connection Used for powering up your Arduino and uploading sketches 7. TX/RX Transmit and receive data indication LEDs 8. ATmega Microcontroller This is the brains and is where the programs are stored 9.
7 Power LED Indicator This LED lights up anytime the board is plugged in a power source 10. Voltage Regulator This controls the amount of voltage going into the Arduino board 11. DC Power Barrel Jack This is used for powering your Arduino with a power supply 12. Pin This pin supplies volts of power to your projects 13. 5V Pin This pin supplies 5 volts of power to your projects 14. Ground Pins There are a few ground pins on the Arduino and they all work the same 15. Analog Pins These pins can read the signal from an analog sensor and convert it to digital Arduino Power Supply The Arduino Uno needs a power source in order for it to operate and can be powered in a variety of ways. You can do what most people do and connect the board directly to your computer via a USB cable.
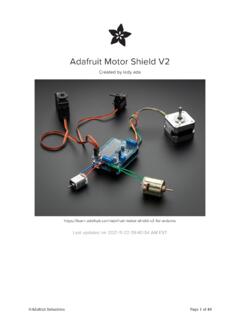
8 If you want your project to be mobile, consider using a 9V battery pack to give it juice. The last method would be to use a 9V AC power supply. Arduino Breadboard Another very important item when working with Arduino is a solderless breadboard. This device allows you to prototype your Arduino project without having to permanently solder the circuit together. Using a breadboard allows you to create temporary prototypes and experiment with different circuit designs. Inside the holes (tie points) of the plastic housing, are metal clips which are connected to each other by strips of conductive material. On a side note, the breadboard is not powered on its own and needs power brought to it from the Arduino board using jumper wires. These wires are also used to form the circuit by connecting resistors, switches and other components together.
9 Here is a visual of what a completed Arduino circuit looks like when connected to a breadboard. How To Program Arduino Once the circuit has been created on the breadboard, you ll need to upload the program (known as a sketch) to the Arduino . The sketch is a set of instructions that tells the board what functions it needs to perform. An Arduino board can only hold and perform one sketch at a time. The software used to create Arduino sketches is called the IDE which stands for Integrated Development Environment. The software is free to download and can be found at Every Arduino sketch has two main parts to the program: void setup() Sets things up that have to be done once and then don t happen again. void loop() Contains the instructions that get repeated over and over until the board is turned off.
10 How Everything Works Together Check out our quick Arduino video to see how a breadboard, Arduino , jumper wires and the sketch work together to perform a function. In this video, we use a momentary push button switch to blink an LED. Arduino Projects You may be wondering what an Arduino board can do besides blink an LED. Below are some example projects which help to showcase how truly amazing this board is and the capabilities of it. If you re looking for more project ideas, check out sites such as Instructables or Make Magazine which are loaded with helpful tutorials. Arduino Light Following Robot Instructables Arduino Drone That Follows You Instructables LED Cube w/ Arduino Uno Instructables Control A Doorlock Using Arduino and Bluetooth MAKE Magazine Tools Needed Next we will help to highlight some of the most common tools you will need when working with Arduino projects.