Transcription of ArrowLine Shake & Slate Installation Guide - Best …
1 Preparation and General Conditions ..2 Panel Installation sequence procedure ..3 General underlayment instructions ..3 A Eave Starter ..4 B Rake Starter (Gable Rollover option) ..5 C Closed Valley Assembly ..6 D Open Valley Assembly ..7 E End Wall Flashing (Chimney Flashing option) ..8 F Steel Shingle- Shake / Slate and Shingle Clip ..9 G Hip and Ridge Assembly (non-vented) ..10 H Hip and Ridge Assembly (vented) ..11 Ridge & Soffit Ventilation Requirements ..12 Roof Vent Flashing ..13 Pipe Vent Flashing ..14 Roof Jack ..13 J Side Wall Installation (Side wall corner, Shake to Shake detail) ..14 K Starter Strip - Steel #1063-000 (part shown on page) ..15 Espa ol instrucciones ..16 Parts List ..20 DESCRIPTIONPAGEDETAIL2/01/09 InstallationGuideRoofing That LastsBBM2 PREPARATION AND GENERAL CONDITIONS * 1 . Cartons should be stored in dry place under cover . Carry only one carton at a time and avoid having loose pieces on the roof.
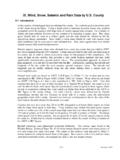
2 2 . Follow all workers compensation and OSHA safety guidelines . 3 . Minimum recommended roof pitch is 4/12 . Contact EDCO for recommendations on roofs with 3/12 pitch or less . 4 . Inspect all roof sheathing and framing to make sure that it is free of warping, in good condition and fastened properly . 5 . When re-roofing determine if existing roofing needs to be removed . Before installing new shakes/ Slate over existing shingles, remove any mouldings on fascia board, then cut back existing shingles flush with the fascia board at the eave and rake lines . 6 . A Class "A" fire rating can be achieved by covering the entire roof area with Georgia-Pacific 1/4" Dens-Deck . The Dens-Deck must be applied directly over the sheathing or existing roof and underneath the new underlayment . Shakes/ Slate installed directly over a synthetic underlayment or #30 felt underlayment without 1/4" Dens-Deck will achieve a Class "C" fire rating . 7 . The entire roof must be covered with an underlayment prior to installing shakes/ Slate .
3 The underlayment should be selected based on climatic weather conditions and must comply with all local building codes . A #30 felt underlayment can be used with double layers at the eaves edge to a point at least 24" inside the exterior wall line, 18" on each side of the centerline along the entire length of the valley and around openings . The underlayments are to be overlapped 2" horizontally and 4" vertically . Follow local buidling codes . 8 . In weather climates that experience freezing temperatures and high winds it would be advisable to use a polymer modified bitumen ice and water shield in lieu of the bottom layer of doubled underlayment and possibly throughout the entire job . Ice and water shield is recommended for new construction as is following the manufacturer s recommendations . Follow local building codes . 9 . Proper attic ventilation is necessary . Using ArrowLine venting hip, ridge and soffit panels are an excellent way to ventilate the attic.
4 See page 3 for details on preparing the roof and page 11 for installing the hip and ridge vents . 10 . When walking on roof always wear soft soled shoes or foam rubber soled overshoes and stay close to the top of the Shake / Slate just under the butt projection where the Shake / Slate is closest to under support . Always avoid walking on four way interlock of the Shake / Slate . Recommended scaffolding methods should always be adhered to . 11 . Architects, contractors, and roofing installers must ensure that construction bylaws and building codes are complied with and approved . Before construction begins, building permits may need to be obtained from the local building department . To qualify for protection under the manufacturer s warranty, the application instructions herein must be followed . 12 . Contact EDCO Products, Inc . for testing deails: UL 580-Uplift Resistance; UL 2218-Hail Resistance (4); FL4077-Florida Building Commission . 13.
5 Use OSHA approved fall protection equipment when working on any roof . * THIS Installation MANUAL IS INTENDED TO BE A GUIDELINE FOR INSTALLING OUR ArrowLine ROOFING PRODUCTS . EDCO PRODUCTS, INC . ASSUMES NO RESPONSIBILITY FOR LEAKS OR OTHER ROOFING DEFECTS DUE TO FAULTY APPLICATION . ArrowLine ROOFING PRODUCTS ARE COVERED BY A LIFETIME LIMITED WARRANTY . FOR A COPY OF THE WARRANTY CALL 800 - 728 - 4010 . OR YOUR LOCAL DEALER . USE A PROFESSIONAL CONTRACTOR FOR Installation OF YOUR ArrowLine ROOF .800-728-40103 Flush to Gable End63971 Shown withopening forventingShown withopening forventingFlush toEave Starter4" lap2" lap35431023210 Tools needed Screw gun Hammer Chalk line Snips Caulk gun Roofing brackets or jacks Utility knife & blades Shingle remover Knee pads Portable brake Tape measure Hand seamer Hand staplerGeneral underlayment instructionsShake/ Slate Installation sequence procedure For new construction, it is recommended to use ice and water shield instead of #30 felt paper.
6 The ice and water shield seals around screws and nails and is a final water barrier where there are conditions of heavy driving rain and ice dams . Refer to underlayment manufacturer s instructions and local building codes .Installing ice and water shieldCheck to see that no nails or staples are protruding from the roof decking before applying ice and water shield . Do not nail any closer than 6 from the rake edge or the bottom of the roof when mounting panels . Steps 2 & 3 are shown as tinted and Step 4 is shown as white .2a: At the eave starter, apply the first row of 36 underlayment to be flush to the bottom edge of the eave starter and flush at the gable ends . 24 inside external wall .2b: Install 36 wide underlayment in valley (18 each side with 6 vertical overlap .)3: Use 18 wide underlayment and provide 6 of vertical overlap on hips, ridges, and rake edge .4: Install 36 wide ice and water shield on the entire roof with a minimum of 2 horizontal lap and 4 vertical lap if needed.
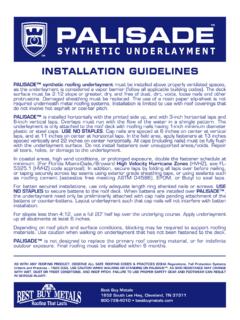
7 REFER TO LOCAL BUILDING CODESI nstalling Synthetic underlayment or #30 felt paperCheck to see that no nails or staples are protruding from the roof decking before applying synthetic underlayment or #30 felt paper . Do not nail any closer than 6 from the rake edge or the bottom of the roof when mounting panels . Steps 2 & 3 are shown as tinted and Step 4 is shown as white .2a: At the eave starter, overhang the first row of 36 wide underlayment to be flush to the bottom edge of the eave starter and flush at the gable ends .2b: Install 36 wide underlayment in valley (18 each side with 6 vertical overlap) .3: Use 18 wide underlayment and provide 6 of vertical overlap on hips and ridges .4: Install synthetic underlayment or #30 felt on the entire roof with a minimum of 2 horizontal lap and 4 vertical lap . 1 . Mount all eave starter trim (detail A - Page 4) . 2 . Install 36-inch wide ice and water shield at all eaves and valleys (denoted by dark lines & tint).
8 24 beyond inside wall . 3 . Use 18-inch wide ice and water shield for end walls, vented and non-vented hips / ridges, skylights, rake edge, and any vents through the roof (denoted by tinted area) . 4 . Cover the rest of the roof with ice and water shield, synthetic underlayment or #30 felt (denoted by white area) . Follow local building codes . 5 . Install rake starter with 7/8 j-trim (detail B - Page 5) . 6 . Install valley flashing (details C & D - Pages 6 & 7) . 7 . Install end wall flashing (detail E - Page 8) . 8 . Install roof panel going from left to right and bottom to top (detail F - Page 9) . 9 . Install valley cap (detail C - Page 6) . 10 . Use 6-inch wide sub seal over unvented hips and unvented ridges . Mount vented and non-vented hip / ridge cap systems (details G & H - Pages 10 & 11) .4 Eave Starter (Detail A) _____Shingle Clips(see )Roof DeckingShake or Slate PanelUnderlayment / Ice & Water ShieldFlush to Eave StarterFasten every 12" 16" after gutters and/or fascia is installedFasciaEave StarterFasteners as requiredFascia BoardField form to roof pitchEave Starteroverlap 2"Wrap Eave Starter around cornerand under Rake StarterRake Starteroverlap 2"Rake Starterover underlaymentUnderlayment7/8" J-Trim7/8" J-TrimNotch top leg 2" back andslip outside of upper J-TrimDetermine the roof pitch and bend the eave starter to the correct angle using a 10 brake.
9 Install eave starter at all eaves. Fasten eave starter with #10 x 1 long galvanized zip screws 12 Screw length is to be long enough to penetrate the is to be installed over the eave not walk on the butt or thebottom 1/3 of the on the center or upper part ofthe panel to help minimize installing roofing panels take care to avoid walking on the butt of the panels. It is recommended that you walk on the middle part of the panel. (See illustration to the right.)5LT Rollover ToolRake Starter (Detail B) _____GABLE ROLLOVER OPTION FOR Shake PANELSF asciaFastenerFascia BoardRake StarterFastener 16" after guttersand/or fascia are installedFastener 16" & Water Shield18" wideRoof DeckingUnderlayment7/8" J-Trim3/4" Field NotchShake or Slate PanelShingle-ShakeFastener 16" & Water ShieldForm shingle end 180 7/8" OverhangFastener face nail 16 (optional)Eave StarterFasciaSoffitEaveStarterEave StarterShake or Slate PanelLeave Shingle extended over Eave Starter by 7/8" for bendingHave the Shake or Slate overhang the eave starter by 7/8 and cut to length.
10 Notch the top leg of the shingle back 7/8 . Then form the shingle overhang around with the LT Shingle Former .Install Rake Starter with 2 of overlap going up the rake edge and over the underlayment . Fasten with #10 x 1" galvanized zip screws or ring shank nails . Mount 7/8 j-trim going up the roof and notch back 2 on lower j-trim and slip the upper j-trim inside when progressing up the rake edge . Cut a 3/4" notch on the bottom butt edge of the panel that extends into the j-trim to create a weep hole on each course . This will allow any moisture to seep out at the overhang .Shingle-Shakeon roofEave StarterStep 6 : Hand form 180 hemStep 2: Slip rollover tool onto shingleStep 3: Hold down on hinged plateStep 4: Lift and rotate handle 90 Step 5: Rotate rollover tool 120 and remove tool6 Closed Valley Assembly (Detail C) _____To assure a properly aligned and straight valley Installation , it is important to first snap a chalk line on the roof in the center of the valley, running the full length of the valley.