Transcription of Audio Controls Guide and Release Notes for FR29
1 CONFERENCING & COLLABORATION CISCO webex | 1 Using Cisco webex Web Conferencing you have the ability to add a teleconference to your web conference. Audio Controls are available* on Cisco webex Meeting Center, Cisco webex Event Center , and Cisco webex Training Center. This Guide provides details as to how to add your Audio account information to your profile, schedule, join and manage the teleconference portion of your meeting. Key Features of the Audio Controls Schedule and send invitations to your web conferences that include your Reservationless-Plus dial-In information without manually typing it in each time. Start instant meetings with your Reservationless-Plus Audio information included. Select call-in or call-back options for attendees. See participants connection status both on the phone and on the web using the participant list phone indicator. Mute and unmute Audio participants lines participants can also perform this function for their own lines. Adding your Reservationless-Plus account to your profile On your branded website, you can add your Reservationless-Plus account information to your profile.
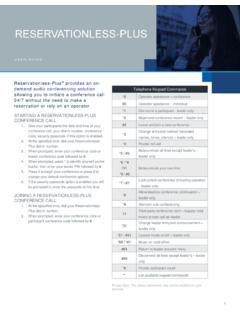
2 This allows you to manage your online meeting and teleconference from the same web interface. To add your Reservationless-Plus account information to your profile, please follow the steps below. STEP ACTION 1 Log in to your webex URL with your user name and password ( ). If you do not have a user name or password, please contact your site administrator or Customer Service. For customers using our pay per use service, your Reservationless-Plus account information is automatically populated for you. 2 Once you have logged into your account, click My webex . On the left hand navigation, select My Audio . 3 On the My Audio screen, select Add an Account. You can store up to three different Reservationless-Plus accounts. Accounts must be added one at a time. 4 In the Add Teleconference window, enter: (see screenshot below) Your toll-free Reservationless-Plus telephone number into the Toll-free call-in number field. Your toll Reservationless-Plus telephone number into the Toll call-in number field if applicable.
3 Your Leader PIN. Your Conference Code into the Conference Code field. In the recording dial-out number drop down menu, select the number that you would like to utilize for U S E R G U I D E Cisco webex Audio Controls Guide and Release Notes for FR29 CONFERENCING & COLLABORATION CISCO webex | 2 Network Based recording . Click OK. 5 If you have more than one Reservationless-Plus account stored, select the default number by selecting Set as Default, on the My Audio screen Scheduling the Teleconference In the Scheduler, you can select your Audio Option or Teleconference option and three options appear: None (no teleconference) Reservationless-Plus Other teleconference service NOTE: For some customer sites, Integrated VoIP is also an available option. None If you do not require a teleconference for your meeting, click the radio button next to None. Reservationless-Plus IMPORTANT: This is the option that is linked with Reservationless-Plus Audio Controls .
4 To use your Reservationless-Plus account, click the radio button next to Reservationless-Plus. Then click the radio button next to the appropriate account ( Account1, Account2, Account3) if necessary. IF YOU WOULD Attendees to call in Click the radio button next to the option. Attendees to receive a call back Click the radio button next to the option. Allow participants to access available global dial in numbers Click the box next to Allow access to teleconference via global numbers CONFERENCING & COLLABORATION CISCO webex | 3 Other teleconference service If you would prefer to use either Operator Assisted or Automated teleconferencing service, click the radio button next to Other teleconference , and type the dial-In information, conference code and passcode (if applicable) in the instructions box that appears. Joining the Teleconference There are two different ways for attendees to join the teleconference, depending upon how the host scheduled the meeting. Attendees can join by: Dialing in Receiving a call back Either way, if the host opts to use Reservationless-Plus when scheduling the meeting, a Teleconference dialog box appears when attendees join the meeting.
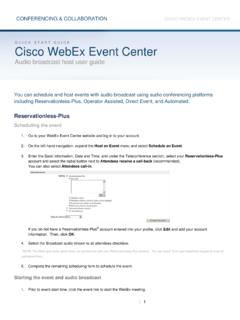
5 Attendees can also access the Teleconference dialog box by selecting Audio (Communicate menu if you are using Event Center) on the main menu, followed by Join Teleconference. Dialing in Follow the steps listed in the table below to dial into the Reservationless-Plus teleconference. STEP ACTION 1 Call the phone number listed. To view available global dial in numbers, select the View Global Numbers link in the dialog box, in the meeting invitation, or on the Info tab in the webex content viewer. 2 Enter your Conference Code followed by the pound or hash sign (#). 3 Press star (*) if you are the Leader. 4 Enter your Leader PIN followed by the pound or hash sign (#). 5 Press 1 to start or join your conference. 6 Enter the Attendee ID and/or Identity Code listed on the Join Teleconference dialog box to identify yourself in the participant list. NOTE: The Reservationless-Plus Audio does not provide a voice prompt to enter this code. 7 Once you are connected, click OK, located on the Join Teleconference dialog box.
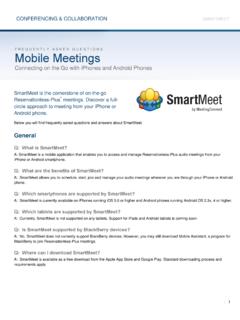
6 CONFERENCING & COLLABORATION CISCO webex | 4 Receiving a call back Follow the steps listed in the table below to receive a call back (screenshot below). STEP ACTION 1 In the Use Phone drop down menu, select a previously used phone number or select Call me at a new number. 2 If you selected Call me at a new number, select the country code, type the area/city code and phone number in the textbox provided. You can select the checkbox to save your phone number on this computer for future use. 3 Click Call Me. A Calling prompt appears in the bottom left-hand corner of your screen and your phone should ring. 4 Answer the phone and you should hear a greeting. 5 Press 1 to join the conference and you are connected. NOTE: If you still have attendees dial into the meeting, please advise them to identify themselves in the participant list by going to the Info Tab and entering the Attendee ID and/or Identity Code number listed on the screen. Leaving the Teleconference To leave the teleconference click Audio (Communicate menu if you are using Event Center) on the main menu, followed by Leave Teleconference.
7 If you are the Host of the meeting and choose to exit the meeting, you will receive a prompt to continue Audio and end only the web conference portion. If you select the option to end, the teleconference and web conference will end for everyone. If you select to continue the Audio , only the web conference will end. Managing the Teleconference MUTING To mute your Audio line, click Participant on the main menu, followed by Mute, or right-click on your name on the Participants tab and click Mute. Once you are muted, a red X will appear next to the phone icon alongside your name (for meetings scheduled with the call-back option only). NOTE: The meeting host can right-click on any attendee s name on the Participants tab and mute their Audio line. CONFERENCING & COLLABORATION CISCO webex | 5 UNMUTING To unmute your Audio line, click Participant on the main menu, followed by Unmute, or right-click on your name on the Participants tab and click Unmute. Once you are unmuted, the red X disappears from the phone icon alongside your name (for meetings scheduled with the call-back option only).
8 MUTING ALL To mute all attendees Audio lines, click Participant on the main menu, followed by Mute All. The phone icon beside each attendee s name will have a red X by it. Or you can right-click on any attendee s name on the Participants tab, and click Mute All. UNMUTING ALL To unmute all attendees Audio lines, click Participant on the main menu followed by Unmute All. The red X disappears from the phone icon alongside each attendee s name. Or you can right-click on the Participants tab, and click Unmute All. MUTING ATTENDEES ON ENTRY* To have attendee s Audio lines muted when they join the teleconference, click Participant on the main menu, followed by Mute Attendees on Entry. A checkmark appears next to this option when it is active. To deactivate this option, click Participant on the main menu, followed by Mute Attendees on Entry. The checkmark next to this option disappears. *See Audio Controls Release Notes . INVITING ATTENDEES BY PHONE Follow the steps listed in the table below to invite attendees by phone.
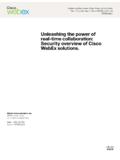
9 STEP ACTION 1 Click Participant on the main menu. 2 Highlight Invite and Reminder. 3 Click by Phone. The Invite and Remind dialog box appears. 4 Type the attendee s name in the Name textbox. 5 Select the country code, and then type the attendee s area/city code and phone number in the text box provided. 6 Click Call. 7 Select *1 on your telephone keypad to join the participant to the Audio conference. CONFERENCING & COLLABORATION CISCO webex | 6 You can also Invite Participants by Phone if you select Invite and Remind on the Quick Start screen. IF Want to invite additional attendees by phone Follow steps 4-7 listed above. Want to clear all fields Click Clear. Are done inviting attendees by phone Click Close. INVITING ATTENDEES BY TEXT MESSAGING (sms) Follow the steps listed in the table below to invite attendees by text messaging (SMS): STEP ACTION 1 In the main menu, click Participant. 2 Select Invite and Remind. 3 To type a mobile phone number, select the country code in the drop down menu and then enter the mobile number.
10 4 Click Send and an invitation will be sent to the recipient. 5 Once the text is sent, you can click Invite More to invite additional SMS recipients or click Done. if you are finished. Participants that join via text message can reply with the number 1 to receive a call-back to join the teleconference portion of the meeting. You can also invite participants by text messaging if you select Invite and Remind and then SMS on the Quick Start screen as shown below. NOTE: Site administrator must enable the Invite by SMS option using the site administration tool. Regular text messaging and line charges apply. CONFERENCING & COLLABORATION CISCO webex | 7 RENAMING ATTENDEES Follow the steps listed below to rename an attendee. STEP ACTION 1 Right-click on the attendee s name on the Participants tab. 2 Click Rename. 3 Type the attendee s name in the textbox. 4 Click off of the text box after typing the attendee s name. NOTE: If you rename a Call-in User, it will only show up your own participant list.