Transcription of BLOOD SMEAR BASICS - NC State Veterinary Medicine
1 BLOOD SMEAR BASICS . JENNIFER A. NEEL, DVM, DACVP (CLINICAL). ASSOCIATE P ROFESSOR, CLINICAL P ATHOLOGY. NC State COLLEGE OF Veterinary Medicine . RALEIGH, NC, 27607. Introduction Although tremendous advances have been made in the field of point-of-care hematology analyzers, examination of a well prepared, well stained BLOOD SMEAR remains the cornerstone of Veterinary diagnostic hematology. Even the most sophisticated hematology instruments are unable to consistently provide accurate differential cell counts, and no analyzer is capable of accurately identifying morphology changes, hemoparasites, neoplastic cells, etc. This review will cover the BASICS of how to approach BLOOD SMEAR evaluation in a consistent and systematic manner and will focus on recognition of clinically significant findings. Making a quality BLOOD SMEAR Although there are several techniques described for making BLOOD smears, most people use the wedge or push technique.
2 Always start with room temperature, well-mixed, clot free, EDTA anticoagulated BLOOD (heparin is used for some exotic species). If the BLOOD has been refrigerated, allow it to return to room temperature. The best slides to use for making BLOOD smears are the premium, pre-cleaned kind; those with a frosted end also facilitate easy labeling. If you are not using premium pre-cleaned slides, you will need to wipe off each slide you plan to use for making the BLOOD SMEAR , including spreader slides, in order to eliminate glass grit and dust which can ruin your SMEAR . Always mix the specimen immediately before making the SMEAR by gently rolling the tube several times to ensure good cellular distribution, don't shake or invert. To transfer BLOOD from the tube to the slide, fill a plain microhematocrit tube with BLOOD by capillary action and place a finger over the end to prevent the BLOOD from running out.
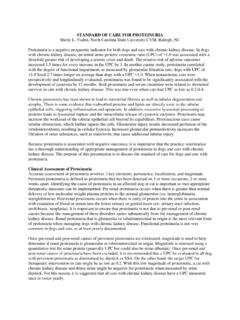
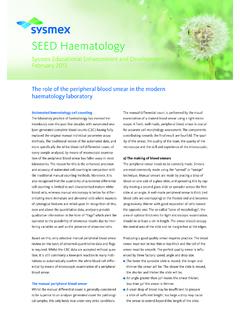
3 Do NOT. try to dab BLOOD from the cap onto the slide or use a 1 ml plastic pipette; the microhematocrit tube will give you better control and, if you have a microhematocrit centrifuge, you can simply plug the clean end after making your slide and spin the tube for your hematocrit and total protein. Place an approximately 4mm diameter drop of BLOOD on one end of the slide. If there isn't enough BLOOD in the microhematocrit tube to produce the required droplet of BLOOD , DO NOT. repeatedly tap the tube onto the glass to try and get enough BLOOD out; go back and get some more from the EDTA tube. Holding the spreader slide at an approximately 30-45 angle, back into the drop of BLOOD and, as soon as you A well made BLOOD SMEAR . The classic BLOOD SMEAR has a see the drop spreading along the edge thumb print appearance. A well developed feathered edge is of the spreader slide, push the spreader apparent.
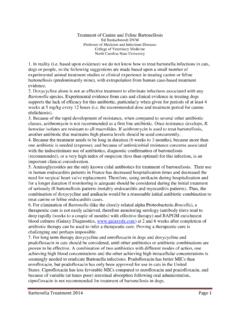
4 The dense body of the SMEAR takes up most of the slide forward in a smooth, moderately slide and there is a thin counting area which blends with the feathered edge and the dense body. fast motion; apply only enough pressure to keep the spreader slide on the glass, excessive pressure will push too much BLOOD forward without allowing development of a good body and monolayer; you should be pulling the BLOOD along the slide, not pushing it. If the BLOOD is very thin (severe anemia) you may need to increase the angle of the spreader slide to avoid going off the end of the slide. A good quality SMEAR has the following features;. A dense body; this should take up about 2/3 of the entire SMEAR and should blend smoothly into the monolayer area. A well-developed feathered edge. This edge should have a fine, feathery appearance; if there is a thick line of BLOOD where the slide stopped, it's an indication of a poorly made SMEAR .
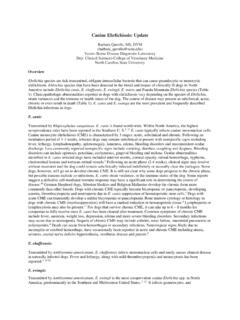
5 A monolayer area just behind the feathered edge. This region should be noticeably thinner than the body, but should blend in with the body of the SMEAR . Often this area is only about cm wide. Prior to staining, if the slide is held up to the light, there is a rainbow effect seen just behind the feathered edge on well made smears. Poor quality slides are typically cause by excessive downward pressure, a slow spreading motion, or wobbling of the spreader slide on the surface of the SMEAR . Slow spreading motion tends to cause long, thin smears that lack a dense body, thin monolayer and well-developed feathered edge. The leading edge may have a line of BLOOD instead of a thin , feathered appearance from pushing the BLOOD instead of pulling it. Often there is streaking in the SMEAR . Linear lines arranged horizontally to the leading edge are called hesitation marks and they indicate hesitation in the forward motion.
6 Excessive downward pressure will produce short slides with hesitation marks and a poorly developed feather edge and monolayer region. Wobbling is often due to inexperience or trying to exert pressure rather than letting the spreader slide rest on the surface of the SMEAR . If you are having trouble making quality slides, it can be helpful to have an experienced individual spot your technique Slide staining Romanowsky-type stains give good nuclear and cytoplasmic detail. Red BLOOD cells stain red-orange, nuclei stain blue-purple and cytoplasm stains blue to pink. Most commercial laboratories use some form of Romanowsky-type stain ( Wright - Geimsa) and these stains give excellent result but tend to be fussy. Quick Romanowsky type stains (such as Diff-Quik) are modified versions that are inexpensive, robust, fast and easy to use and generally give very good results.
7 However, note that mast cell and basophil granules may not stain. I recommend the standard 6/6/6 dipping protocol for BLOOD smears; dips should be slow (1-2 seconds each) and smooth. Some people prefer to add 2-3 extra dips when examining a SMEAR for red cell parasites as this makes the organisms stand out more, but this shouldn't be done routinely because it imparts an excessive blueness to the slide making toxic change and polychromasia difficult to recognize. Staining problems. The most common problems arising from use of rapid stain are 1) poor sample fixation 2) under-staining of the specimen 3) poor staining from use of weakened or exhausted stain or fixative and 4) stain contamination 5) excessive stain precipitation. Poor sample fixation. You can't over fix a slide, but you can definitely under fix one, and under-fixed cells will lyse and fail to stain adequately.
8 Once you move from the fixative solution to the stain solution, an under-fixed slide can't be improved. For very thin cytology smears and for BLOOD smears, 5 or 6 dips in the fixative solution should be adequate, but for thick cytology smears, up to 120 seconds may be required for adequate fixation. When in doubt, fix them a little longer. Under-staining of the specimen. This occurs when there is inadequate contact with the stain solutions. It can also occur if you attempt to stain several slides at once and the specimen surface of one slide is covered by another slide. As long as a slide has been adequately fixed, a poorly stained slide can be put back into either stain solution for additional time, thus a poorly stained specimen can gradually be stained to the desired color intensity. An over-stained slide can be soaked in fixative solution until stain is removed and re-stained, although I have often found that with rapid stains, results are not as good as getting it right the first time.
9 Poor staining due to weakened/exhausted stain or fixative. Stain solutions do weaken with repeated use, and prolonged exposure of the fixative to air at room temperature can result in impaired staining from formation of degradation products. How often you need to change the stain will depend on how many slides are put through it. The best advice is to keep an eye on the quality of the slides; when staining is not as good as typically seen, it's time to change the solutions. Signs that your stain is weakening include overall pale staining, especially pale blue nuclei that lack sharp chromatin detail. Never top off a weakened stain, it must be changed! Also remember that stain, even when kept in closed containers, will eventually go bad. If you don't use a lot of stain, purchase smaller containers to avoid losing money on stain that goes bad before you can even use it.
10 Contamination. Stain contamination occurs when dirty' specimens such as fecal smears, ear scrapings, skin cytology or material from abscesses are stained in the same solution as clean'. specimens ( BLOOD films, most cytology specimens). The easiest way to avoid this is to set up two staining stations, one for clean samples and one for dirty samples. Contamination of the fixative with water can produce refractile water artifact' on slides. Slides should be completely dry before staining (use of a gentle amount of warm air from a hair dryer can facilitate this), slide holders should be dried before slides are loaded, and stains should be tightly covered when not in use. Stain precipitation. This appears as fine, dark blue-purple stippled material on the background of the slide and on the cells. It makes identification of small hemoparasites a nightmare.