Transcription of C Programming Introduction to Arduino and
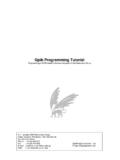
1 Introduction to Arduino and C Programming Presentation by: Shamim Ahmed 1. Assumptions and Goals Assumptions You have taken at least one Programming course prior Goal Be able to create applications on Arduino using the following methods Adding Shields (Accessories; Attachments). Adding Libraries Using control flows (If-Else, Do While, While loop). Using functions (Methods: getVariable, setVariable, changeVariables). Reading connection diagrams Debugging applications Why 495 will not be a success if the hardware does not complete its mission objectives. Faculty are eager to see a working model. To improve something and make it work, you first must understand it 2. Agenda Introduction to the Arduino Hardware IDE, Variables, Operands, and the Serial Monitor Control Flow Loops Arrays & Strings Functions, Structs, and Unions Libraries/IO/Connection Diagrams/EEPROM. Group Activities, Post-490 Planning 3. Arduino Models Arduino 's are microcontrollers: mini-computers with their own memory, disk, and processor 4.
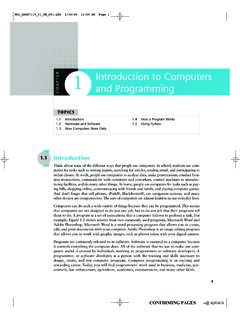
2 Lights on an Arduino ( Arduino UNO). 4 Lights on an Arduino 1. ON Light - shows that it is powered on 2. TX Light - shows that data is being transmitted 3. RX Light - shows that data is being received 4. L Light - an LED you are able to control in your program Serial Port (USB). External Power Source (AA, AAA Batteries). 5. Arduino Accessories & Shields Accessories include USB A-B cable, external power source, breadboard, resistors, variable resistors (potentiometers), switches, wires, sensors, motors Shields are add ons or accessories that extend the functionality of Arduino . The code is already written for them Ethernet Shields LCD Shields Motor Shields extends the number of motors you can use on an Arduino from 6. Prototype Shield - for circuit development rather than soldering Use breadboard as an alternative to this shield There are many more shields including bluetooth, wireless, etc. Arduino models allow you to connect a battery or AC/DC converter to run without being connected to a computer 6.
3 Basic components of the Arduino Microcontroller 7. Agenda Introduction to the Arduino Hardware IDE, Variables, Operands, and the Serial Monitor Control Flow Loops Arrays & Strings Functions, Structs, and Unions Libraries/IO/Connection Diagrams/EEPROM. Group Activities, Post-490 Planning 8. The Arduino IDE. You can retrieve the IDE from the main Arduino website Tip: ( ) 1. Use Auto-Format The IDE is written in Java; however, the Arduino only to clean your code accepts programs written in C. Therefore you must spacing program in C. The IDE acts as a C Compiler. 2. Use Serial Plotter to see Arduino Output Verify: Checks if your program compiles (syntax check). Upload: Uploads your program to the Arduino . New: Creates a new program file Open: Open an existing Arduino program file Save: Allows you to save the current program Must Choose Appropriate Arduino Board before uploading programs & choose the port on the computer the Arduino is connected to 9.
4 How are Arduino Programs Structured void setup() {. Code to run once Title of Program }. void loop(){. Code to run repeatedly }. Programs get saved in Documents/ Arduino on your workstation 10. Declaring and Instantiating Variables Declaring a Variable dataType variableName;. Example: int year;. Instantiating a Variable Add equals sign Example: Declaring and Instantiating For Constants int year; Simultaneously Add const' before dataType year = 2017; Example: Example: int year = 2017; const float pi = ;. 11. Scope of Variables Variable scope determines where the variable can be used in the sketch. There are two variable scopes Local Variables Can only be used inside a function, and only appear inside that function block. You won't see a local variable from the setup function in the loop function Global Variables (Static Variables). Can be used in ALL functions Common to see them at the start of the sketch before the setup function 12.
5 Math Operators Standard Operators are built-in for use and can be used with variables. Two examples below: int x;. float y;. int z;. x = 5;. y = ;. z = x+y;. What is z equal to above? int x = 5;. float y = ;. float z = x+y;. What is z equal to above? Tip: instead of x = x + 1; you can write x += 1;. 13. Using the Serial Monitor The serial monitor allows you to see the output from the program 1. insert (baudRate); to initialize the serial port Located Here baudRate = Speed of Connection (higher is faster;. must match workstation baud). // i want that baud default baud rate is 9600;. 2. Printing to the serial monitor: (sum) // does not start a new line (sum) //starts a new line 3. Working with time delay(x): pauses the sketch for x milliseconds delayMicroseconds(x): pauses the sketch for x microseconds micros(): Returns the number of microseconds since the Arduino was reset millis(): returns the number of milliseconds since the Arduino was reset 14.
6 Output on the Serial Monitor Note: You cannot concatenate the Serial output Tip: use // to place a comment. Examples above Ex. // this won't work ( The sum is + sum); 15. Advanced Math Functions Example int Temperature = -7;. int value = abs(temperature);. (value);. What does it print above? Note: The map() and contrain() functions are mostly used with sensors. They allow you to keep values returned by the sensors within a specific range that your sketch can manage 16. Generating Random Numbers Two functions are available for working with random numbers. random() and randomSeed(). random(min, max) : returns a random number between min and max -1. random(max) : returns a random number between 0 and max -1. randomSeed(seed): Initializes the random number generator, causing it to restart at an arbitrary point in random sequence. 17. Agenda Introduction to the Arduino Hardware IDE, Variables, Operands, and the Serial Monitor Control Flow Loops Arrays & Strings Functions, Structs, and Unions Libraries/IO/Connection Diagrams/EEPROM.
7 Group Activities, Post-490 Planning 18. if control if/else control if/else if control if (condition) { if (condition) { if (condition). Statement 1; Statement 1; Statement;. Statement 2; Statement 2; else if (condition). etc. etc. Statement;. } } else if (condition). else { Statement;. Statements; else } Statement;. Example Example Example if (temperature > 100) { if (grade > 92) { if (grade > 92) {. ( wow !) myGrade = A'; myGrade = A';. ( that's hot! ) else else if (grade > 83). } myGrade = F'; myGrade = B';. else myGrade = C'; 19. Numeric Comparisons Compound Conditions Negating a condition check int a == 1;. Example 1 Example 2. If (!(a == 1)). If ((a == 1) || (b == 1)){ If ((a == 1) && (b == 2)) { ( The a' variable is not statements; statements; equal to 1 );. } } if(!(a ==2)) Or just use ( The a' variable is not != in the equal to 2 ); condition 20. Using a switch statement Instead of doing a lot of if and else statement, it may be useful to do a switch Format Example switch (var) { switch (grade) {.}}}}
8 Case 23: case A': //do something when var equals 23 ( you got higher than a 92 );. break; break;. case 64: case B': //do something when var equals 64 ( You got higher than a 80 );. break; break;. default: default: // if nothing else matches, do the default ( You have dishonored the family );. // default is optional break;. break; }. }. 21. Agenda Introduction to the Arduino Hardware IDE, Variables, Operands, and the Serial Monitor Control Flow Loops Arrays & Strings Functions, Structs, and Unions Libraries/IO/Connection Diagrams/EEPROM. Group Activities, Post-490 Planning 22. for while do while for (statement1; condition; statement 2){ while (condition){ do {. Code statements Code statements Code statements } } } while (condition);. executes until condition is met executes until condition is met executes at least once, and until condition is met Example Example Example int values[5] = {10, 20, 30, 40, 50}; int i = 0; int i = 0.
9 For (int counter = 0; counter < 5; counter ++){ while (i<3) {//hearts for days ( Hi );. ( one value in the array is ); ( i is : i); do {. (values[counter]); i++; ( my name is );. } } if(i==0) ( What );. if(i==1) ( Who );. i++;. } while (i < 2);. ( slicka chika slim shady ); 23. Loops Continued Using Multiple Variables Nesting Loops You can initialize multiples variables in a for You can place loops inside of another loop. The trick to using inner loop sis statement that you must complete the inner loop before you complete the outer loop. Example Example int a,b; int a,b;. For (a = 0, b = 0; a < 10; a++, b++){ for (a = 0; a < 10; a++){. ( One value is ); for (b = 0; b < 10; b++){. (a); ( one value is );. ( and the other value is ); (a);. (b); ( and the other value is );. } (b);. }. }. 24. Controlling Loops Break Statement Continue Statement You can use the break statement when you need You can use the continue statement to control loops.
10 Instead of to break out of a loop before the condition would telling the Arduino to jump out of a loop, it tells the Arduino to stop normally stop the loop processing code inside the loop, but still jumps back to the start of the loop Example Example: int i;. int i; for (i = 0; i <= 10; i++){. for (i = 0; i <= 20; i++) { If ((i > 5) && (i < 10)). if (i == 15) Continue;. Break;. ( currently on iteration: ); ( The value of the counter at );. (i); (i);. } }. ( This is the end of the test ); ( this is the end of the test );. }. 25. Agenda Introduction to the Arduino Hardware IDE, Variables, Operands, and the Serial Monitor Control Flow Loops Arrays & Strings Functions, Structs, and Unions Libraries/IO/Connection Diagrams/EEPROM. Group Activities, Post-490 Planning 26. Arrays An array stores multiple data values of the same data type in a block of memory, allowing you to reference the variables using the same variable name.