Transcription of CheXpress CX30 User Manual - Digital Check
1 CheXpress CX30 User Manual April 2016_Rev 042516 CheXpress CX30 User Manual Rev 042516 Page | 2 Contents About the CheXpress CX30 .. 4 Radio Frequency Interference .. Error! Bookmark not defined. CheXpress CX30 System Requirements .. 4 CheXpress CX30 Included Equipment .. 5 CheXpress CX30 Features .. 6 External View of the CheXpress CX30 .. 6 Bottom View of the CheXpress CX30 .. 6 Exit Door Positions of the CheXpress CX30 .. 7 CheXpress CX30 Initial Setup .. 8 New User Notice .. 8 Unboxing the CheXpress CX30 .. 8 Cable Connections and Scanner Placement .. 9 Disconnecting the USB and Power Supply Cables .. 9 Installing the Ink cartridge .. 10 Installing the Ink cartridge (continued) .. 11 Installing the Franker Roller .. 12 Testing the Scanner .. 13 Installing the Optional USB Driver .. 13 Installing ScanLite2 .. 13 Getting Started with the CheXpress CX30 .. 14 LED Status Indicator .. 14 LED Status Indicator (continued).
2 15 Exit Door Function and Optional Scan Modes .. 15 Inserting an Item into the Scanner .. 16 Accessing the CheXpress CX30 .. 17 Removing the Cover .. 17 Accessing the Cameras .. 18 Accessing the Internal Document Path .. 18 CheXpress CX30 User Manual Rev 042516 Page | 3 CheXpress CX30 Routine Maintenance .. 19 CheXpress CX30 Maintenance Overview .. 19 Inspect the CX30 Document Track .. 19 Cleaning the CX30 Cameras .. 19 Cleaning the CX30 Drive Rollers .. 19 Cleaning the CX30 Drive Rollers (continued) .. 20 CheXpress CX30 Troubleshooting .. 21 Document Feeding Problems .. 21 Clearing Jams .. 21 Image Quality .. 21 MICR Errors .. 21 Using the Diagnostic Pop Up .. 21 CheXpress CX30 Frequently Asked Questions .. 22 How Many Checks Per Minute Should My CX30 Scan? .. 22 Why Am I Getting Skewed or Short Images? .. 22 What is the LED Status Light Sequence? .. 22 What About Avoiding MICR Read Head Interference? .. 22 When Should the CX30 Be Cleaned?
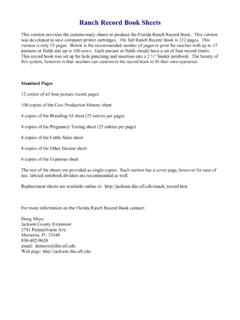
3 22 How Long Does the Ink cartridge Last? .. 22 CheXpress CX30 Specifications .. 23 Digital Check Contact Information .. 24 CheXpress CX30 User Manual Rev 042516 Page | 4 About the CheXpress CX30 The CheXpress CX30 is an easy-to-use and compact scanner that connects to a personal computer (PC). The CheXpress CX30 automatically scans the front and/or back of sides of checks and also reads the MICR (Magnetic Ink Character Recognition) code line. The images and data are then transmitted through a Universal Serial Bus (USB) interface to the PC. The CheXpress CX30 model has a single-item Manual drop and slide feeder that offers several modes of operation. The default mode is the Scan & Return operation. Other options are Pass Through and Scan, Park & Return . These are controlled through the application and by the exit door position. See the Exit Door Function and Optional Scan Modes section for more information on how to enable the various scan modes.
4 The CheXpress CX30 model is rated at up to 30 documents per minute (DPM) scanning speed. Speeds will vary based on the applications used, the PC processing speeds and mode of operation. The CheXpress CX30 uses mini-connectors in a recessed area in the bottom cover, along with multiple cable channels to minimize desk footprint and increase placement options. The scanner does not use an On / Off switch, but it does have a momentary Reset Button that can be pressed to reset the scanner, if needed. The CheXpress CX30 is powered off when the PC powers down, as it senses the loss of power to the USB port. FCC - Class B This equipment has been tested and found to comply with the limits for a Class B Digital device, pursuant to part 15 of the FCC Rules. These limits are designed to provide reasonable protection against harmful interference in a residential installation. This equipment generates, uses and can radiate radio frequency energy and, if not installed and used in accordance with the instructions, may cause harmful interference to radio communications.
5 However, there is no guarantee that interference will not occur in a particular installation. If this equipment does cause harmful interference to radio or television reception, which can be determined by turning the equipment off and on, the user is encouraged to try to correct the interference by one or more of the following measures: Reorient or relocate the receiving antenna. Increase the separation between the equipment and receiver. Connect the equipment into an outlet on a circuit different from that to which the receiver is connected. Consult the dealer or an experienced radio/TV technician for help. Industry Canada - Class B This Digital apparatus does not exceed the Class B limits for radio noise emissions from Digital apparatus as set out in the interference-causing equipment standard entitled Digital Apparatus, ICES-003 of the Department of Communications. CheXpress CX30 System Requirements Minimum Recommended GHz Pentium IV class processor or faster 1 GB RAM GHz Dual Core Processor or faster 2 GB RAM or more GB free disk space 10 GB free disk space Windows XP, Windows Vista or Windows 7 (32/64 bit) Windows 7 or 8 (64-bit) USB port USB port DCC API DCC API or newer CheXpress CX30 User Manual Rev 042516 Page | 5 CheXpress CX30 Included Equipment The CheXpress CX30 includes the following equipment in the box: CheXpress CX30 Check scanner 100V-240V 50/60Hz voltage sensing external power supply USB cable with mini B connector Ink cartridge - MS0083 Note: Ink cartridges are included only with Inkjet models Franker roller Note.
6 Franker rollers are included only with Franker models CheXpress CX30 User Manual Rev 042516 Page | 6 CheXpress CX30 Features External View of the CheXpress CX30 Bottom View of the CheXpress CX30 CheXpress CX30 User Manual Rev 042516 Page | 7 Exit Door Positions of the CheXpress CX30 Located at the rear of the scanner is an exit door that can be opened to enable the Pass Through . See the Exit Door Function and Optional Scan Modes section for details about how the exit door can be used to enable additional scanning modes. CheXpress CX30 User Manual Rev 042516 Page | 8 CheXpress CX30 Initial Setup New User Notice PLEASE NOTE: Do not connect the USB cable from the scanner to your PC before installing the drivers or the scanning application / software . Digital Check does not provide scanning software. Please contact your bank or other solution provider for further assistance with installing the driver or getting the scanning software set up or installed.
7 Digital Check provides only an optional driver installation utility and a separate demonstration program. See the Installing the Optional USB Driver section or the Installing ScanLite2 section for additional information. Unboxing the CheXpress CX30 Lay the box on its side and slide out the packaging and scanner. Lift off the top plastic insert (the USB cable is inside), then lift the scanner from the bottom insert. CheXpress CX30 User Manual Rev 042516 Page | 9 Cable Connections and Scanner Placement Note: Do not connect the USB cable from the scanner to your PC before installing the drivers or the scanning application / software . Place the unit on a flat surface near the PC and away from direct light sources such as spotlights or underneath desk lamps. Place the scanner in a position that is at least 6 inches away from its Power Supply or others. Connect the external Power Supply by plugging the connector into the bottom access port.
8 Connect the USB cable by plugging it into the bottom access port. Route the two cords through any of the three cable channels to provide the best routing for your environment. Disconnecting the USB and Power Supply Cables When removing or disconnecting the USB or Power Supply cables from the CheXpress CX30, be sure to pull straight back on the cable and remove as shown below. Do not remove the cable by pulling up, vertically or at an angle. Doing so can damage the connector. The cables must be removed by gently pulling straight back on the cable from the connector. CheXpress CX30 User Manual Rev 042516 Page | 10 Installing the Ink cartridge Note: This step only applies to CheXpress CX30s that have the optional inkjet configuration. Follow these instructions when installing the ink cartridge for the first time, or when replacing an empty cartridge . Inkjet platform style might vary based on production. The cartridges are installed the same way for all CX30 platform styles.
9 Step 1: Gently pull out the tabs on both sides of the scanner cover. Lift up on the cover to remove it and provide access to the inkjet platform. Step 2: Open the ink cartridge pouch and remove the protective tape covering the ink nozzles. Be careful not to touch the ink nozzle with your fingers or allow it to come in contact with anything else. CheXpress CX30 User Manual Rev 042516 Page | 11 Installing the Ink cartridge (continued) Step 3: Insert the nozzle end of the cartridge into the platform first, while keeping the reservoir end of the cartridge tilted slightly upward. Push the cartridge downward until it snaps into position. The cartridge should be level with the baseplate when it is fully seated. Step 4: Replace the center cover by setting it back on the unit vertically. Make sure that both sides of the Locking Tabs are fully latched. If replacing an existing cartridge , remove the ink cartridge by grasping the small tab at the rear end and gently pulling upward.
10 Replace the ink cartridge using the steps above. Note: If the scanner has to be transported by common carrier from one place to another or will experience extended periods of inactivity, it is advisable to remove the ink cartridge from the scanner and seal it in an airtight bag. If the cartridge has not been used for an extended period of time, it might be necessary to clean the inkjet nozzles by blotting them with a towel dampened with water. CheXpress CX30 User Manual Rev 042516 Page | 12 Installing the Franker Roller Note: This step only applies to CheXpress CX30s that have the optional franker configuration. Follow these instructions when installing the franker roller for the first time, or when replacing an empty franking roller. Step 1: Remove the Main Scanner Cover. Open the Exit Door located at the rear of the scanner. Locate the Spring Loaded Arm. Step 2: Swing out and hold the Spring Loaded Arm open (as shown). The Franker Roller will slide onto a Post that is part of the Spring Loaded Arm.