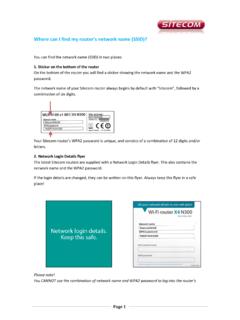
Transcription of Configuring 802.1X Authentication Client for Windows 10
1 Wireless LAN Client Configuration Guide for Windows 10 Configuring Authentication Client for Windows 10 1. Type Control Panel on the search window. Click Control Panel In the Control Panel window, click on Network and Sharing Center . 1 Wireless LAN Client Configuration Guide for Windows 10 In Network and Sharing Center, click on Setup a new connection or network . In Setup, a connection or network, click on Manually connect to a wireless network and click Next. 2 Wireless LAN Client Configuration Guide for Windows 10 When prompted to enter the wireless network information: Enter the correct Network name/SSID.
2 (See Table 1 below) Select WPA2-Enterprise as the Security type. Encryption type will default to AES. Enable the Start this co nnection automatically checkbox. Enable the Connect even if the network is not broadcasting checkbox. Click the Next button The SSID to be used are as follo ws: User Group SSID All Staff STAFF All Students NYP-Student Table 1 For Student, please see below configuration settings: 3 Wireless LAN Client Configuration Guide for Windows 10 For Staff, please see below configuration settings.
3 Aft er adding the wireless network profile success fully, click on the Change Connection settings . Pop-up window will appear. 4 Wireless LAN Client Configuration Guide for Windows 10 In the pop-up window, Wireless Network Properties: Ensure the checkboxes for Connect automatically when this network is in range and Connect even if the network is not broadcasting its name (SSID) are checked. Click on the Security tab. 5 Wireless LAN Client Configuration Guide for Windows 10 Under the Security options: Ensure Security type is set to WPA2-Enterprise.
4 Ensure Encryption type is set to AES. Select Microsoft: Protected EAP (PEAP) for network Authentication method. Uncheck the Remember my cr edentials for this connection each time I m logged on checkbox. Click on Settings butto n. 6 Wireless LAN Client Configuration Guide for Windows 10 In the Protected EAP Properties page: Uncheck Verify the serve r s identity by validating the ce rtificate . Check Enable Fast Reconnect . Select Secured password (EAP-MSCHAP v2) for authentica tion method.
5 Click on the button. Uncheck the Automatically use my Windows logon name and password . Click on OK button. 7 Wireless LAN Client Configuration Guide for Windows 10 Under the Security options: Click on the Advanced settings option fr om the follo wings: Ensure the checkbox for Specify Authentication mode is checked. Select User Authentication under the Specify Authentication mode. 8 Wireless LAN Client Configuration Guide for Windows 10 Click the OK button twice to return to the below screen.
6 Click on Close button. You have successfully cr eated a wireless network profile. 9 Wireless LAN Client Configuration Guide for Windows 10 Connection to NYP wireless LAN 2. When you are within range of the wireless Access Point and your wireless network radio enabled, Windows will display a pop-up message on your taskbar. When you click on the pop-up message, the below screen will appear. Enter your username and password to login to the wireless network. For Student: <Domain Name>\01234a (Admin_No) Password is the password given by the school administrator of each individual school.
7 Login domain is as follo ws: User Group for School Domain Name SEG Students SEGSTUD SCL Students SCL SIT Students NYPSIT SDN Students SDNSTUDENT SIDM Students SIDM SBM Students SBMSTUD SHS Students SHSLAB Table 2 Note: A login example for a SIT st udent will be NYPSIT\Admin_No For Staff: < Windows Logon ID> (Staff ID) Password is the password given by the system administrator 10 Wireless LAN Client Configuration Guide for Windows 10 If the logon does not appears, type settings on the search window.
8 Click Settings. Click on Network & Internet 11 Wireless LAN Client Configuration Guide for Windows 10 Click on the SSID that you have configured previously and connect as shown below. Key-in your username and password. 12 Wireless LAN Client Configuration Guide for Windows 10 Click on Network and Sharing Center under Control Panel and you will see Access type Connections Internet as highlighted. Click on Wi-Fi (NYP-Student) and you ca n check the SSID, si gnal quality.
9 End of Procedure 13