Transcription of CONTENTS
1 User Manual 1/43 CONTENTS 1. Introduction .. 2 2. System requirements .. 2 3. Fly NOW ! quick 3 4. The Dashboard .. 5 Print configuration .. 5 The controllers .. 8 The buttons .. 8 The axes .. 8 The keyboard .. 9 5. Operating principles .. 10 6. Creating a Basic configuration .. 11 Select Controller(s) to configure .. 11 Configure axes mapping .. 12 Configure axes response .. 14 7. Graphical User Interface .. 20 The Select Control window .. 20 Selecting a button .. 21 The Assign Parameters window .. 22 Assigning several functions to the same button .. 24 Creating a chain .. 25 Creating a sequence .. 25 LED Management .. 25 8. Programming an axis .. 28 Axmap1: generates events that depend on the axis movement direction .. 28 Axmap2: generates an event when the axis reaches a predefined value range .. 29 The Select Event window .. 30 Launching the configuration .. 31 9. Basic exercise .. 34 10. Creating an Advanced configuration.
2 36 Layers .. 36 Press and Release .. 39 11. A few words about the text programming .. 40 Consumer warranty information .. 42 Additional warranty provisions .. 42 Liability .. 42 2/43 User Manual Foreword First of all, welcome to this manual and congratulations on your purchase! We hope that this game controller will provide you with many hours of enjoyment and will meet your every need. To help you get the most out of your controller, we would ask you to read this manual and keep it within easy reach the first few times you use This document has been written to answer questions from all types of users, whether experienced or complete beginners. 1. Introduction (Thrustmaster Advanced pRogramming Graphical EdiTor) is a software suite which lets you test, configure and program Thrustmaster controllers. All of the features can be accessed from the software s main page.
3 This page is called the Dashboard . All Thrustmaster controllers are Plug and Play; installing and using this application is therefore optional. However, if you want to use profiles, change the control sensitivity or just get the maximum out of your purchase, will be your loyal ally. Thrustmaster products such as the HOTAS COUGAR are famous for their exceptional programming. The downside of this power was the use of a programming language in a non-user friendly text format. In order to make this power accessible to as many people as possible, Thrustmaster has developed an application which can satisfy both beginner and expert users: By default, a DirectX controller only generates information related to its nature. With you can add keyboard and mouse functions. This will allow you to be more effective, to use buttons and axes as you like and use the keyboard as little as possible, as this hinders you from becoming fully immersed in the game.
4 In certain cases, you can even correct software ergonomics or functionality faults. These items of equipment are often called programmable controllers; however, you must not be intimidated by these terms as in practice, "programming" a joystick simply means associating an input (a button or axis) with an output (a function, keyboard key emulation, etc.). With , you can create complex programs using only your mouse, according to the Drag and Drop principle. There are several levels of programming complexity to allow you to start using the application: Basic will be ideal for starting out, or for creating a simple profile quickly. Advanced lets you use the advanced functions offered by a top-of-the-range customization application. Script lets you use the full power and flexibility of s script-based system. perfectly summarizes Thrustmaster s experience in programmable peripherals. In addition to creating a full graphic interface, the traditional Script language has been fully rewritten to provide more flexibility, new functions and almost unlimited possibilities.
5 You must have a good level of knowledge of input peripherals to get the most out of the application s capabilities. 2. System requirements PC Desktop/laptop PC with Intel Pentium III/Athlon 1 GHz processor or higher 512MB RAM Operating system: Microsoft Windows Vista /7/8/10 (32 & 64-bit) 16-bit, 1280 x 960 video resolution 100MB free hard disk space User Manual 3/43 3. Fly NOW ! quick launch Double-click the T GUI (Graphical User Interface) icon on your desktop, or launch the application via the Windows Start menu. Fly NOW! is a little tool to launch a configuration and the associated gaming software quickly. To use it, the first thing to do is to teach "Fly NOW!" which simulator you want to use: simply click the Add button. A new window opens. In the Title Field, name the simulator. In the Path field, click the Browse button and indicate the path to the application s executable file. Warning: certain programs require specific commands to be launched; this is the case for the DCS series.
6 In this case, the best thing to do is to right-click the shortcut to the simulator on your desktop. Select Properties and copy the CONTENTS from the target field. Then all you need to do is copy and paste this to the Path field in the window. In the Associate Configuration field, click the Browse button and select the profile that corresponds to the selected simulator. The profiles are .fcf or .tmc type files. Finally, click the Add button. This is how you add new simulators to the Fly NOW! quick launch. 4/43 User Manual To launch the simulator and its associated configuration automatically, simply click on the green arrow that appears when you place the cursor over the gaming software name. The following window opens: the configuration is being launched. Once this procedure is complete, the simulator will be started. The first thing to do once you have accessed the simulator is to configure the axes in the simulator s Options menu.
7 You will only need to do this once. When you exit the simulator, you will need to shut down the configuration by clicking the Stop button in the top right of the Wizard Running Script window. User Manual 5/43 4. The Dashboard The Dashboard is the main page. This page is divided into several zones. The left -hand column is intended for quick launch: Fly NOW! lets you quickly launch a simulator and its associated configuration. How Do I? lets you display help. My Configuration Files lets you launch, edit or print a configuration quickly. Double-click on a configuration to launch the editor. Right-click to open an action menu. These are stored under 2 tabs: Custom for personal creations; and Stock for the files provided with Resources contains links to Web support. The right-hand section is dedicated to editing and managing Thrustmaster USB peripherals. The New Configuration button lets you create a new configuration.
8 The Load Configuration button lets you edit a configuration. The Run Configuration button lets you execute a configuration and thereby activate programming for your controllers. The lower windows correspond to the controllers that you currently have connected. Certain windows may contain a button if the peripheral suggests operating options. Print configuration The Print button in the GUI Configuration Files area generates an image that displays the functions mapped on buttons. The way in which button functions are displayed is generated automatically: that is why sometimes the text box positions don t seem to be optimized. The Print function can generate 2 kinds of images. You can switch between them by selecting the type in the lower left-hand corner: 6/43 User Manual Graphic mode is easy to read but limited for very complex files. If the configuration file is complex, some programmed functions may not be displayed.
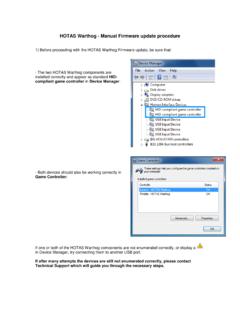
9 For CHAIN or SEQUENCE (see later), only the first function is displayed. Table Mode is more basic (you have to know the names of your controller buttons) but displays a wider range of data (highly recommended for advanced configuration files). User Manual 7/43 The "Controllers" area simply displays the Thrustmaster compatible controllers connected to your computer. Some of these devices include some options. hotas warthog Get Firmware: displays the version number of the controller s firmware. Available for the Joystick and the Throttle. hotas warthog Joystick Control center deadzone: displays a window used to enable and disable the center deadzone on the joystick. You will probably not notice the deadzone with a "stock" joystick, but if you use a "grip extension" mod, we recommend that you deselect this box. Control LED State: opens a lighting management window where you can turn LEDs "ON" or "OFF" and adjust backlighting intensity.
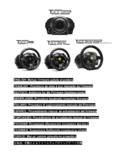
10 Supports some devices that were developed a long time before the software was created. The MFD lighting support in the software is a bonus. If you are experiencing issues like MFDs not responding, simply unplug and then reconnect the MFDs. This can happen if the USB port was in "sleep" mode while the MFDs were not being used. You will also notice that if you move the Backlight intensity slider too quickly on a large number of values, the MFD will freeze for a few seconds (saturated by data), before reaching the right intensity value. 8/43 User Manual The controllers What is a game controller? Today, there are many different types of game controllers, such as joysticks, throttles, steering wheels, rudders and so on. While they may look different from one another, they all measure and transmit the same types of information to the computer. In fact, we only distinguish between 2 types of information generated by a game controller: the all or nothing state information (ON or OFF) for the buttons, and the position information within a value range (for example, 54 in a range between 0 and 256) for axes, such as turning the steering wheel or the position of the throttle.