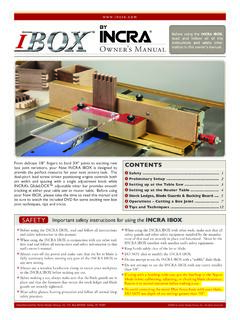
Transcription of Coping Sled - Incra Tools
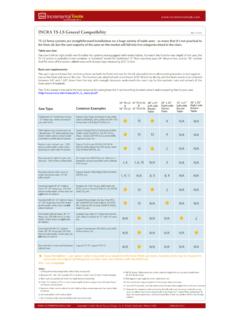
1 It can be tricky trying to make the end grain Coping cuts on the rails of a frame and panel door without this handy router table jig. During assembly the end of the backing board is aligned with the bearing on your Coping cutter. Then, just position the end of your rail flush with the end of the backer board for a perfect tearout-free Coping cut. Add the T-Track Plus with a user made stop to make cutting the opposite end of the first piece and any subsequent pieces of equal length a simple matter of clamp and cut. The Build-It Clamp is required for this type of cut so don t forget to pick one up from your local Incra a Miter Slider and (2) T-Slot Panel Connectors to a small Build-It Panel and place in the miter slot at your router table. Adjust the Miter Slider to fit your slot. Cut a piece from another Build-It Panel to fill the gap between the existing assembly and your router ll want this piece to be about 1 narrower than the distance bet ween the T-Slot Panel Connector and the 1/2 shank of the cutter.
2 Cut 3/4 material forthe fence to 4 x 18 , then cut the (2) 5/16 wide slots as shown. (The slottedholes will permit support for angled workbut you can simply drill (2) 5/16 holes s p a ced 8 -1/2 a p a r t i f yo u a re o n l y interested in a 90 degree fence position.) Attach the fence with Build-It Knobs and 1/4-20 x 1-1/2 hex bolts with washers then add the 18 T-Track Plus. The T-Track should be offset from the business end of the fence by 2 to provide safe cutter clearance. For most Coping work, the fence should be adjusted square to the edge of the panels with the end just touching the cutter s bearing Platform Components Required: 2 Small Build-It Panels or 1 Small & 1 Large 1 Miter Slider 2 T-Slot Panel Connectors 18 T-Track Plus Build-It Knobs Build-It ClampJust add:rev. 2007 by Taylor Design Group. All rights Small Build-It PanelBuild-It Paneltrimmed to fit18 T-Track PlusFence3 31/2 4 3 31/2 Detail 3A31/2 11/8 2 13/16 3/4 3/4 3/4 Stop Positioner21/16 5/16 dia hole1 2 Plan # 003