Transcription of Cornet - hagtech.com
1 HAGERMANT E C H N O L O G Y Cornet Phono Preamp Kit User s Manual Cornet Phono Preamp Kit Manual 2 Warnings This product uses dangerous and potentially lethal voltages. Extreme care must be taken while assembling this amplifier and should only be attempted by a skilled technician. The instructions in this manual are a suggested guide only and no liability is assumed by Hagerman Technology LLC. Copyrights & Trademarks Copyright Hagerman Technology LLC 2002 2007. All rights reserved. No part of this document may be photocopied, reproduced, or translated to another language without the prior written consent of Hagerman Technology LLC.
2 Disclaimer The information contained in this document is subject to change without notice. Hagerman Technology LLC shall not be liable for errors contained herein or for consequential damages in connection with the furnishing, performance, or use of this material. See Chapter 6 for warranty information. Cornet Phono Preamp Kit Manual 3 1 Before You Begin Description Congratulations! You have just purchased one of the highest performance-per-dollar audiophile products available. The Cornet was designed to be a simple phono stage capable of achieving excellent sound quality.
3 The circuit topology consists of common cathode class-A gain stages, passive equalization, and cathode follower output buffers. Vacuum tube rectification for the high voltage provides a gentle turn-on without the need for muting circuits. The moderate gain accommodates all moving magnet and high output moving coil cartridges. Features All vacuum-tube signal path Pure class-A amplifier stages No feedback Cathode follower low impedance outputs Vacuum tube B+ rectification Constant current sinks Tools This is a kit product and construction should only be attempted by skilled electronic technicians (refer to warnings at the front of this manual).
4 You will need an array of shop tools and a good soldering iron. If you are at all unsure of this, send it back! Cornet Phono Preamp Kit Manual 4 2 Parts to Buy Kit The Cornet kit does not need to be built as specified. You may make any circuit and component changes you wish (but you had better know what you re doing). Feel free to substitute vacuum tubes or capacitor types. A recommended parts list is given below. Parts List This parts list is for a stock 43dB RIAA MM phono stage. Parts should be ordered directly from and (AES). Included with your box/2 kit are: Cornet circuit board (1) AC voltage select board (1) Chassis (1) #6 x self-tapping screws (20) Terminal ring (1) #10 x 1 screws (4) #10 nuts (8) #10 rubber washers (4) #8 x screws (4) #8 nuts (4) Upgrades Signal coupling capacitors can be improved, substitute AES #CAUD1-450 and #CAU1-450 for C5 and C6 respectively, two each.
5 Cornet Phono Preamp Kit Manual 5 Component Qty DigiKey AES References 47uF 450V 5 493-1461-ND C2, Cx, C10 10,000uF 10V 4 493-1275-ND C13, C14, C15, C16 470uF 10V 2 Cx 1uF 630V PP 6 PF4105-ND C1, C3, Cx 100nF 400V PP 2 PF4104-ND C5 47nF 630V PP 2 P3517-ND C7 1nF 630V PP 2 P3497-ND C8 10nF 250 Vac 2 P11423CT-ND C9, C20 1N5821 4 1N5821 DICT-ND D1, D2, D3, D4 MJE340 2 MJE340G-ND Heat Sink 2 HS216-ND Power Cord 1 Q120-ND Ground Jack 1 J587-ND Standoffs 10* 4818K-ND Feet 4 SJ5523-0 AC Input 1 Q205-ND Fuse 5* F2419-ND Switch 1
6 SW620 Res. 220 1W 14 220W-1-ND R6, R7, R8, R10, R11, R12, Ry Res. 910 1W 8 910W-1-ND R15, R17, Rx, Rz Res. 3k3 1W 2 R23 Res. 6k8 1W 5 R2, R13, R20 Res. 10k 1W 4 10KW-1-ND R1, R9 Res. 47k 1W 2 47KW-1-ND R14 Res. 150k 1W 6 150KW-1-ND R3, R5, R16 Res. 330k 1W 4 330KW-1-ND R4, R19 Res. 1R8 5W 1 R21 RCA Jack, R 2 S-H267R RCA Jack, W 2 S-H267W Transformer 1 P-T370BX Socket 8 pin 1 P-ST8-193 V4 Socket 9 pin 3 P-ST9-214 V1, V2, V3 12AX7 2 12AX7 12AU7 1 12AU7 5AR4 1 5AR4 * Minimum quantity.
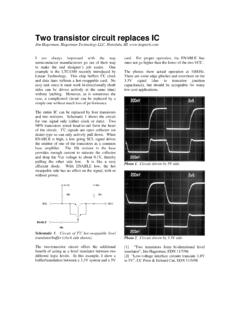
7 Cornet Phono Preamp Kit Manual 6 3 Assembly Circuit Board Solder the sockets onto the backside of the circuit board. This is the side without silk screening. Make sure the orientation of the octal socket is correct! Then install the six standoffs (on socket side). Install all of the resistors and solder in place (except R15s). Use the guide in the back of this manual. Don t forget to clip leads. Repeat for the diodes, signal capacitors, and finally the large electrolytic capacitors. Make sure the polarity of the electrolytics is correct ( + is positive polarity).
8 Install R15s as shown below, using the ground connection of the socket s pin 9. Use a wire for R22. C11 and C12 are unused, but you can add small 100nF caps if you desire. Add heat sinks to MJE340 transistors and solder in place as shown. The heat sinks do not attach to board. The metal part of the transistor faces away from the mickey mouse ears. Cornet Phono Preamp Kit Manual 7 Finally, add short lengths (about 2 ) of signal wire to the input and output connections on the circuit board, including ground. Chassis Remove from plastic. Apply rubber feet to bottom panel, put aside.
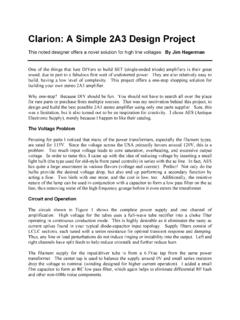
9 Install grounding jack with ring terminal on inside. Enlarge the RCA jack holes to and install RCA jacks with their insulating washers. White pair goes on left, red on right. Insert power switch and ac input connector. Mount the transformer with #10 screws, with washers between mounting tabs and chassis (do not tighten yet), with primary wires towards the outside. Inside the chassis, slide the AC voltage select board onto the screws. Put on nuts loosely. Ok, now tighten down the screws from above, securing the transformer in place. Do not over tighten or the washers will deform excessively.
10 Tighten the nuts holding the board down on the inside. Finally, solder C1 (10nF 250 Vac cap) into place. Replace the #8 bolts holding the transformer together with the supplied stainless steel types (do not remove insulators). Mount circuit board inside. Cornet Phono Preamp Kit Manual 8 Wiring it up You can optionally use #1285K-ND solder tabs and #A27804-ND crimp terminals for wiring to the circuit boards. This allows you to plug and unplug as in the photo above. Normally, you can solder wires straight to the boards. Connect transformer secondary wires to the Cornet circuit board.