Transcription of Creating an Expense Report in Concur®
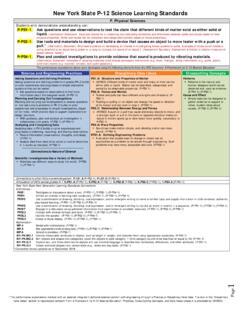
1 1 Creating an Expense Report in Concur You can create an Expense Report two different ways: within the Concur application or by using your smartphone and the Concur mobile app. If you prefer to create your Expense Report by utilizing the mobile app, please skip to step 5 below. Otherwise, let s begin! 1) Concur - Access the Concur website: a) For first time users, contact the Concur Administrator if you have not received a welcome email with initial login instructions b) Access the Concur website at c) Enter your User Name and Password, then click the Sign In button 2) Reports Create a new Expense Report within the Concur application: a) At the top of your Concur home page, click on + Start a Report 2 b) Complete all required fields (marked with red bars) and the optional fields ( Project and/or Meeting), as appropriate. Click Next. c) At this point, you will either: i) Add company card transactions to your Expense Report (step d below) ii) Add out-of-pocket expenses to your Expense Report (step e below) d) Adding company card transactions: i) From the Available Expenses section on the right, select the check box for each credit card transaction that you want to include in your Report ii) Click Move (in the Available Expenses section) and select the desired Report name.
2 The Expense is moved and appears on the left. 3 e) Adding out-of-pocket expenses: i) Click + New Expense ii) On the New Expense tab (appears right), click the appropriate Expense Type. The page refreshes, displaying the required and optional fields for the selected Expense type. iii) Complete the required and optional fields, as needed. Click one of the following: Save (see example below) Itemize, if the Expense type is hotel (step iv below) Attach Receipts, when applicable (step v below) 4 iv) Itemizing hotel expenses: Create the Expense as usual (steps i-iii above), and then click Itemize (instead of Save) On the Nightly Lodging Expenses tab (appears right), use the calendar to select the Check-in and Check-out Dates (the number of nights appears automatically). Enter the Room Rate, Room Tax and Additional Charges such as parking, meals, internet, etc. Click Save Itemizations If there is a remaining amount to be itemized (for other charges such as dinner), the remaining amount is displayed in the Remaining field on the right side of the Expense tab.
3 Select the Expense Type. 5 Complete the required Expense details on the New Itemization tab (which appears after the Expense Type is selected), then click Save. Continue to itemize the amounts until the Remaining balance is $ v) Attaching Receipts - Dated receipts are required for expenses $25 or greater and must be submitted with the Expense Report . Receipts can be submitted by attaching them to your Report as follows: Create the Expense as usual (steps i-iii above), and then click Attach Receipt (instead of Save) 6 In the Attach Receipt window, choose a previously uploaded image1 from your Available Receipts and click the Attach button (and then skip the next two steps), or click the Browse button to upload a scanned image of your receipt2. Browse to the location of your scanned receipt image, select the corresponding image file and click Open The image file name will appear in the Attach Receipt window.
4 Click Attach. 1 Electronic or e-mail receipts (such as itemized hotel invoices) forwarded to will be added to your Available Receipts automatically by Concur . First time users of this functionality must first submit their email address for verification. On the top right side of the Concur home page, click Profile, then Profile Settings and follow the instructions in the Email Addresses section to complete the verification process. 2 Receipt images are created by scanning each receipt individually, emailing the scanned image to yourself, and then saving the image file on your PC (where it can be accessed when completing the Expense Report ). 7 Click on the new Receipt Image window to ensure the image is clear and legible Click on the New Expense tab, and then click Save f) Attaching receipts for company card transactions (see step 2d above for instructions on how to add company card transactions to an Expense Report ) i) All company card transactions $25 and over require a dated receipt to be submitted with the Expense Report .
5 These items will be flagged with a Receipt Required icon in the Expenses window, on the left side (as shown below). Visa Company Card 8 ii) In the Expense window, on the right side, click Attach Receipt iii) In the Attach Receipt window, choose a previously uploaded image3 from your Available Receipts, click the Attach button and then skip to step vi below, or click the Browse button to upload a scanned image of your receipt4. iv) Browse to the location of your scanned receipt image, select the corresponding image file and click Open 3 Electronic or e-mail receipts (such as itemized hotel invoices) forwarded to will be added to your Available Receipts automatically by Concur . First time users of this functionality must first submit their email address for verification. On the top right side of the Concur home page, click Profile, then Profile Settings and follow the instructions in the Email Addresses section to complete the verification process.
6 4 Receipt images are created by scanning each receipt individually, emailing the scanned image to yourself, and then saving the image file on your PC (where it can be accessed when completing the Expense Report ) Visa Company Card 9 v) The image file name will appear in the Attach Receipt window. Click Attach. vi) Confirm that the receipt is attached by noting that the Receipt Required icon (in the Expenses window, on the left side) has changed to Receipt Received, or click the Receipt Image tab, on the right side, to view the receipt image vii) Click on the Expense tab, and then click Save 10 g) Adding attendees to a Business Meal i) Expense types such as dinner, lunch and breakfast include an Attendees section at the bottom of the Expense tab which must be completed for all attendees at a business meal other than yourself ii) Click the New Attendee button to add attendees such as business guests and employees not listed in previous reports you created iii) Complete each of the Add Attendee fields, then click Save (or Save & Add Another to add additional attendees) 11 iv) Click Save at the bottom of the Expense window when complete v)
7 To quickly add attendees who you have listed in previous reports, click the Favorites button (instead of the New Attendee button) vi) Select the check box next to the desired attendee, then click Add to Expense 12 vii) Click Save at the bottom of the Expense window to complete h) Entering personal car mileage i) Create a new Expense (step e above) and select the Personal Car Mileage Expense type ii) Complete required and optional fields, as appropriate. The Amount field will populate automatically when the Distance field is completed. Click Save. Please note that per SPP policy, travel to and from the following specific locations is based on these mileages: Corporate Center Maumelle Center 16 miles Corporate Center Little Rock National Airport 17 miles Maumelle Center Little Rock National Airport 20 miles 13 i) Exceptions All exceptions must be corrected before Report submission. Exceptions are listed in the Exceptions box (above Expenses).
8 Select the check box next to the Expense with the exception and make the necessary corrections on the Expense tab which opens on the right. Click Save when finished. Repeat this process until all exceptions are cleared. 3) Printing and Submitting Expense reports a) Printing is not required but you may want to print your Report to review it before submitting. At the top of the Expense Report page, click Print and then select the Detailed Report option from the dropdown list b) Review the details, and then click Print 14 c) When ready, on the right side of the Expense Report page, click Submit Report d) The Final Review window appears. Click Accept & Submit. e) If you cannot successfully submit the Report , a message appears describing the Report error or exception. Correct the error and then repeat steps c and d above. 4) Correcting and Resubmitting Expense reports a) Your Expense Report approver might send a Report back to you if an error is found.
9 The approver will include a comment explaining why the Report was sent back to you. To identify and correct the Expense Report , from the home page, click the Open Reports task arrow ( ). 15 b) In the Active Reports section of the page, the Report appears with Returned on the Report tile. Click the Report tile to open the Report . c) Make the requested changes. Click Submit Report . 5) Concur mobile - Utilize the Concur mobile app and your receipts to create an Expense Report in Concur : a) Download the Concur Mobile app on your smartphone for free from the app store b) Open the Concur Mobile app on your phone and log in using your Concur username and password RETURNED 16 c) To create a mobile Expense , on the Home screen, tap the ExpenseIt icon in the lower menu d) Take a picture of the receipt using your phone s camera. Follow any on-screen prompts and then click Done. The receipt will appear as a line item on the Expenses screen.
10 Tap on the receipt line item to create the Expense . e) On the Expense screen, fill in the fields and make the desired selections. Click the Move To Report button at the bottom of the screen. 17 f) On the Move screen, click on the plus icon (+) to Create New Report (or click to add the Expense to an existing Report in the list). g) On the New Report screen, fill in the fields and make the desired selections. Click Create in the upper menu. h) When you have finished entering all Expense and attaching all receipts, click on the Submit button at the bottom of the screen to submit your Report . 18 6) Additional resources a) For additional Concur training resources, copy the following link into your browser: b) For additional information regarding SPP s Expense and Travel Policy, click the following link: Southwest Power Pool, Inc. Employee Handbook