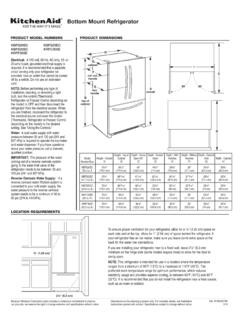
Transcription of DECKING INSTALLATION INSTRUCTIONS
1 DECKING INSTALLATION INSTRUCTIONSARMORGUARD, PARAMOUNT, SYMMETRY, HORIZON, SANCTUARY, PROTECT ADVANTAGE, GOOD LIFE AND VERANDA BY FIBERON1-800-573-8841 | 2 Table of ContentsSafety Information ..2 Warranty ..2 Pre- INSTALLATION ..3 Surface Fastening and Fascia INSTALLATION ..5 Cortex Hidden Surface Fastener INSTALLATION ..7 Removing Damaged Cortex Plugs or Screws ..8 Phantom Hidden Fastener INSTALLATION - Grooved Edge DECKING 9 Hidden Fastener INSTALLATION for Paramount Grooved Edge . 12 Post Sleeve INSTALLATION ..14 Safety InformationRead and understand this entire manual before you begin the INSTALLATION of your ELECTRICITY NOTICEDry or windy environments may create a temporary condition of static electricity, which will vary depending on climate and site conditions.
2 In the case of excessive static buildup on an installed deck, Fiberon recommends the following procedure: 1. Remove loose debris from the deck surface. 2. Dilute ACL Staticide Concentrate as directed on the bottle. 3. Spray or mop the entire surface of the deck. Allow to air dry. Do not attempt to wipe the surface dry as wiping will reduce the effectiveness of the anti-static : Although very safe in diluted form, ACL Staticide Concentrate is considered a hazardous chemical non-diluted. DO NOT use ACL Staticide Concentrate : Use extreme caution when using power : This DECKING is for deck surfaces only, and not structural : When using a ladder on composite DECKING , it is mandatory to lay down a sheet of plywood over the deck surface to disperse the load of the ladder s feet to nearby underlying joists.
3 Drill fasteners downward through the top of the plywood sheet to keep it from slipping. Position fasteners so they adequately protrude and rest firmly in the gaps between the deck boards and into the joists. This will avoid leaving holes in your DECKING once the plywood sheet is removed. Always follow the ladder manufacturer s INSTRUCTIONS and safety : Unusual sources of heat and heat buildup can potentially damage DECKING surfaces. Examples include fire pits, reflected light from nearby windows and doors, and under-deck waterproofing installations that do not provide adequate ventilation. Exercise caution if walking barefoot on the deck while it is in full sun. CAUTION: Fasteners have sharp edges. Use proper care when more information, visit WarrantiesParamount Symmetry Horizon Sanctuary ProTect Advantage Good LifeArmorGuard Veranda by FiberonLimited Performance WarrantyLifetime25-Year25-Year25-Year25- Year25-Year20-Year15-YearLimited Stain & Fade WarrantyN/A25-Year25-Year25-Year25-Year2 5-Year20-YearN/ALimited Commercial Warranty10-Year10-Year10-Year10-Year10-Y ear10-Year10-Year10-YearNOTE: Fiberon recommends the use of a quality joist flashing to ensure optimal INSTALLATION and reduce potential noise caused by the boards moving against the joist.
4 Products such as Grace Vycor Deck Protector, Tite Seal, or other comparable self-adhesive flashing products enable a smooth and consistent contact surface between joists and Fiberon DECKING . All Fiberon DECKING offers long-term warranty coverage, as noted above. To extend the life of the joists beneath the DECKING , we recommend using joist tape. Properly applied, joist tape has proven effective in protecting joists against premature decay. 3 Pre-InstallationIMPORTANT: Follow local applicable building codes.
5 Careful planning of the finished deck layout will result in more pleasing finished projects. Failure to follow INSTALLATION guidelines could void the : Thoroughly read all INSTRUCTIONS for both DECKING and railing systems planned for the project prior to installations. Failure to do so may result in more difficult installations and may void the YOU BEGIN THIS INSTALLATIONACCLIMATION AND STORAGEB efore INSTALLATION , material should be stored on a flat surface, supported every 24 in. ( mm), and in the shade or covered if original packaging is FLOW AND DRAINAGEMake sure there is adequate and unobstructed air flow under 50% of the deck perimeter to allow for cross-ventilation. This is not only to promote dryness, but also to negate heat buildup beneath the deck.
6 Allow a minimum of in. ( mm) between the bottom of the joists and the ground or existing surface. Water must be able to flow away from under the deck. Improve drainage or grade flat areas where standing water may gather. Do not install DECKING directly to an existing or solid surface. Sleeper INSTALLATION : Minimum joist height is in. ( mm), installed level, in the direction of water runoff and directly to a solid sub-structure. Create adequate cross-ventilation for the deck by widening side-to-side spacing between boards to 1/4 in. ( mm) with a maximum of 3/8 in. ( mm) gap. The deck design must allow for a minimum of in. ( mm) of unrestricted air flow under the deck at the open joist ends for cross-ventilation and waterproofing systems, properly installed, can provide additional living or storage space.
7 Improper installations are those that restrict air flow and result in buildup of heat and/or humidity, which can result in unwanted consequences. Follow all previous airflow and drainage JOIST LOCATIONJ oist location is important for the safety of the deck and will affect the layout, cost, and ease of INSTALLATION for the railing system. If railing will be installed, determine rail post placement prior to joist construction. See page 14 for information about planning post placement for rail installations. Joists used in deck frame construction should be 2 in. x 8 in. ( mm x mm) or : For decks using metal joists, specialized surface fasteners are required. Do not use Phantom or ArmorGuard Hidden Fasteners. Fasteners for metal that install at a 90 angle are SPACINGR esidentialCommercialPerpendicularDiagona l (up to 45 angle)StairsPerpendicularDiagonal(up to 45 angle)StairsParamount*16 in.
8 ( mm)12 in. ( mm)**24 in. ( mm)12 in. ( mm)8 in. ( mm)**24 in. ( mm)Symmetry9 in. ( mm)9 in. ( mm)HorizonSanctuary8 in. ( mm)8 in. ( mm)ProTect AdvantageGood Life7 in. ( mm)7 in. ( mm)ArmorGuardVeranda by Fiberon*Paramount DECKING is approved for use over joists spaced 16 in. on center. However, Fiberon recommends spacing the joists at 12 in. on center to increase stability and reduce the flexing of the deck boards.**When installing Paramount DECKING , secure stair treads over and in contact with a treated pine 2 in. x 6 in., installed flat, not on edge, as under support, and secured with Simpson A23 approved connectors and 10d x 1-1/2 in. hot galvanized in. ( mm)12 in. ( mm)DeckBoards 4 Pre- INSTALLATION (continued)EXPANSION AND SPACING CONSIDERATIONSAll DECKING materials, whether wood, composite, or metal, undergo some degree of linear expansion with the change of weather and the seasons.
9 For best spacing results, keep boards out of direct sun during storage and cutting processes and throughout INSTALLATION , if possible. To compensate for the effects of contraction and expansion, use short boards (where possible) with splitter/divider boards between each continuous run of board spacing of a minimum 3/16 in. ( mm) between board sides will provide proper drainage and assist with the removal of small organic debris. Allow a minimum of 1/4 in. ( mm) spacing between boards and any permanent structure. Spacing requirements must be met for full Fiberon warranty coverage. End-to-side spacing recommendations are determined by the temperature at 1/8 in. for temperatures below 70 F, or 1/16 in. for temperatures above 70 : Special consideration should be taken when working with dark colors, as they will experience larger temperature swings during normal use.
10 To help control end-to-end spacing, darker-colored DECKING should be kept at ambient temperature and shaded from direct sun prior to cutting and immediate securing. To create less visible gapping, use lighter-colored boards in the field of the deck with darker-colored boards as design BY INSTALLATION TEMPERATURE35 and Under36 - 69 70 - 89 90 - 109 110 and UpParamount1/16 in. ( mm)1/32 in. ( mm)1/32 in. ( mm)0 in. (0 mm)0 in. (0 mm)Symmetry1/4 in. ( mm)3/16 in. ( mm)1/8 in. ( mm)1/16 in. ( mm)1/32 in. ( mm)HorizonSanctuaryProTect AdvantageGood LifeArmorGuardVeranda by FiberonNOTE: In areas where extreme temperature swings are prevalent, adding 2X blocking at butt joints is recommended. When using hidden fasteners, add two surface fasteners into the deck at the joist location closest to the mid-point of each deck board to pin the board in place and make thermal expansion and contraction go equally in both VARIOUS DECKING PATTERNSA chieve different looks by laying the DECKING in the same or alternating directions.