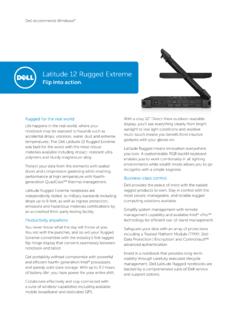
Transcription of Dell DCS-1130 Setup and Features Guide - RtroniX
1 Regulatory Model: P21 GRegulatory Type: P21G001 MKW58 Rev. A02-01 - September 2011 dell Latitude E6420 XFRS etup and Features InformationRegulatory Model: P21 GRegulatory Type: P21G001 MKW58 Rev. A02-01 - September 2011 Notes, Cautions, and Warnings NOTE: A NOTE indicates important information that helps you make better use of your computer. CAUTION: A CAUTION indicates either potential damage to hardware or loss of data and tells you how to avoid the problem. WARNING: A WARNING indicates a potential for property damage, personal injury or death. Information in this document is subject to change without notice. 2011 dell Inc. All rights used in this text: dell , the dell logo, dell Precision , Precision ON , ExpressCharge , Latitude , Latitude ON , OptiPlex , Vo s t r o , and Wi-Fi Catcher are trademarks of dell Inc.
2 Intel , Pentium , Xeon , Core , Atom , Centrino , and Celeron are registered trademarks or trademarks of Intel Corporation in the and other countries. AMD is a registered trademark and AMD Opteron , AMD Phenom , AMD Sempron , AMD Athlon , ATI Radeon , and ATI FirePro are trademarks of Advanced Micro Devices, Inc. Microsoft , Windows , MS-DOS , Windows Vista , the Windows Vista start button, and Office Outlook are either trademarks or registered trademarks of Microsoft Corporation in the United States and/or other countries. Blu-ray Disc is a trademark owned by the Blu-ray Disc Association (BDA) and licensed for use on discs and players. The Bluetooth word mark is a registered trademark and owned by the Bluetooth SIG, Inc.
3 And any use of such mark by dell Inc. is under license. Wi-Fi is a registered trademark of Wireless Ethernet Compatibility Alliance, trademarks and trade names may be used in this publication to refer to either the entities claiming the marks and names or their products, dell Inc. disclaims any proprietary interest in trademarks and trade names other than its Latitude E6420 XFR Setup and Features InformationContents | Page 3 ContentsNotes, Cautions, and Warnings ..2 Front View ..4 Figure 1. Front View ..4 Back 2. Back View ..5 Bottom View ..6 Figure 3. Bottom View ..6 Battery Installation ..8 Hard Drive Removal ..9 Hard Drive Installation ..9 Operating the PrimoSeal Doors.
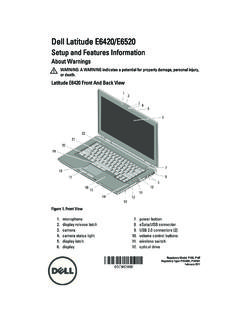
4 10 Docking Device Connector Door ..10 Press-Latch Doors ..10 Slide Latch Doors ..11 Front Secure Digital Door ..11 Quick Setup ..12 Figure 4. AC Adapter ..12 Figure 5. Network Connector ..12 Figure 6. USB Connector ..13 Figure 7. Power Button ..13 Smart Cards ..13RF Pass-Through ..14 Direct Vue Touch Display Information ..14 Accessing Drivers and Documentation ..14eGalaxTouch Configuration Utility ..15 General ..15 Tools ..16 Setting ..17 Display ..18 Edge Parameters ..18 Specifications ..19 Finding More Information and Resources ..23 dell Latitude E6420 XFR Setup and Features InformationPage 4 | Front ViewFront View2120191816171514131210119876541321 Figure 1. Front View1.
5 Microphones (2)2. Display latch3. Camera (optional) and camera status light4. Direct Vue outdoor-readable display (optional touchscreen)5. Power button ()6. eSata/USB connector ()7. HDMI connector ()8. Volume control buttons ( )9. Wireless switch ()10. USB connectors (2) ()11. Media bay modules (optical drives, second hard drive, second battery, USB , legacy I/0 module) 12. Express card slot ()13. Audio connector ()14. Fingerprint reader (optional)15. Contactless smart-card reader (optional) (see Smart Cards on page 13) ()16. Secure Digital (SD) memory-card reader (see Front Secure Digital Door on page 11) ()17. Handle18. Touch pad buttons (2)19. Touch pad20. Backlit Keyboard (optional rubber backlit keyboard available)21.
6 Device status lightsDell Latitude E6420 XFR Setup and Features InformationBack View | Page 5 Back View10987654321 Figure 2. Back View1. Power connector ()2. Battery access panel (see Battery Removal on page 7)3. Power and battery status lights4. Security cable slot5. RJ-45 network connector ()6. Serial port connector ()7. VGA connector ()8. QuadCool sealed thermal chamber9. Hard Disk Drive (see Hard Drive Removal on page 9) ()10. Enclosed Smart-card reader (see Smart Cards on page 13) () WARNING: Do not block, push objects into, or allow dust to accumulate in the air vents. Do not store your dell computer in a low-airflow environment, such as a closed briefcase, while it is running.
7 Restricting the airflow can damage the computer or cause a fire. The computer turns on the fan when the computer gets hot. Fan noise is normal and does not indicate a problem with the fan or the Latitude E6420 XFR Setup and Features InformationPage 6 | Bottom ViewBottom View1321454 Figure 3. Bottom View1. Battery latch release2. RF pass-through connectors (see RF Pass-Through on page 14) (optional)3. Sliding cover to docking device connector (see Docking Device Connector Door on page 10) ()4. QuadCool sealed thermal chamber5. Stylus holderDell Latitude E6420 XFR Setup and Features InformationBattery Removal | Page 7 Battery Removal WARNING: Before working inside your computer, read the safety information that shipped with your computer.
8 For additional safety best practices information, see the Regulatory Compliance Homepage at WARNING: Using an incompatible battery may increase the risk of fire or explosion. Replace the battery only with a compatible battery purchased from dell . The battery is designed to work with your dell computer. Do not use a battery from other computers with your computer. WARNING: Before removing or replacing the battery, turn off the computer, disconnect the AC adapter from the electrical outlet and the computer, disconnect the modem from the wall connector and computer, and remove any other external cables from the Release the rear panel by pushing the slide latch to the right. If the secondary latch is engaged, press in to Lower the rear Latitude E6420 XFR Setup and Features InformationPage 8 | Battery Installation3 Press outward on the two battery release latches on the bottom of the Use the tab on the bottom of the battery to remove the battery to remove the battery from the Installation1 Insert battery until you hear a click and a mechanical Rotate the door into Ensure the door is in the fully closed and locked Latitude E6420 XFR Setup and Features InformationHard Drive Removal | Page 9 Hard Drive Removal WARNING: Before working inside your computer, read the safety information that shipped with your computer.
9 For additional safety best practices information, see the Regulatory Compliance Homepage at WARNING: Before removing or replacing the hard drive, turn off the computer, disconnect the AC adapter from the electrical outlet and the computer, disconnect the modem from the wall connector and computer, and remove any other external cables from the Open the hard drive access slide-latch door located on the left side panel by pushing the latch towards the rear of the computer, and rotate door down and open. NOTE: See hard drive removal instructions on the sticker on the front face of the hard drive2 Press in the blue locking button on the right side of the compartment. 3 While pressing in the blue locking button, use the tab in the center of the hard drive to pull the hard drive from the Drive Installation1 Insert hard drive until you hear a click and a mechanical Rotate the door into place and press until it clicks into its closed Latitude E6420 XFR Setup and Features InformationPage 10 | Operating the PrimoSeal DoorsOperating the PrimoSeal DoorsDocking Device Connector DoorThe docking device connector door () is opened by sliding the door towards the front of the computer to its fully open position.
10 Reverse this procedure to close the door. Be sure the door is fully closed by sliding door until it reaches a mechanical DoorsThere are three press-latch doors. Two on the back (power and RJ45 ) and one on the right side panel (HDMI and eSATA ). The press-latch door is opened by:a Unlock the door by pushing the slide-lock to the left (the latch is locked when slid to the rightb Open the door by pressing down on the latch and pulling the door away from the close the door, rotate the door back towards the computer and press until it is in its fully closed position. Engage the slide-lock by pushing to the right until the lock symbol is Latitude E6420 XFR Setup and Features InformationOperating the PrimoSeal Doors | Page 11 Slide Latch DoorsThere are three slide-latch doors on the unit, two on the left side and one on the right side.)