Transcription of DIGITAL VOICE RECORDER W-10
1 1 DIGITAL VOICERECORDERW-10 Thank you for purchasing an OlympusDigital VOICE read these instructions for informationabout using the product correctly and the instructions handy for future ensure successful audio/image recording,we recommend that you test the audio/imagerecording functions before ENEN2 For Safe andCorrect UsageBefore using your new RECORDER , read thismanual carefully to ensure that you knowhow to operate it safely and this manual in an easily accessiblelocation for future reference. The warning symbols indicate important safetyrelated information. To protect yourself and othersfrom personal injury or damage to property, it isessential that you always heed the warnings andinformation Precautions Do not leave the RECORDER in hot, humidlocations such as inside a closedautomobile under direct sunlight or onthe beach in the summer.
2 Do not store the RECORDER in placesexposed to excessive moisture or dust. Do not use organic solvents such as alcoholand lacquer thinner to clean the unit. Do not place the RECORDER on top of ornear electric appliances such as TVs orrefrigerators. Avoid recording or playing back nearcellular phones or other wirelessequipment, as they may causeinterference and noise. If youexperience noise, move to anotherplace, or move the RECORDER further awayfrom such equipment. Avoid sand or dirt. These can causeirreparable Batteries should never be exposed toflame, heated, short-circuited ordisassembled. Do not attempt to recharge alkaline,lithium or any other non-rechargeablebatteries.
3 Never use any battery with a torn orcracked outer cover. Keep batteries out of the reach ofchildren. If you notice anything unusual whenusing this product such as abnormalnoise, heat, smoke, or a burning odor:1remove the batteries immediately whilebeing careful not to burn yourself, and;2call your dealer or local Olympusrepresentative for servicing. Avoid strong vibrations or shocks. Do not disassemble, repair or modifythe unit yourself. Do not operate the unit while operatinga vehicle (such as a bicycle, motorcycle,or go-cart). Keep the unit out of the reach ofchildren.<Warning regarding data loss>Recorded content in memory may bedestroyed or erased by operating mistakes,unit malfunction, or during repair is recommended to back up and saveimportant content to other media such asa computer hard disk or MO of ContentsGetting StartedMain Features.
4 4 Identification of Parts .. 5 Inserting Batteries .. 10 Recording Modes (MOdE) .. 11 Microphone Sensitivity (MIC) .. 12 Using the Variable ControlVoice Actuator (VCVA) .. 13 Recording, Taking Pictures, and PlaybackSetting Time/Date (TIME) .. 8 Notes on the Folders .. 9 Other functionsMoving Files Between Folders (MOVE) .. 19 Alarm Playback Function (ALARM) .. 23 System Sounds (bEEP) .. 24 Resetting the RECORDER (CLEAR) .. 25 Taking Pictures .. 14 Playing .. 17 Managing Files on Your PCUsing OLYMPUS VOICE Album Software .. 27 Installing Software .. 29 Starting VOICE Album .. 30 Window Names .. 31 Using Online Help .. 32 File Format .. 33 Other InformationTroubleshooting .. 35 Technical Assistance and Support.
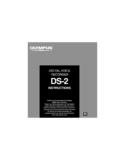
5 25 Menu List .. 264 Main Features The RECORDER stores highly compressedWAVE and JPEG format in 16 MBintergrated flash memory. The RECORDER supports three recordingmodes, HQ (High Quality) mode, SP(Standard Playback) mode and LP (LongPlayback) mode. Continuous recording time is approximately 45minutes in HQ mode, approximately 67 minutesin SP mode and approximately 180 minutes inLP mode.* A and B VOICE folders can hold a maximumof 100 audio files each, and the (image)folder can hold a maximum of 250 imagefiles. The RECORDER has a C-MOS solid-state300,000-pixel image sensor (true pixels). Audio and image files are recorded to built-in flash memory. Data isn't lost duringbattery changes.
6 It's easy to operate with Jogdial and a cleardisplay. You can take pictures while recordingaudio. If you transfer data to your computer,you can see linked images while listeningto recorded audio. You can edit audio and image files usingthe special OLYMPUS VOICE Album software included in the package. Connect the included USB cable to yourcompurter for faster transmission Features* Available recording time for one continuous file. Availablerecording time may be shorter if many short recordingsare made. (The displayed available recording time andrecorded time are approximate indications.)..Microsoft and Windows are registered trademarksof Microsoft and Pentium are registered trademarks of product and brand names mentioned hereinmay be the trademarks or registered trademarks oftheir respective microphone2 Record indicator lamp3 Display (LCD panel)4 REC (Record) button5 MENU/FOLDER button6 Shutter button7 Lens8 HOLD switch9PC (USB) terminal0 ERASE button!
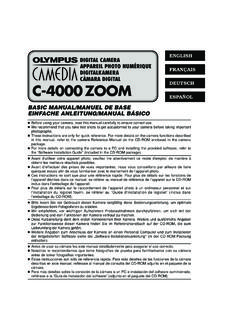
7 VOLUME control@STOP button# /0 (Rewind) button$+/9 (Fast Forward) button%PLAY button^Built-in speaker&Strap hole*Battery cover(Viewfinder)Shooting lamp-Earphone jackIdentification of Parts1654327890!@#$%^-)(*&JogdialIdentif ication of Parts61 Folder indicator2 Recording mode indicator3 Microphone sensitivity display(LOW)4 Current time/date, Recording time/date (REC DATE), Recording/Playing time, Remaining recordingtime (REMAIN), Menu display, indicator6 Battery indicator7 Rewind indicator(7),Fast Forward indicator (8),Record indicator (s), Play(`)indicator8 File number indicator9 VCVA (Variable Control VoiceActuator) indicatorDisplay (LCD Panel)Identification of Parts124356789abcWhen the RECORDER is haltedand is not recording orplaying back, it displays folderbTotal number of files recorded in the currentfoldercRemaining recording timeStandby Mode and Display Shut OffIf the RECORDER is stopped or paused for 60minutes or longer, it goes into Standby(power-save)
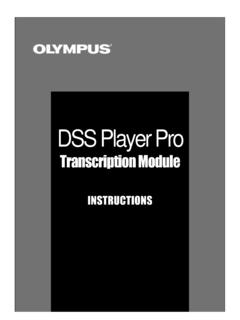
8 Mode, and the display shuts exit Standby mode and turn on the display,press any of PartsIf the STOP button ispressed and held, it displaysthe available remainingrecording time and the totalnumber of files in a BatteriesInserting Batteries1 Lightly press down on the arrow and slide thebattery cover two AAA alkaline batteries, observing thecorrect the battery cover hour indicator flashes, indicating the start of the Time/Date setup process ( ).123 Replacing batteriesWhen appears on the display, replace the batteries assoon as possible. When the batteries are depleted, flashes on the display, and the RECORDER shuts off. AAA alkalinebatteries are is recommended to set the HOLD switch to the HOLD positionbefore you replace batteries to maintain the current settings(time/date, etc.)
9 For your convenience,the RECORDER also logsthe current settings in nonvolatile memory at hourly Be sure to stop the RECORDER before replacing the batteries. Unloading the batteries while the recorderis recording, erasing or otherwise accessing a audio file may corrupt the file. If you are recording into a fileand the batteries run out, you will lose your currently recorded file because the file header will not be ableto close. So, it is crucial to change the batteries once you see only one mark in the battery icon. Be sure to replace both batteries at the same time. Never mix old and new batteries, or batteries of different types and/or brands. Remove the batteries if you are not going to use the RECORDER for an extended period of Time/Date (TIME)Changing the Time/DateSetting Time/Date (TIME)If you have set the time and date, information as to when a file is recorded is stored automaticallywith that file.
10 The time and date should be set to ease file management tasks. The time and datesetting is also needed to perform the alarm playback function ( ).When you install batteries for the first time or each time you replace the batteries, the hourindication will flash. In such a case, be sure to set the time and date by following steps 4through 5 described ,43,4511 Press and hold the MENU/FOLDER button for 1 second menu opens ( ).2 Press the +/9 or /0 buttonuntil TIME flashes on the the PLAY hour indicator flashes, indicating thestart of the Time/Date setup steps 1 and 2 to set thetime and date:1 Press the +/9 or /0 to select the PLAY button to set thevalue.