Transcription of DUAL RANGE NON-CONTACT VOLTAGE TESTER (NCVT-2) …
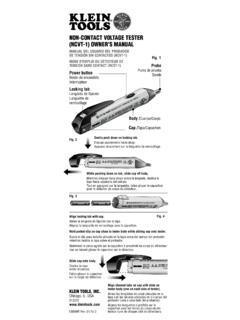
1 DUAL RANGE NON-CONTACT VOLTAGE TESTER . (NCVT-2) OWNER'S MANUAL. Power button /. MANUAL DEL USUARIO DEL PROBADOR DE TENSI N Bot n de alimentaci n /. SIN CONTACTOS DE INTERVALO DUAL (NCVT-2) Bouton de mise sous tension Fig. 1. D TECTEUR DE TENSION SANS CONTACT . DOUBLE PLAGE (NCVT-2) - MODE D'EMPLOI. Locking tab / Leng eta de fijaci n /. Languette de verrouillage Probe /. Conductor de prueba /. Sonde Body / Cuerpo / Corps Cap / Tapa / Capuchon AAA AAA. Fig. 2 Gently push down on locking tab. Empuje suavemente hacia abajo sobre la leng eta de fijaci n. A AA A. AA sur la languette de verrouillage. Appuyez doucement While pushing down on tab, slide cap off body.
2 Mientras empuja hacia abajo sobre la leng eta, deslice la tapa hasta separarla del cuerpo. Faites glisser le capuchon de fa on le d tacher du corps de l'appareil tout en appuyant sur la languette. Fig. 3. AAA AAA. Fig. 4 Align AAA. locking tab with cap. AAA Hold pocket-clip on cap close to TESTER body while Alinee la leng eta de sliding cap onto TESTER . fijaci n con la tapa. Sujete la pinza para bolsillo ubicada en la tapa cerca del cuerpo Alignez la languette de del probador mientras desliza la tapa sobre el probador. verrouillage avec le capuchon. Maintenez la pince pour la poche sur le capuchon proximit . du corps de l'appareil de mesure pendant que vous faites glisser le capuchon sur l'appareil de mesure.
3 Align channel tabs on cap with slots on TESTER body (one on each side of TESTER ). Alinee las leng etas de canal ubicadas en la tapa con las ranuras ubicadas en el cuerpo del probador (una a cada lado Slide cap onto body. del probador). Deslice la tapa sobre el cuerpo. Alignez les languettes rainures sur le Faites glisser le capuchon sur le corps de l'appareil. capuchon avec les fentes sur le corps de l'appareil de mesure (une de chaque c t de l'appareil de mesure). ENGLISH. SYMBOLS ON TESTER : Warning. Risk of electric shock. Risk of danger. Important information: It is important that users of this TESTER read, understand, and follow all warnings, cautions, safety information, and instructions in this manual before operating or servicing this TESTER .
4 Failure to follow instructions could result in death or serious injury. Double Insulated. CAT IV Equipment is designed to protect against transients from the primary supply level. ( - electricity meter or overhead/ underground utility service). OPERATING INSTRUCTIONS: Modes of operation: The NCVT-2 can operate as a dual RANGE (NCVT-2 mode) or single RANGE (NCVT-1 mode) TESTER . In NCVT-2 mode, the TESTER will light a steady blue LED in the tip to indicate power-on and dual RANGE mode. In NCVT-1 mode, the TESTER will light a steady green LED in the tip to indicate power-on and single RANGE mode. Turn unit on: Press and hold the power button for second, then release.
5 Listen for single-beep sound and watch for a steady green or blue LED to illuminate in the tip of the TESTER . The TESTER is now activated and is operational. Test on known live circuit to verify TESTER functionality. See Silent mode for additional power-on options. Turn unit off: Press and hold the power button for second then release. Listen for a double-beep sound and watch the green or blue LED turn off. The TESTER is now deactivated and is not operational. System self-test: The power on blue or green LED visually confirms battery sufficiency, system integrity, and operation/active mode. Always test on known live circuit to verify TESTER functionality prior to use.
6 Changing operation modes: While the unit is powered on, press and hold the power button for 2 seconds. The unit will beep 3 times and the power-on LED will switch from blue to green or green to blue. The TESTER will start in whichever mode it was last powered off in. Checking for the presence of AC VOLTAGE : Prior to use, test on known live circuit to verify TESTER functionality. Place tip of the TESTER near an AC VOLTAGE and refer to the tables below for each mode: NCVT-2 mode: POWER-ON 12 TO 48 VOLTS AC 48 TO 1000 VOLTS AC. Audible Single Beep Low-Pitched Pulsing Beeping Sound High-Pitched Continuous Beeping Sound Visual Steady Blue LED Blue LED Turns OFF and Red LED Blinks Blue LED Turns OFF and Red LED.
7 (approximately 2-times per second). illuminates continuously. NCVT-1 mode: POWER-ON 12 TO 48 VOLTS AC 48 TO 1000 VOLTS AC. Audible Single Beep No Sound High-Pitched Continuous Beeping Sound Visual Steady Green LED Steady Green LED Green LED Turns OFF and Red LED. illuminates continuously. In NCVT-2 mode, the TESTER will be more sensitive and will show VOLTAGE indication at a further distance away from a high VOLTAGE source than in NCVT-1 mode. Use NCVT-1 mode in situations where you expect the VOLTAGE source will be greater than 48V AC. Low battery indication: Scenario 1 Powering on the TESTER : The power on LED in the tip of the TESTER changes from a steady green or blue to a blinking green or blue and a series of beeping sounds is generated.
8 The TESTER then turns off. The unit is now deactivated and is not operational, the batteries require replacement. To replace the TESTER batteries refer to the Maintenance section titled Battery Replacement.. Scenario 2 Operating the TESTER : If the LED lights dim and the tone fades, the TESTER may require new batteries. To replace the TESTER batteries refer to the Maintenance section titled Battery Replacement.. Auto Power Off: After 4 minutes of non-use, the TESTER automatically powers off to conserve battery life. Listen for a double-beep sound and watch the power on LED turn off. The TESTER is now deactivated and is not operational.
9 Silent mode: The TESTER can be operated with only visual indication of VOLTAGE . With the TESTER powered off, press and hold the power button for 2 seconds then release. MAINTENANCE: Battery Replacement: Orient the tool/ TESTER with the pocket-clip facing you. Gently depress the tab, Fig. 2, until you can slide the end-cap off the main body of the TESTER . Remove the batteries using caution to prevent damage or injury to the internal components. Replace with two AAA or LR03 or NEDA 24A batteries. Place batteries into TESTER with the positive terminals facing the tip, Fig. 3. Carefully align and slide the end-cap to the body of the TESTER , Fig.
10 4. Push the cap until it is fully seated (denoted by a clicking sound), Fig. 4. Note: Hold pocket-clip on cap close to TESTER body while sliding cap onto TESTER . Test on known live circuit to verify TESTER functionality. Cleaning TESTER : TESTER contains sensitive electronic components; do not submerse in liquid. Do not use alcohol, ammonia or cleaners containing solvents to clean TESTER . Gently wipe the TESTER with Klein Kleaners (CAT. # 51425 or 51426), a damp cloth or a cloth containing a mild cleaning solution. Make sure the TESTER is completely dry prior to operation. DISPOSAL: Do not throw depleted batteries away; please recycle properly.