Transcription of Eaton 9-Speed Synchronized Transmissions ... - Road Ranger
1 Driver InstructionsEaton 9-Speed Synchronized TransmissionsDouble H Shift Control ConfigurationTRDR0070 February 2008FS(O) 6109FS(O) 6209FS(O) 6309FS(O) 8209FS(O) 8309FS(O) 10209FS(O) 10309iWarnings and CautionsWarnings and CautionsRead the entire driver instruction before operating this the park brakes before starting the vehicle, always be seated in the driver's seat, move the shift lever to neutral, and depress the master engine cranks in any gear other than neutral or without the master clutch depressed, service your vehicle neutral safety start circuit immediately (where a safety start circuit is fitted).
2 Before working on a vehicle, parking the vehicle, or leaving the cab with the engine running, place the transmission in neutral, set the parking brakes, and block the not release the parking brake or attempt to select a gear until the air pres-sure is at the correct : To avoid damage to the transmission during towing, place the trans-mission in neutral and lift the drive wheels off the ground or disconnect the of ContentsWarnings & Cautions .. iIntroduction .. 1 Tag Information .. 1 Operation .. 2 Nomenclature .. 2 Shift Pattern .. 2 General Information .. 3 High to Low Range Shifting.
3 3 Driving Tips .. 4 Initial Start-Up .. 5 Upshift .. 5 Downshift .. 6 Service & Maintenance .. 7 Proper Lubrication .. 7 Mixing Oil Types .. 7 Proper Transmission Lubrication 8 Lubricant Change Intervals .. 9 Operating Temperatures .. 10 Lubricant Change .. 11 Maintenance Checks .. 121 IntroductionTag InformationTransmission model designation and other transmission identification information are stamped on the transmission tag. To identify the transmission model designation and serial number, locate the tag on the transmission and then locate the numbers as : DO NOT REMOVE OR DESTROY THE TRANSMISSION IDENTIFICATION the Transmission Model and Serial Number below.
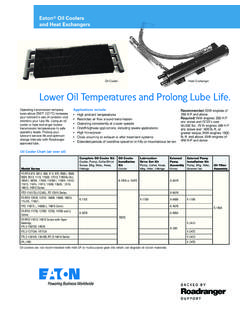
4 Have these reference numbers handy when ordering replacement parts or requesting service information:Transmission Model: Transmission Serial Number:Every effort has been made to ensure the accuracy of all information in this manual. However, Eaton Truck Components Operations makes no expressed or implied warranty or representation based on the enclosed information. Any errors or omissions may be reported to Eaton Corporation, Truck Components, Global Marketing Services, 4013, Kalamazoo, Michigan, Tag 2 OperationNomenclatureShift PatternNote: The shift lever is cross gate biased and will rest naturally in 3rd / 4th gate position when in LOW and in 5th / 6th gate position when in HIGH.
5 The cross gate bias could vary or may be omitted depending on the vehicle manufacturer. Ensure you are familiar with this before driving the vehicleFFullerSynchronizedOverdrive Ratio SetDesign LevelNominal Torque Capacityx 100 lb. Speeds10309A(O)S C 3 OperationGeneral Information9- speed Double H Models in this series provide nine forward speeds and one reverse speed , consisting of a five- speed front section and a two- speed auxiliary range gear (C) in the front section is used only as a starting gear. The other four ratios are used once in LOW range and once again in HIGH shifting out of Crawler gear, shift the remaining gears in LOW range and HIGH range as you would shift any Synchronized transmission.
6 Shift range from LOW to HIGH and HIGH to LOW by moving the shift lever fully to the right or fully to the left as described in the Operation section. The transmission will automatically make the Synchronized range shift as the shift lever is moved fully left or to Low Range ShiftingNever attempt to shift down at too high a vehicle speed as this will result in major damage to the : Some vehicles are fitted with a range shift over- speed protection device in conjunction with the vehicle manufacturer. Never assume a range over- speed device is a guide never shift from HIGH range to LOW range above 30 kph - not even if the vehicle is in neutral and the clutch pedal is : This speed will vary based on the overall driveline configuration.
7 WARNING4 OperationShift Pattern DiagramsA shift pattern diagram / etched shift knob should be in your vehicle (depending on vehicle manufacture). Driving Tips Always use the clutch when making up shifts or down shifts. Premature synchronizer failure can result from not using the clutch. Always select an initial starting gear that provides sufficient reduction for load and terrain. Never slam or jerk the shift lever to complete gear engagement. Never coast with the shift lever in the neutral position. Never downshift at too high of a road speed . Never shift to crawler gear (C) while the vehicle is moving.
8 Never select reverse gear while the vehicle is Start-UpBefore starting the vehicle, always be seated in the drivers seat, move the shift lever to neutral, and depress the master clutch moving a vehicle, make sure you understand your shift pattern sure the shift lever is in neutral, the range section is in LOW, and the parking brakes are on the key switch. Start the up the air pressure to cut the service the clutch pedal to the the shift lever to the desired initial the parking release the clutch pedal and apply the following instructions it is assumed that the driver is familiar with operating a commercial vehicle and can coordinate the shift lever movement and clutch pedal to make a smooth gear engagement while upshifting and downshifting.
9 Depress the clutch pedal. Move the shift lever to the next desired the clutch the upshifting to 4th Shift Low to High (4th to 5th) in the last LOW range gear position (4th) and ready for the next upshift, with the engine / vehicle speed at a point that will allow the vehicle to the depress the clutch pedal. Move the shift lever to the shift lever fully RIGHT for a short period - doing this will trigger the range valve to automatically shift the transmission to HIGH the shift lever to return to its natural cross gate the clutch still depressed shift to 5th the clutch and apply the upshifting to 8th speed .
10 Depress the clutch pedal, move the shift lever to the next desired the clutch downshifting to 5th Shift High to Low (5th to 4th) in the last HIGH range gear position (5th) release the depress the clutch pedal. Move the shift lever to the shift lever fully LEFT for a short period - doing this will trigger the range valve to automatically shift the transmission to LOW the shift lever to return to its natural cross gate the clutch still depressed shift to 4th the the vehicle and continue downshifting. Note: Never shift to crawler gear (C) while the vehicle is & MaintenanceProper LubricationProper lubrication procedures are key to a good all-around maintenance program.