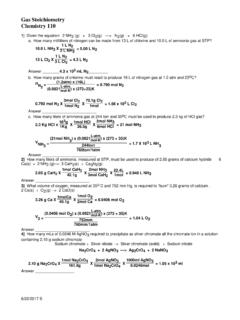
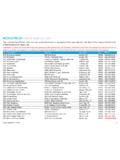
Transcription of ELECTRICAL CONDUCTIVITY - Cerritos College
1 1 ELECTRICAL CONDUCTIVITY OBJECTIVES: 1. To observe the ELECTRICAL CONDUCTIVITY of various pure liquids, ionic solids, metals and aqueous solutions using a CONDUCTIVITY probe and LED CONDUCTIVITY indicator. 2. To classify substances as strong, weak or nonelectrolytes. 3. To observe the changes in CONDUCTIVITY during the course of double displacement reactions. DISCUSSION 1. ELECTRICAL CONDUCTIVITY of molten compounds a. Ionic compounds, in the solid state, are composed of ions that are not free to move. The ions become mobile after the compound is heated to its melting temperature, becomes fluid, and the ions are freed from their positions in their crystalline lattice. The large number of mobile ions then causes the molten compounds to become good ELECTRICAL conductors. b. Covalent compounds do not conduct electricity even when molten because the resultant mobile particles are neutral molecules.
2 Their movement cannot be used to carry an electric charge. 2. ELECTRICAL CONDUCTIVITY of metallic solids Metals conduct electricity in the solid state because the valence electrons of the atoms generate a mobile sea of electrons. 3. ELECTRICAL CONDUCTIVITY of compounds in aqueous solutions Water is a good solvent for many covalent and ionic compounds. Substances that dissolve in water to form electrically conducting solutions are electrolytes. Substances that dissolve to form nonconducting solutions are known as nonelectrolytes. All soluble ionic compounds are electrolytes. Water molecules are able to pull the positively and the negatively charged ions away from each other in the solid state, and carry them along to be distributed throughout the solution. NaCl (s) !"# Na+(aq) + Cl- (aq) Most covalent compounds are nonelectrolytes.
3 When dissolved, molecules of covalent compounds are separated from each other by water molecules. The separated molecules are not charged species and will not conduct electricity. However, some covalent compounds actually react with water to form ions. The process of forming ions in this manner is known as ionization. HCl (g) + H2O (l) H3O+ (aq) + Cl- (aq) If all dissolved molecules react to form ions, the solution becomes strongly conducting and the solutes are referred to as strong electrolytes. If only a fraction of the dissolved molecules ionizes the solution becomes weakly conducting and the compound is known as a weak electrolyte. HC2H3O2 (aq) + H2O (l) H3O+ (aq) + C2H3O2- (aq) 2 PROCEDURE: 1. SOLVENT EFFECT ON THE ELECTRICAL CONDUCTIVITY ( Demonstration by the instructor) Students are not allowed to do parts of the experiment designated as demonstration by the instructor.
4 A. The instructor will set-up the light- bulb CONDUCTIVITY apparatus as shown in the figure 1 below. Light bulb Electrodes Electric plug Beaker containing a sample to be tested Figure 1: Light bulb CONDUCTIVITY apparatus The CONDUCTIVITY apparatus consists of an electric lamp in series with open electrodes. The electrodes will fit inside a 50 ml beaker containing the liquid to be tested. The electrodes are to be rinsed thoroughly with distilled water between testing the different samples. Caution: The instructor will put on a pair of rubber gloves before plugging the CONDUCTIVITY apparatus cord into the ELECTRICAL outlet. The gloves are kept on through out the entire experiment and while the apparatus is plugged in.
5 To prevent electric shock, the electrodes are not to be touched while the apparatus is plugged into the 110 volts. The apparatus is not to be left on unattended. In any lab experiment involving live contacts, the apparatus is to be disconnected from the source power except when actually making measurements. 3 b. ELECTRICAL CONDUCTIVITY of glacial acetic acid, HC2H3O2(l), no solvent present: The instructor will test the ELECTRICAL CONDUCTIVITY by using the light bulb CONDUCTIVITY apparatus. Students are not allowed to do this part of the experiment: i. Approximately 15 ml of glacial acetic acid is poured into a 50 ml beaker. Glacial acetic acid is a pure form of acetic acid ( ). It is called glacial because its freezing point ( C) is only slightly below room temperature. ii. The CONDUCTIVITY is tested by raising the beaker up around the pair of electrodes.
6 When a measurable number of movable ions are present, the light bulb will glow. A dim glowing light indicates a relatively small number of ions, while a bright glowing light indicates a relatively large number. iii. Record your observation of the light bulb on table A, page 7. c. ELECTRICAL CONDUCTIVITY of HCl in different solvents. The instructor will test the ELECTRICAL CONDUCTIVITY by using the light bulb CONDUCTIVITY apparatus. Students are not allowed to do this part of the experiment: i. This part of the experiment will be done under the fume hood. The CONDUCTIVITY of a solution labeled HCl in Toluene will be tested. Note: Toluene is a nonpolar solvent. Then, about 10 ml of distilled water are added. The beaker is shaken gently to stir the solution. There will be two liquid layers in this mixture.
7 The electrodes are placed so that they penetrate below the surface of the lower (water) layer, and the CONDUCTIVITY is tested again. ii. Record your observation of the light bulb on table A, page 7. All solutions containing toluene are disposed of in a special waste container, labeled Halogenated Hydrocarbon, found under the fume hood. Caution: Glacial acetic acid is corrosive and will burn the skin. If skin contact occurs, the contacted area should be washed with large amounts of water. It also has a strong odor and should be kept away from the nose while testing it. When finished, it is to be flushed with lots of water into the large sink before, while and after it is emptied. Caution: Toluene is flammable and quite volatile. The use of burners during this part of the experiment is prohibited.
8 No student in the area is allowed to use the burner. 4 2. ELECTROLYTES: (strong, weak, or nonelectrolyte solutions) Each pair of students will check out from the instructor a Vernier CONDUCTIVITY probe and a LabQuest 2. The CONDUCTIVITY probe is sensitive and must be calibrated before using. Before performing this part, you will need to calibrate the LabQuest 2 as follows: 1. Make sure to have a beaker of DI water ready (enough in small beaker so tip of electrode is immersed in DI water) 2. Plug in the power supply to the LabQuest 2. 3. Turn on the LabQuest 2. 4. On the sensitivity switch on the side of the LabQuest, move the switch to 0-2000 S if this is not set here. 5. Connect the CONDUCTIVITY probe to the LabQuest. 6. Click on Sensors on the top of the screen. 7. Click Calibrate. 8. Select CH1: CONDUCTIVITY 2000 MICS.
9 9. Click one point calibrate. 10. Immerse CONDUCTIVITY probe into beaker of DI water. 11. Enter in 0 for the Known value. 12. Press Keep (on bottom left of screen). 13. You will now return to the previous screen. Press OK (on bottom left of screen). 14. LabQuest will now show 0 S/cm. 15. You are now ready to take CONDUCTIVITY measurements of your solutions. 16. Make sure you fill the spot plate all the way to the top without spilling solution all over the plate. This ensures that the electrode tip is in contact and immersed within the solution. 17. CONDUCTIVITY may fluctuate. Choose the measurement that stays around a value that is constant. You are now ready to perform taking CONDUCTIVITY measurements of solutions from table B page 7. a. Take a clean spot plate to the reagent bench. Fill each separate well of the spot plate all the way to the top with each solution listed on table B-page 7.
10 B. Immerse the tip of the CONDUCTIVITY probe in each solution to be tested. Before testing each solution, rinse the probes by immersing them in distilled water placed in a small beaker. To prevent contamination, do not allow a solution from one well to mix with a solution of another well. The measured CONDUCTIVITY (in units of S/cm) of the tested solution will be recorded in table B, page 7 and will indicate one of the following types of ELECTRICAL CONDUCTIVITY : i. Strong conductor- very high measured CONDUCTIVITY values in the range of 1000 5000 S/cm . ii. Weak conductor- low to high measured CONDUCTIVITY values in the range of 100 1000 S/cm . iii. Non-conductor- essentially zero or very low CONDUCTIVITY values in the range of 0 100 S/cm . c. Record the measured CONDUCTIVITY value for each of the solutions from the LabQuest 2 as described above onto table B, page 7.