Transcription of EVERLOCK SYSTEMS, INC. Installation Instructions For EVER ...
1 EVERLOCK SYSTEMS, Instructions For EVERROCK SKIRTINGC areful attention to a few basic details will insure that your EverRock Skirting will provide a beautiful, easily installed, completelyaccessible exterior with a minimum of maintenance. EverRock Skirting is easily installed over any terrain, and requires few specialtools. Following these basic Installation techniques will assure that your EverRock Skirting will contribute to the beauty of your home Instructions :The 5 foot wide rocks come in 3 heights, 30", 36" and 48". Measure the height the home is above the ground every 5 feet, add 3inches and order the needed rocks by heights.
2 The 30" x 5' size covers 56" horizontally, while the 36" x 5' and 48" x 5' sizes cover 58"horizontally. 48" EverRock panels can be cut in half, if shorter heights are & Accessories You Will Need (not included) razor knife / carpet saw with fine tooth blade (reverse blade) orconcrete screwdriver or drill with 1/4" hex head driver edge and/or carpenter s spade (for using bottom trench method). or hoe for dirt replacement and line and/or marking attaching panelsto mobile home and/or bottom track, use no. 8 by 1"hex head screws every 12 attaching panels to mobile home and/or bottomtrack use no.
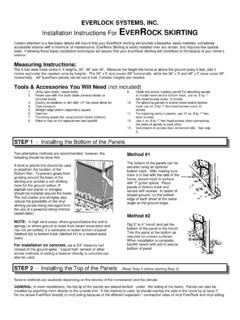
3 8 by 1" hex head screws every installing vents in panels, use 12 no. 8 by 1" hexhead 4 no. 8 by 1" hex head screws when connectingthe sides of panels to each inserts & access door conversion kits. See 1 - Installing the Bottom of the PanelsTwo alternative methods are recommended; however, thefollowing should be done first ..A level or plumb line should be usedto establish the location of theBottom Rail. To prevent grass fromgrowing around the base of theskirting and provide a non-shiftingbase for the ground spikes, 9"asphalt roof starter or shinglesshould be installed around the home. The roof starter and shingles alsoreduce the possibility of the vinylskirting panels being damaged fromthe use of a powered string trimmer(weed eater).
4 NOTE: In high wind areas; where ground below the unit isspongy; or where ground is loose from recent excavation andhas not yet settled, it is advisable to fasten bottom of panel(Method #2) or bottom track (Method #1) to a treated Installation on concrete, use a 3/4" masonry nailinstead of the ground spike. Liquid Nail cement or othersimilar methods of setting a fastener directly to concrete canalso be #1 The bottom of the panels can besecured using an optionalbottom track. After making suretrack is in line with the side of thehome, secure track to surfacewith 7" gutter spikes. Placepanels in bottom track andsecure with screws.
5 In cases ofsloped ground, cut the bottomedge of each sheet at the sameangle as the ground #2 Dig 3" to 4" trench and set thebottom of the panel in the trench. Trim the panel at the bottom asrequired on uneven surfaces. When Installation is complete,backfill trench with soil to securebottom of 2 - Installing the Top of the Panels (Read Step 3 before starting Step 2)Several methods are available depending on the desires of the homeowner and the : In most installations, the top lip of the panels are placed behind - under - the siding of the home. Panels can also beinstalled by attaching them directly to the outside trim.
6 If this method is used, lip should overlap the side of the home by at least 2". Do not screw EverRock directly to vinyl siding because of the different expansion / contraction rates of vinyl EverRock and vinyl method leaving top lip onand screwing through lip. Be sureskirting is a minimum of 2" above thebottom of the trim, or method leaving top lip onand placing top lip behind the sidingtrim. Slide top lip of panel behind theoutside trim board of home andsecure with screws. You may wish toremove trim board entirely, attachpanels to home and replace trimboard over top lip of Where Frost Heave and /or Soil Movement is SignificantA top metal rail or framing with 1' x 4", 2" x 2", or 2" x 4" treated wood will allow earth movement when EverRock is not installed on aconcrete foundation or 3 - Connecting Panels (To be done concurrent with Step 2)A.
7 Remove lip of only one side of panel by cutting along edge of rock face. NOTE: Remove only one side of the panel. B. Place panel with cut edge on top of flat lip of last panel Screw panels together using hex head screws in the mortar joints between the rock Underside ViewB Front Side View of Cut EdgeC Connecting ScrewNOTE: Each side of every panel can be connected to each side of the other panels using this method, regardless of panel size. Thisallows stacking and flexibility for unusual Inside and outside corners can bemade by heating panels with aheavy duty heat gun and bendingpanels around the corner.
8 Scorethe panel at desired location priorto heating and FRAMING ISRECOMMENDEDREGARDLESS OF SIZEOR HEIGHT: Installingvertical treated wood or u-channel aluminum dry wallposts behind each overlapwill secure screws and helpprevent & AccessVentilation - Since EverRock Skirting is nearly airtight, and will not self-ventilate, vent inserts are needed and are available atyour EverRock outlet. Each vent insert provides 28 square inches of ventilation. Ventilation codes may vary by community andmanufacturer. Contact your dealer to determine amount of ventilation needed to meet your code. Cutting out louvers in EverRockvent inserts will allow additional ventilation if a power saw (reverse blade) or concrete blade, or razor knife, cut an opening in the panel.
9 Insert the vent through the openingwith the vent flange on the outside of the panel and attach with 1 no. 8 hex head - Access can be gained at virtually any point by using an EverRock Access Door Conversion Kit. The conversion Kitallows for a full panel to be completely SYSTEMS, Gun Park Dr., #F, Boulder, CO 80301800-843-3336 * 303-530-1566 * Fax: 303-530-3820 *