Transcription of Finite Element Analysis Using ANSYS - University of Florida
1 AppendixCFinite Element AnalysisUsing INTRODUCTIONANSYS is the original (and commonly used) name for ANSYS mechanical or ANSYSM ultiphysics, general-purpose Finite Element Analysis software. ANSYS , Inc actuallydevelops a complete range of CAE products, but is perhaps best known for ANSYS Me-chanical & ANSYS Multiphysics. The academic versions of these commercial productsare referred to as ANSYS Academic Research, ANSYS Academic Teaching Advanced,Introductory etc. All of these products are general purpose Finite Element self containedanalysis tools incorporating preprocessing (geometry creation, meshing), solver and postprocessing modules in a unified graphical user interface (GUI).
2 For the remainder of thisappendix, when we state ANSYS , we mean the FEA capability of either the commer-cial or academic ANSYS Inc. products discussed above. Further we are limiting our dis-cussion to the traditional (or classic ) user interface of ANSYS , not the ANSYSW orkbench of the advantages of ANSYS isthe user-programmable capability. TheANSYS Command Language contains several thousand commands relating to creatinggeometry, mesh, boundary conditions, solver settings & many other features. A subsetof these commands are termed ANSYS Parametric Design Language (APDL), and fo-cus on managing parameters, macros, if-then-else branching, do-loops, and scalar, vec-tor and matrix operations.
3 For example, if multiple analyses are required with differentvalues of parameters, do-loops can be usedto change parameters, or the Optimizationmodule (/OPT) can be used to automaticallymanage parameters & populate a are two different modes of performing Finite Element Analysis in ANSYS :batch and interactive modes. The batch mode requires an input file of commands andexecutes it from the command line, while the interactive mode turns on the graphical userinterface and shows the result of each user action (picked from a menu or typed as acommand) in a graphics window. The batch mode is best suited for those experiencedwith the ANSYS Command Language. In this tutorial, only the interactive mode will are two different modes of inputting commands in ANSYS : graphic mode andtext mode.
4 In the graphic mode, the user can pick commands and type in required datavalues. Thus, there is no need to memorize all commands. This mode is beneficial in asense that the user can see the result of each command in the graphic window. In the textmode, the user type in commands and data in the command area. In this case, the usershould remember what command should be used to perform a particular action. However,the text mode has its own advantages. For example, during the design process, the user363may want to perform the Analysis multiple times with different values of parameters. Insuch a case, the user can prepare a text file of all commands and then input the file as aninput command file.
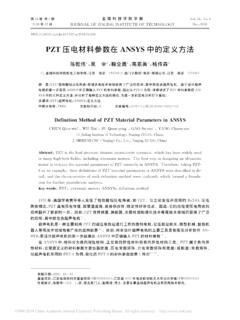
5 In fact, all actions in the graphic mode are stored as commands in atext file, Thus, it would be a good practice to prepare the initial model usingthe graphic mode, and then, modify the inputfile for the further modification. In thischapter, we will present two tutorials Using the graphic mode, and then will present sever-al examples in Chapters 2 7 Using the text GETTING STARTANSYS can be started in different ways. In this tutorial, we will start ANSYS in thetraditional mode. To access ANSYS program on Windows systems, chooseStart>Programs> ANSYS > ANSYS . This command will open ANSYS window asshown in Figure The ANSYS window is composed of different areas. The graphicarea shows geometries and Finite elements as well as results of simulation.
6 The mainmenu contains primary ANSYS functions. The user can directly type in commands inthe command area. The standard toolbox collects commands that are frequently utility menu contains utility functions that are available throughout the order to finish ANSYS , chooseFile>Exitcommand. Then,Exit from ANSYS window will show up as shown in the right-lower corner of Figure Choose a properoption andOKto finish the has its full documents in help menu. In the utility menu, chooseHelp> HelpTopics. Then ANSYS Documentation windows will show up. In this documentation,the user can find all manuals and tutorials available in of ANSYS main window and exit window364 Appendix C Finite Element Analysis Using STATIC Analysis OF A CORNER BRACKET2A.
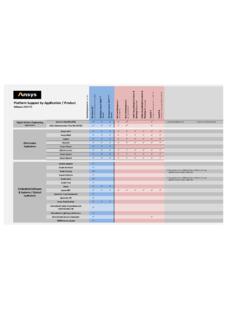
7 Problem DescriptionThis is a simple, single load step, structural static Analysis of the corner angle bracketshown in Figure The upper left-hand pin hole is constrained (welded) around itsentire circumference, and a tapered pressure load is applied to the bottom of the lowerright-hand pin hole. The objective of the problem is to demonstrate the typical ANSYS Analysis procedure. The US Customary system of units is dimensions of the corner bracket are shown in the figure. The bracket is made ofA36 steel with a Young s modulus of 30E6 psi and Poisson s ratio of Since thebracket is thin in thez-direction (1/2 inch thick) compared to itsxandydimensions, andsince the pressure load acts only in thex-yplane, the problem can be assumed as planestress.
8 We will use solid modeling to generate the two-dimensional model and automati-cally mesh it with nodes and elements . (Another alternative in ANSYS is to create thenodes and elements directly.)If your system includes a Flash player (Macromedia, Inc.), one can view demonstra-tion videos of each step by pointing the web browser to the following URL address: Building the GeometryIn order to perform the Finite Element Analysis , we need to create the geometry, and ele-ments, and to apply boundary conditions. This step is called 1: Define rectanglesThere are several ways to create the model geometry within ANSYS , some moreconvenient than others. The first step is to recognize that you can construct the bracketeasily with combinations of rectangle and circle primitives.
9 Decide where the origin willbe located and then define the rectangle and circle primitives relative to that origin. Thelocation of the origin is arbitrary. Here, use the center of the upper left-hand hole. ANSYS does not need to know where the origin is. Simply begin by defining a rectangle relativeto that location. In ANSYS , this origin is called theglobal bracket stress Analysis problem2By the courtesy of ANSYS , Static Analysis of a Corner Menu>Preprocessor>Modeling>Create>Areas> Rec-tangle>By the following data to create the first rectangle:X1 0;X2 6;Y1 1;Y2 1 (Note: Press the Tab key between entries)3. Applyto create the first the following data to create the second rectangle:X1 4;X2 6;Y1 1;Y2 35.
10 OKto create the second rectangle and close the dialog the geometry should look like the figure 2: Change plot controls and replotThe area plot shows both rectangles,which areareas, in the same color. To moreclearly distinguish between areas, turn on areanumbers and colors. The Plot NumberingControls dialog box on the Utility Menu con-trols how items are displayed in the GraphicsWindow. By default, a replot is automati-cally performed upon execution of the dialogbox. The replot operation will repeat the lastplotting operation that occurred (in this case,an area plot). Menu>Plot Ctrls> on area change controls, close the dialog box, and C Finite Element Analysis Using ANSYSB efore going to the next step, save the work you have done so stores any input data in memory to theANSYS save that database to a file, use the SAVE operation, availableas a tool on the Toolbar.