Transcription of Getting Started - Cisco Webex
1 Cisco Webex Meeting Center Getting Started This guide covers the basic functions you will use to schedule or attend a Meeting Center session from your Windows computer. Also included here are instructions for using the most common tools available during your sessions. Visit for more Meeting Center training materials and detailed instructions. The Meeting Center Schedulers You can schedule a Webex meeting using either the Advanced Scheduler or the Quick Scheduler, both of which are available after you log in to your Webex site. The Advanced Scheduler lets you add more information about your meeting, while the Quick Scheduler is often used to start a meeting on short notice. To open and use the Advanced Scheduler: 1. Click Host a Meeting > Schedule a Meeting on the left navigation bar of your Webex Meeting Center site. Your site might be configured for the Quick Scheduler to open. 2. Click Advanced Scheduler.
2 The Advanced Scheduler opens on the Required Information page. 3. Select a Me eting type and enter a M e eting topic, then enter and confirm the password. 4. Click Sta rt if you want the meeting to begin immediately, or click each of the links on the right-hand side of the page and complete the information. 5. Click Schedule Meeting when you are done entering the additional information. To open and use the Quick Scheduler: 1. Click Host a Meeting > Schedule a Meeting on the left navigation bar of your Webex Meeting Center site. 2. Click Quick Scheduler. The Quick Scheduler opens on the Schedule a Meeting Page. 6. Select a Me eting type and enter a M e eting topic, then enter and confirm the password. 7. Specify the Date, Time, and Duration. 8. Enter the Attendees. 9. Click Sta rt. Start a Meeting The host will start a scheduled meeting. Hosts can also start an unscheduled meeting and then invite other participants to join .
3 To sta rt a scheduled meeting: 1. Log in to your organization s Meeting Center site and click My Webex on the top navigation bar. A list of meetings appears. 2. Select the meeting from the list and click Sta rt. The Meeting window opens. Page 1 10/24/2014 Cisco Webex Meeting Center Getting Started To start an instant meeting: On your Webex site, click One-Click Meeting on the left navigation bar. The meeting window opens, and you can then invite participants. Join a Meeting When hosts schedule meetings, they send an email to invited attendees with the information on how to join . The meeting can also be joined from your Webex site. to join a meeting: From an email 1. Open your invitation message, and then click the link to join the meeting. The Meeting Information page appears. 2. Under Join Meeting Now , enter your name, email address, and the meeting passw ord.
4 3. Clic k Join Now. You are connected to the meeting. Fr o m a Webex s ite 1. Open a w eb brow ser and navigate to the Webex site. 2. Clic k Br o wse Meetings under Attend a Meeting on the lef t navigation bar. A list of meetings appears. No t e: to join an unlisted meeting, in the lef t navigation bar, click Unlis te d Meeting. Enter the meeting number, then click Join No w. 3. Clic k the name of the meeting. The Meeting Information page appears. 4. Enter your name, email address, and the meeting passw ord. 5. Clic k Join No w. Connect to the Audio Conference You can connect to the audio conference with a telephone, or with a computer through VoIP (Voice over Internet Protocol). After you join a meeting, click the audio panel to connect using the previous method you used, or click the dots ( ) to display more choices. To connect by phone to the audio: Call Me 1.
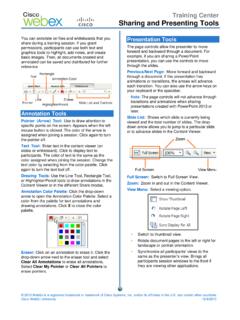
5 Select the check box Remember phone num ber on this com puter if you w ould like to store this number f or f uture meetings 2. Clic k Call Me. You will receive a call and may b e prompted to press 1 to connect. I Will Call In 1. Dial the phone number listed, enter the meeting access code, and enter your attendee ID #. 2. Close the w indow . Call Us ing Computer 1. Clic k Call Using Com puter. You are connected to the audio conference. 2. Adjust your speaker and microphone settings as needed. Navigate the Meeting Window The meeting window is similar to a conference room where people meet in person. This is also where the meeting is managed and material is shared. The menu items at the top of the page allow access to additional Meeting Center functions. Content Viewer: Displays presentations, documents, video files, whiteboards, and Web content. Panels: Provides areas for chat, polling, Q&A, names of participants, and the recorder.
6 Menu Toolbar: Allows access to Meeting Center tools and functions. Annotation Toolbar: Lets participants annotate files and whiteboards shared during a meeting. Page 2 10/24/2014 Cisco Webex Meeting Center Getting Started Use the Participants Panel Icons in and below the Participants panel let you control your audio and video, as well as to interact with other attendees. If you are the meeting host, some functions are available by right-clicking with your mouse. In the Participants panel: Click To do Start/stop sending your video. Mute/unmute your audio. Sw itch to f ull-screen video. On the icon bar beneath the Participants panel: Click To do Make the selected participant the presenter. Raise/low er your hand. Control your audio connection. Change how participants appear on your screen (List or Video view). Set the video options f rom your computer. Invite and remind others to join (available to the host only).
7 With the computer mouse: If you are the host, you can also right-click a participant s name to display some functions. Share Content You can access options for sharing content during your meeting from the Share menu or from the sharing panel on the Quick Start tab. To My Desktop Your computer s desktop. All open applications and icons on your desktop are visib le to other participants. File (including Video).. A f ile on your computer in the Content View er. Use this option to share a presentation, such as a Pow erPoint f ile. Application An application on your computer. Meeting attendees can view the application even if not installed on their computers. Whiteboard A w hiteboard and annotation tools. You must grant annotation privileges to other participants to give access to the tools. Web Content A w ebsite that attendees can navigate in the Content View er.
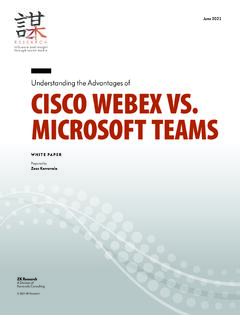
8 Use this option to let participants f ill out a f orm individually, f or example. Web Brow ser A w ebsite that you can navigate w hile attendees w atch you. My Meeting Window Your host view of the entire meeting w indow . Close any private chat conversations bef ore sharing your meeting w indow . Page 3 10/24/2014 Cisco Webex Meeting Center Getting Started Use Annotation Tools You can give participants access to annotation tools when you schedule your meeting, or while the meeting is in progress. To show or hide annotation tools, click S how-Hide . To enable or disable annotation privileges, click Allow to Annotate , then select a participant s name. Click an annotation tool to turn it on. Click again to turn the tool off. To do Use the pointer to draw attention to specif ic points on the screen. Color is assigned w hen joining a session. Click, then select Nam e Pointer or Laser Pointer.
9 Use the text tool to add text. Af ter typing, click to display the text to participants. Change the color by selecting f rom the color palette. Use the line tool to draw straight lines. Change the color by selecting f rom the color palette. Click, then select a line type. Drag your mouse to draw . Use the shape tool to draw squares, rectangles, ovals or circles, and to add check or X marks. Change the color by selecting f rom the color palette. Click, then select a shape or mark type. Use the pen tool to draw f reehand. Change the color by selecting f rom the color palette. Click, then select Pen or Pencil. Click to open the color palette, then select a color f or the text, line, shape or pen tools. The selected color is used the next time you select the tool. Click to select the tool, then click on the annotation you w ant to erase.
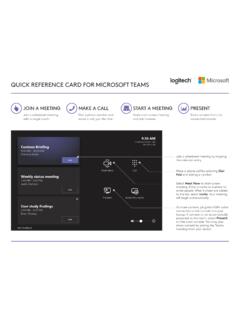
10 Or, click and select an option to clear pointers or annotations. Use Video Participants can share and view their video during a meeting. To sta r t and stop your video: Click the camera icon () in the Participants panel. The icon turns green, and your video feed appears at the top of the Participants panel. Click the camera icon again to stop your video. Video options You can control video settings, as well as switch between cameras connected to your computer, by clicking the Set Video Options icon () beneath the Participants panel. Video view and list view To see the thumbnail images of other panelists video, click the view icon (), then select Video View. Full Screen Mode You can expand the video image to full-screen mode by clicking the active speaker icon () on the Participants panel. To leave full-screen mode, click Ex it Full-Screen View. To end your video while in full-screen mode, click Stop My Video.