Transcription of Getting Started: VISSIM
1 Getting Started: VISSIM Version : July 10, 2015 Table of Contents Section 1: Introduction Section 2: General Settings 1 Section 3: Build a Network 3 Lesson 1. Add a background image Lesson 2. Draw/Edit links Lesson 3. Draw Connectors and Turn Lanes Section 4: Add Vehicles 19 Lesson 1. Enter Vehicle Composition Lesson 2. Enter Entry Volumes Lesson 3. Enter Routing Decisions Section 5: Add Controls 29 Lesson 1. Stop Control Lesson 2. Signal Control Section 6: Run a Simulation 37 Lesson 1. Set Simulation Parameters Section 7: Data Output 41 Lesson 1. Collect Travel Time and Delay Output Data Lesson 2. Configure Travel Time Measurement Lesson 3. Configure Delay Measurement View Output Data Page | 1 Section 1: Introduction This guide will provide a basic understanding of how to use the VISSIM 6 software package.
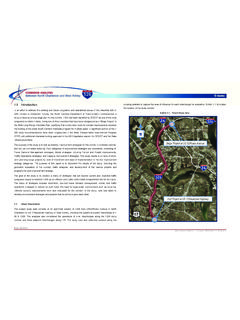
2 This guide was designed to walk a user through the necessary steps to create a network simulation from star t to finish. The network will include signalized and stop controlled intersections. NOTE: This guide does not teach signal phasing or signal timing. Please contact Tiffany Turner if you have any questions, suggestions about this guide or if you notice any errors or discrepancies. Page | 2 Section 2: General Settings Page | 3 1. Go to Base Data, then Network Settings 2. Select the Units tab. Click All Imperial to change to English units. Page | 4 Section 2: Build a Network Page | 5 Lesson 1: Add a background image 1. Select Background Images from the Network Objects side menu Page | 6 2. Right click in the Network Editor window and select Add New Background Image 3.
3 Browse to your project folder to find and select the background image to import. to follow along with this tutorial you can access the example image here . *click the show entire network button to locate image Page | 7 4. Press CTRL + Right click on the background image and select Set Scale to scale the image. 5. Select a known distance (say a distance between intersections, a width of a building, a crosswalk or lane width). Place the center of the crosshair at the first point of the known distance click and drag to the second point of the known distance. (a yellow line will appear) 6. Enter the known distance and select OK. Page | 8 7. The image will resize. Click the show entire network button again. Page | 9 Lesson 2: Draw/Edit links (links are one way): 1.
4 Select Links in the Network Objects menu 2. Click and Hold the right mouse button and drag in the direction of travel to create a link. *draw the link in the center of the direction of travel. If one lane- the middle of that lane, if two lanes-the center line, if three lanes-the middle of the center lane, **start the link outside of the background graphic 3. Enter the following in the Link Data Window a. Name: Street Name b. No. of Lanes : # of lanes in one direction (thru lanes) c. Behavior Type: Urban or Freeway d. Lane Width: leave at 12ft (or reduce to 11ft to view line striping on background image) Note: check the link length of the first link to ensure the scale is correct Page | 10 4. Right click on the link to create moveable points. 5.
5 Left click and drag the point to follow the alignment Page | 11 6. NOTE: Copy link in the opposite direction a. Press Ctrl + Right click on the link and select Generate Opposite Direction b. Select Number of lanes Page | 12 7. Repeat to recreate the entire network to be modeled. (break side streets at the mainline) *CTRL + A will change the link view from centerline (above) to lane (below) Page | 13 Create a curve: 1. Draw a line that closely follows the alignment a. Draw a straight line for begin to end. b. Right click to add four additional points (one before and after each curve) Page | 14 2. Hold Alt+ left click and drag from inside of Point 1 (be careful not to select the point itself), along the link and release just before Point 2.
6 This box will appear. 3. Enter the number of points desire d (the higher the number of points the smoother the curve) Page | 15 4. The curve is created 5. Select individual points to smooth out the curve if need. Or repeat the process from step 1. Page | 16 Lesson 3: Draw connectors (connectors are used for turn movements or transitions from one link to another) 1. Select Links in the Network Objects menu 2. Zoom in around the parking lot off of North Ave. / Techwood Dr. intersection. 3. Right click on the exit lane of the parking lot and hold + drag to the westbound lane of North Ave creating a left turn movement. A pink link will appear. (if it is blue, delete and redraw) Page | 17 4. Complete connector window a. Select the from and to link lane (lane 1 is the outside lane) b.
7 Enter the number of points for Spline (curvature) (3-5 for right turns, 4-8 left turns) c. Click OK Page | 18 5. Repeat for all the turn movements Page | 19 Add turn lanes In this example turn lanes are needed for the WB left turn, SB right turn, EB Left turn and NB left and right turns. Page | 20 1. Create a separate link for the turn bays. Page | 21 2. Connect the through lanes to turn bays with connectors 3. Now you can add the connectors for the turn movements for the intersection Page | 22 Page intentionally left blank Page | 23 Section 3: Add Vehicles Page | 24 Lesson 1: Enter Vehicle Composition (% Heavy Vehicles and desired speed) 1. Go to Traffic>Vehicle compositions 2. Change the Rel.
8 Flow (relative flow) for Cars to (the percentage of cars). Change the desired speed (this shows in km/h) Repeat for HGV. Change Rel. flow to (truck percentage). Check desired speed. Page | 25 Lesson 2: Enter Entry Volume Vehicle inputs are to be added ONLY at the entry lanes of the network. They do not control turn movemets but simply place cars on the system. 1. Right click Vehicle Inputs 2. Right click on a link near the entry point (a black line will appear) Page | 26 3. Ctrl+right click on the input and select show in list to view the Vehhicle Inputs window a. Enter the Volume 4. Repeat for every entry link (1 each for each entry to the system) Page | 27 Lesson 3: Enter Route Decisions (turn movements) 1. Right click on the Vehicle Routes 2.
9 Select Show List > Static 3. Right click on the desired link to place the beginning of the route. (appears as magenta line) 4. Drag your cursor to highlight the desired path/movement (ex. Left turn) and left click. A cyan line will indicate the end of the route. The route is highlighted in yellow. DO NOT RIGHT CLICK Page | 28 5. Repeat for the right turn movement (as well as any other movements) by left clicking. 6. Left click off of the link to complete that leg of an intersection. 7. Notice in that each Decision No. has a multiple Route Numbers. Each Route No. represents a turn movement. Enter the turn volume for each movement (Route No.) in the RelFlow column ( Notice the route will highlight in the background as you select a Route No.)
10 Page | 29 8. Repeat this for every approach at each intersection. Page | 30 Page intentionally left blank Page | 31 Section 4: Add Controls Page | 32 Lesson 1: Add Stop Control Place stop sign 1. Select the Stop Sign Button 2. Left click the link you wish to add a stop control to select 3. Right click on the link (at the stop bar location) to place the stop sign. 4. Click OK Page | 33 Set conflict areas: 1. Select Conflict Area Button 2. Click on a conflict area. Let say the left turn from the parking lot onto North Ave. 3. The conflicting movements are now hightlighted in all yellow. Right click on the area to rotate through the priority options. The movement highlighted in green has the ROW while the movement in red has to yield/giveway to the green movement.