Transcription of Getting Your Printer Back On Your Network After …
1 << Previous Next >> Getting your Printer back On your Network After A Router Or Network Change PIXMA iP7220 Windows and Mac OS 1 If any of the following situations exist You have replaced your Router or Access Point You want to use a different wireless Network Router settings have been changed. Please complete the following steps to apply the new configuration settings to your Printer . 2 << Previous Next >> Preparing to Connect My Printer To My Network << Previous Next >> Network Requirements Before connecting the machine to the Network , make sure that configuration of the computer and access point or router is complete, and that the computer is connected to the Network .
2 Wireless Connection Before connecting the machine to the Network , the computer needs to be connected to the Network . Make sure that configuration of the computer and access point or router is complete. 3 Connect the PIXMA iP7220 to your Wireless Network To re-establish communication on the Network After changing the router / Access Point or when connecting to a different Network , the settings on the Printer need to be changed Simply insert the Setup CD-ROM that came with your Printer into your CD-ROM drive and proceed through the easy to follow instructions On the following screen.
3 Select the Start Setup Again option Connecting to the Network 4 << Previous Next >> Connecting to the Network 5 << Previous 5 On the Connection Method Selection screen, be sure to select Wireless Connection. Next >> When the Printer Setup screen appears, click Connect to the Network . You will be setting up the Printer the same way as a first-time setup. When the Preparation for Connection screen appears, make sure the Printer is turned on, then click Next. 6 Select Wireless Setup Using the USB Cable.
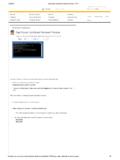
4 This brings up the Software Installation List screen. Since you will have already installed the desired software during your first installation, it will not be necessary to re-install all the software. Click the Clear All button. This will leave just the IJ Printer Driver checked. Click Next and continue through the installation process following the on-screen prompts. << Previous Next >> Connecting to the Network 7 << Previous 7 If you can t find your CD-ROM, you may download the iP7220 series Mini Master Setup, which includes the same step-by-step installation as the CD-ROM, by following the instructions below: 1.
5 Click here to access the iP7220 Drivers & Software page. the operating system and version of your computer (see example below). the Drivers section, if necessary, by clicking the red triangle. on iP7200 series Mini Master . reading the details and disclaimer, click I Agree Begin Download and save the file to your computer. the download is complete, double-click the file from its download location to begin the installation. 7. Follow the same instructions as when using the Setup CD-ROM. See the previous page