Transcription of HardieShingle Siding - Installation Instructions
1 HardieShingle Siding . SINGLE FAMILY Installation REQUIREMENTS. EFFECTIVE DECEMBER 2019. IMPORTANT: FAILURE TO FOLLOW JAMES HARDIE WRITTEN Installation Instructions AND COMPLY WITH APPLICABLE BUILDING CODES MAY VIOLATE LOCAL LAWS, AFFECT. BUILDING ENVELOPE PERFORMANCE AND MAY AFFECT WARRANTY COVERAGE. FAILURE TO COMPLY WITH ALL HEALTH AND SAFETY REGULATIONS WHEN CUTTING AND. installing THIS PRODUCT MAY RESULT IN PERSONAL INJURY. BEFORE Installation , CONFIRM YOU ARE USING THE CORRECT HARDIEZONE PRODUCT Instructions BY. VISITING OR CALL 1-866-942-7343 (866-9-HARDIE). CUTTING Instructions . STORAGE & HANDLING: OUTDOORS INDOORS. 1. Position cutting station so that airflow blows dust away from the DO NOT grind or cut with a power saw indoors.
2 Cut using shears (manual, pneumatic or Store flat and keep dry and covered prior to user and others near the cutting area. electric) or the score and snap method, not recommended for products thicker than 7/16 in. Installation . installing Siding wet or saturated may 2. Cut using one of the following methods: a. Best: Circular saw equipped with a HardieBlade saw blade result in shrinkage at butt joints. Carry planks on and attached vacuum dust collection system. Shears - DO NOT dry sweep dust; use wet dust suppression or vacuum to collect dust. edge. Protect edges and corners from breakage. (manual, pneumatic or electric) may also be used, not - For maximum dust reduction, James Hardie recommends using the Best cutting James Hardie is not responsible for damage caused recommended for products thicker than 7/16 in.
3 Practices. Always follow the equipment manufacturer's Instructions for proper operation. b. Better: Circular saw equipped with a dust collection feature - For best performance when cutting with a circular saw, James Hardie recommends by improper storage and ( Roan saw) and a HardieBlade saw blade. handling of the c. Good: Circular saw equipped with a HardieBlade saw blade. using HardieBlade saw blades. - Go to for additional cutting and dust control recommendations. product. IMPORTANT: The Occupational Safety and Health Administration (OSHA) regulates workplace exposure to silica dust. For construction sites, OSHA has deemed that cutting fiber cement with a circular saw having a blade diameter less than 8 inches and connected to a commercially available dust collection system per manufacturer's Instructions results in exposures below the OSHA Permissible Exposure Limit (PEL) for respirable crystalline silica, without the need for additional respiratory protection.
4 If you are unsure about how to comply with OSHA silica dust regulations, consult a qualified industrial hygienist or safety professional, or contact your James Hardie technical sales representative for assistance. James Hardie makes no representation or warranty that adopting a particular cutting practice will assure your compliance with OSHA rules or other applicable laws and safety requirements. GENERAL REQUIREMENTS: HardieShingle panels can be installed over braced wood or steel studs, 20 gauge (33 mils) minimum to 16 gauge (54 mils) maximum, spaced a maximum of 24 in or directly to minimum 7/16 in thick OSB sheathing. See General Fastening Requirements. Irregularities in framing and sheathing can mirror through the finished application.
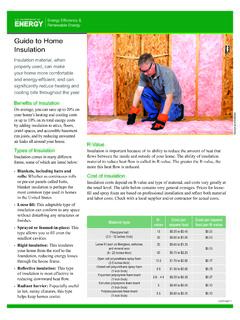
5 Correct irregularities before installing Siding . Information on installing James Hardie products over non-nailable substrates such as gypsum, foam, etc. can be located in JH Tech Bulletin 19 at www. A water-resistive barrier is required in accordance with local building code requirements. The water-resistive barrier must be appropriately installed with penetration and junction flashing in accordance with local building code requirements. James Hardie will assume no responsibility for water infiltration. James Hardie does manufacture HardieWrap Weather Barrier, a non-woven non-perforated housewrap , which complies with building code requirements. When installing James Hardie products all clearance details in figs.
6 1 thru 14 must be followed. Adjacent finished grade must slope away from the building in accordance with local building codes - typically a minimum of 6 in in the first 10ft. Do not install James Hardie products, such that they may remain in contact with standing water. HardieShingle panels may be installed on vertical wall applications only. DO NOT use stain, oil/alkyd base paint, or powder coating on James Hardie Products. James Hardie Building Products provides Installation /wind load information for buildings with a maximum mean roof height of 85 feet. For information on installations above 60 feet, please contact JH technical support. For additional information on HardieWrap Weather Barrier, consult James Hardie at 1-866-4 Hardie or STAGGERED EDGE PANEL | STRAIGHT EDGE PANEL | INDIVIDUAL SHINGLES | HALF-ROUNDS PANELS.
7 Visit for the most recent version. HS1067 P1/8 12/19. HardieShingle Siding CLEARANCE AND FLASHING REQUIREMENTS. Figure 1 Figure 2 Figure 3 Figure 4. Roof to Wall Horizontal Flashing Kickout Flashing Slabs, Paths, Steps to Siding As required by IRC code min 4 in. x 4 in. Min. 2 in Min. in Min. 2 in Figure 7 Figure 8 Figure 9 Figure 10 Figure 11. Deck to Wall Ground to Siding Gutter to Siding Sheltered Areas Mortar/Masonry L-Flashing Z-Flashing Z-Flashing Min. Min. in 2 in. Min. 6 in Min. in Min. 1 in Min. in. Figure 12 Figure 13 Figure 14. Drip Edge Block Penetration Valley/Shingle Extension Z-Flashing Extend shingles at least 1 in. Min. in. out from the Do not caulk fascia when gutters are present Figure 15A Figure 15B Figure 15C Figure 15D.
8 TRIM CONSIDERATION: Minimum 1 in trim thickness is needed as Panels stack at a depth of roughly 15/16 in for the 7 in reveal. If additional trim depth is desired, you can place a spacer under the trim (Fig. 15C & 15D). HS1067 P2/8 12/19. HardieShingle Siding GABLE Installation : Installation over sheathing is recommended (Required for Individuals) for gables.*. 1) Find the center stud of your of your Gable and snap a caulk line down 2) Measure out 16 in* to both the left and the right of the center line and snap a caulk line 3) Measure up 2 in if you are off a roof line or in if you are starting above a band board 4) Set the bottom of your 1 in starter strip at that line 5) Place your 8 in Starter Course -bottom level with the bottom of the starter strip 6) Set your first row of Shingle - starting the first piece at the vertical line left of center (If you are using staggered edged shingles Trim down the first row to the shortest shingle length).
9 7) Drive nails approximately in above Key ways 5 per full panel Center Nail can be either one of the keyways. (Stay by keyway to avoid shiners) (EX1) Blue Dots show nail placement 8) Measure up 7 in with straight and 6 in with Staggered edge and snap a caulk line to get your proper exposure 9) The second row will start at the center line 10) The Third row will start at the line right of center 11) As you work your way up the gable make sure you Keep your Cut Pieces you will use the pieces on the edges of the gable (EX2). 12) Edges Gable butting into trim leave a 1/8 in Gap (for house movement and Caulking). 13) Make sure to sure Siding nails on the small pieces on the edges (Do not use a trim nail to install!
10 Find center of gable; Figure 17. Figure 16 Snap a chalk line 1 in starter strip - Make sure to meet Min. 2 in Snap chalk line; 16 in from clearances at roof line center to the left and right and/or horizontal trim Figure 18 Figure 19. 8 in starter course First shingle goes on Snap chalk line in line with starter far left chalk line 15 in from strip Snap chalk line 7 in bottom of starter above first row for course second row of shingles Use left over and new Figure 20 Second row begins at Figure 21 pieces, where necessary, center chalk line to fill in opposite side Snap chalk line 7 in above second row for Third row begins at third row of shingles right chalk line *Panels can also be installed direct to stud up to 24 in OC.