Transcription of Setup and Installation Guide - Ring
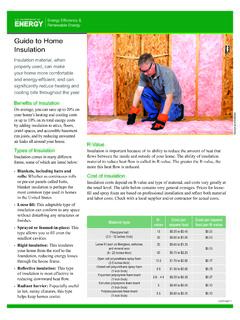
1 Setup and Installation GuideVIDEO DOORBELLStep 1 Download the Ring appThe Ring app will walk you through the process outlined in this manual, but in case you like reading small print we ve also included this : the online Setup Guide for extra helpWe have an online Guide with videos and tutorials all about setting up and using your Ring Video : 2 Say Hello to the back of your Ring DoorbellSetup Button The orange button is the Setup button. You ll be instructed to push it during the in-app Port If you re not wiring your Ring Doorbell, you ll need to charge it periodically by plugging the provided orange cable into the charging more, visit: ID: XXXXXXXXXXXS/N: XXXXXXXXXXXP roduct name: RingFCC ID: YOPGS1011 MEEM odel name: Video DoorbellPower input: 8-24 VAC, 5 Vdc 1 ASetup ButtonCharging Port3 Step 3 Perform the in-app setupThe Ring app will walk you through this process. Download the Ring app by visiting the plus sign in the Ring app to set up a new device, and when prompted, select Video Setup inside near your router.
2 You ll need your network name and Wi-Fi 4 Push the Front Button to Run a TestAfter Setup , push the front button on your Ring Doorbell indoors near your router to see video from your Ring Doorbell in the Ring app. Then test your Ring Doorbell video quality from your Ring Doorbell is not as good outdoors as it was indoors, you may need to move your router closer to your door, or invest in an more at: you notice a diode when you remove your wired doorbell, take note of this as it means you will need to use the included 5 Remove Your Existing Doorbell (optional)If you re replacing a wired doorbell, first turn off the power at the breaker. Then remove your doorbell from the wall, and disconnect the 6 Install the Mounting BracketTake everything that came in the box, along with a power drill if you re installing on stucco, brick or concrete, to the spot where you ll be installing your Ring the provided level onto the mounting bracket and use it to help position the bracket.
3 Then remove the orange tape, and use the mounting bracket as a template to mark the four corner bracket7On wood or siding , you can skip this part, and screw the bracket directly into your you have a smaller drill bit, it may help to use this bit to drill pilot the Mounting Bracket (continued)On stucco, brick, or concrete install the anchors using the provided drill bit and a power drill before installing the mounting the Mounting Bracket (continued) Use the phillips head side of the Ring screwdriver for screwing in your mounting the Mounting Bracket (continued) Drive the screws into the anchors, or directly into your wall until they are flush with the mounting bracket, and the bracket is flat against your your wall is not completely flat, be careful not to screw the bracket in so tightly that it 7 Connect the Wires (optional)Connect the wires coming out of your wall to the screws on the bracket.
4 Note that it doesn t matter which wire connects to which wiring must be connected to a transformer with a voltage of 8 VAC 24 VAC and an internal doorbell or transformers and (therefore) most intercoms are not you have a digital doorbell, connecting the diode the wrong way won t do any harm. If your doorbell doesn t ring, just reverse the more at and When to Use the DiodeIf your doorbell is digital (ie: plays a melody), attach the included diode to the two screws on your your doorbell is mechanical (ie: goes ding-dong ), DO NOT use the diode. 12 First make sure the security screws are 8 Attach Your Doorbell to the BracketLine up the holes in your Ring Doorbell with the slots on the bracket. Push firmly towards the wall and then down until you feel a 8 Secure Your Ring DoorbellUse the star-shaped end of your Ring screwdriver to tighten the security screws on the bottom of your Ring restore power at the 8 Bask in the pride of having installed your Ring Video Doorbell!
5 Thanks for helping to make your neighborhood safer. Now push the front button on your Ring to try it out. Then check out the following advanced Shared UsersTo let family or friends answer live events and view recordings (if cloud recording is enabled), select Shared Users on the settings screen of the Ring app, and enter their email(s). Motion DetectionTo enable and customize motion detection, select Motion Settings on the settings screen of the Light PatternsThe front light on your Ring Doorbell uses a number of patterns to communicate messages. Here are some common ones:Blue SpinningFront Button PushedWhite SolidWiredCharge PercentageChargingWhite SpinningIn Setup ModeWhite FlashingUpdating softwareBlue SolidRing Speaker Enabled16 Answering Your DoorWhen someone is at your door, you can perform the following actions:Turning alerts on or off:Disable/enable your microphoneMute/unmute your speakerZoom in/outAccess the Ring Plus menuYou can toggle alerts for Rings or Motions on or off in the Ring alerts on or off:Cloud Video RecordingThis optional feature saves events captured by your Ring can access these events on any device running the Ring app, or at: learn more about Cloud Video Recording, Ring, You re Always Home18 Ring Chime Ring Chime is an optional add-on that alerts you when you have a visitor even if your phone is in the other more at: Miss a Ring19 Protect the device from direct sunlight.
6 Install the device at dry locations and protect it against rain and humidity. The device may not get contact to salt water or other conductive liquids. The device must be charged only within a building in a dry state. 2016 Bot Home Automation, Inc. RING and ALWAYS HOME are trademarks of Bot Home Automation, Inc., registered in the is a trademarks of Bot Home Automation, updated: 03/21/16 For additional help, immediate assistance, we re available 7 days a week at:DOMESTIC: 1-800-656-1918 INTERNATIONAL: +1 26th St. Santa Monica, CA 90404 Hereby, Bot Home Automation, declares that this consumer electronic is in compliance with the essential requirements and other relevant provisions of Directive 1999/5/EC. The declaration of conformity may be consulted at