Transcription of HardieTrim Boards - Installation Instructions
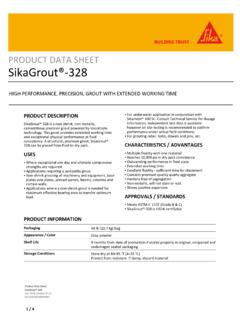
1 Do not use HardieTrim Boards to replace any structural Boards are decorative non-load bearing trim products. HardieTrimBoardsHardieTrimBoardsHardiePl ankLap SidingHardieTrimCrown Mouldingwater- resistivebarrierFigure 1 EFFECTIVE SEPTEMBER 2019 HardieTrim BoardsIMPORTANT: FAILURE TO FOLLOW JAMES HARDIE WRITTEN Installation Instructions AND COMPLY WITH APPLICABLE BUILDING CODES MAY VIOLATE LOCAL LAWS, AFFECT BUILDING ENVELOPE PERFORMANCE AND MAY AFFECT WARRANTY COVERAGE. FAILURE TO COMPLY WITH ALL HEALTH AND SAFETY REGULATIONS WHEN CUTTING AND INSTALLING THIS PRODUCT MAY RESULT IN PERSONAL INJURY. BEFORE Installation , CONFIRM YOU ARE USING THE CORRECT HARDIEZONE PRODUCT Instructions BY VISITING OR CALL 1-866-942-7343 (866-9-HARDIE)These Instructions are to be used for HardieTrim HZ Boards ONLY and are ONLY VALID in the following states: WA, OR, CA, NV, UT, ID, CO, WY, MT, AZ, REQUIREMENTS Wood or steel must be provided for attaching HardieTrim Boards .
2 Follow all appicable codes when installing HardieTrim Boards . DO NOT install HardieTrim Boards , such that they may remain in contact with standing water. DO NOT use stain, oil/alkyd base paint, or powder coating on James Hardie OF CONTENTSGENERAL REQUIREMENTSFLASHING/CLEARANCE REQUIREMENTSFASTENING Face Nailing RequirementsINSTALLATION Trimming Corners Openings Band Boards Frieze Batten Boards Fascia HardieTrim TabsFINISHINGPage 1 Page 2 Page 3 Page 3 Page 4-8 Page 4 Page 4 Page 4 Page 4 Page 5 Page 6 Page 7-8 Page 9 Visit for t he most r ecent 09/19 Store flat and keep dry and covered prior to Installation . Installing siding wet or saturated may result in shrinkage at butt joints. Carry planks on edge. Protect edges and corners from breakage. James Hardie is not responsible for damage caused by improper storage and handling of the Position cutting station so that airflow blows dust away from the user and others near the cutting Cut using one of the following methods: a.
3 Best: Circular saw equipped with a HardieBlade saw blade and attached vacuum dust collection system. Shears (manual, pneumatic or electric) may also be used, not recommended for products thicker than 7/16 in. b. Better: Circular saw equipped with a dust collection feature ( Roan saw) and a HardieBlade saw blade. c. Good: Circular saw equipped with a HardieBlade saw DO NOT grind or cut with a power saw indoors. Cut using shears (manual, pneumatic or electric) or the score and snap method, not recommended for products thicker than 7/16 DO NOT dry sweep dust; use wet dust suppression or vacuum to collect For maximum dust reduction, James Hardie recommends using the Best cutting practices. Always follow the equipment manufacturer s Instructions for proper operation.
4 - For best performance when cutting with a circular saw, James Hardie recommends using HardieBlade saw Go to for additional cutting and dust control recommendations. CUTTING INSTRUCTIONSSTORAGE & HANDLING:IMPORTANT: The Occupational Safety and Health Administration (OSHA) regulates workplace exposure to silica dust. For construction sites, OSHA has deemed that cutting fiber cement with a circular saw having a blade diameter less than 8 inches and connected to a commercially available dust collection system per manufacturer s Instructions results in exposures below the OSHA Permissible Exposure Limit (PEL) for respirable crystalline silica, without the need for additional respiratory protection. If you are unsure about how to comply with OSHA silica dust regulations, consult a qualified industrial hygienist or safety professional, or contact your James Hardie technical sales representative for assistance.
5 James Hardie makes no representation or warranty that adopting a particular cutting practice will assure your compliance with OSHA rules or other applicable laws and safety in. resistive barriersiding flashingdeck materialledgertrimflashingFLASHING/CLEAR ANCE REQUIREMENTS NO-COVER vertical trim1/4 in. in. may be installed with a minimum 1/4 in. clearance when installed vertically to grade, decks, paths, steps, and driveways Figure 2At the juncture of the roof and vertical surfaces, flashing and counter flashing shall be installed per the roofing manufacturer s Instructions . Provide a 1 in. clearance between the roofing and the bottom edge of the trim. Maintain a minimum 1 in. horizontal clearance between James Hardie trim products and decks, paths, steps and 3siding 1/4 in. gapflashingDo notCaulkFigure 5 Maintain a 1/4 in. clearance between the bottom of James Hardie products and horizontal flashing.
6 Do not caulk Penetration(recommended in HZ10)Figure 8Z-FlashingMin. not caulkDrip EdgeFigure 6for fascia Installation see page 6 Valley/Shingle ExtensionFigure 9 Extend shingles at least 1 in. out from the fascia when gutters are presentMortar/MasonryFigure 7 Figure 101/4 in. min. clearance4 in. min. 10 ft. maxCLEARANCE REQUIREMENTS UNDER-COVERM aintain a 1/4 in. clearance for HardieTrim Boards installed under cover. Under cover is defined as: Not more than 10 feet below a roof overhang, and Not less than 4 inches horizontally from the edge of the roof overhangVisit for t he most r ecent 09/19 HardieTrim BoardsMin. 41 in. maximumLeave a minimum 1/8 in. gap between the siding and trim, then caulk. finish nailingpatternplywood orOSB sheathingwater-resistivebarrier1 in. fromendsFigure 11 FACE NAILING REQUIREMENTSUse 2 in.
7 Minimum 16 ga. finish nails to attach HardieTrim Boards to wood frame construction. ET&F or equivalent fasteners or screws may be used to attach HardieTrim Boards to steel frame Instructions are similar for all applications. When using finish nails, position nails no closer than 1/2 in. from the edges of the trim and for all other fasteners no closer than 3/4 in. Fasteners must be no closer than 1 in. from ends of trim and spaced a maximum of 16 in. Ensure trim is adequately Hardie recommends using stainless steel finish nails when installing HardieTrim a 2 in. finish nail to fasten trim together. Longer finish nails may fastener guide for finish nailing:4 Built Corners2 nails every 16 nails every 16 nails every 16 areas ( window trim, and band Boards )2 nails every 16 nails every 16 nails every 16 corner1 nail every 16 in.
8 To attach Boards together + 1 nail every 16 in. each board1 nail every 16 in. to attach Boards together + 2 nails every 16 in. each board--*Follow all applicable codes when installing HardieTrim boardsPNEUMATIC FASTENINGJ ames Hardie products can be hand nailed or fastened with a pneumatic tool. Pneumatic fastening is highly recommended. Set air pressure so that the fastener is driven snug with the surface of the trim. A flush mount attachment on the pneumatic tool is recommended. This will help control the depth the nail is driven. If setting the nail depth proves difficult, choose a setting that under drives the nail. (Drive under driven nails snug with a smooth faced hammer - Does not apply for Installation to steel framing).DO NOTSTAPLEdo notunderdrive nailsdo notover drivesiding nailsFigure BSiding NailFigure AFinish NailFlushSnugFlushVisit for t he most r ecent 09/19 HardieTrim BoardsGENERAL FASTENING REQUIREMENTSF asteners must be corrosion resistant, galvanized, or stainless steel.
9 Electro-galvanized are acceptable but may exhibit premature corrosion. James Hardie recommends the use of quality, hot-dipped galvanized nails. James Hardie is not responsible for the corrosion resistance of fasteners. Stainless steel fasteners are recommended when installing James Hardie products near the ocean, large bodies of water, or in very humid of ACQ and CA preservative-treated wood recommend spacer materials or other physical barriers to prevent direct contact of ACQ or CA preservative-treated wood and aluminum products. Fasteners used to attach HardieTrim Tabs to preservative-treated wood shall be of hot dipped zinc-coated galvanized steel or stainless steel and in accordance to 2009 IRC or 2009 IBC Vertical trim may be installedwith a 1/4 in. min. clearance*.Figure 16 Butt-to SidingHardieTrimfrieze boardTrim Over SidingHardieTrim frieze boardblocking/supportif requiredsheathingwater resistive barrierlap siding 1/4 in.
10 GapflashingHardieTrim boardcaulk if requiredHardiePlank lap sidingFigure 15 Butt to SidingHorizontal Flashingleave a minimum 1/8 in. gap between siding and trim, then 14flashing over trimdo notcaulk alongtop edgeHardieTrimboardwater-resistivebarrie rsiding16 in. : Follow your window/door manufacturer s Installation Instructions for caulking guidance between window and to SidingTrim the opening prior to the Installation of the siding. Position trim Boards on the wall and secure. Allow proper fastener spacing at edges and 12 Figure 132 in. Finish nail2 in. Finish nailcornerstudsTRIMMING CORNERSWhen installing corners or other vertical trim, position Boards on the wall and attach (figure 12). Pre-Built CornersAlternatively, corners can be pre-built off the wall using 2 in. finishing nails. Each side of the pre-built corner must be secured to the wall (figure 13).