Transcription of HEAD LIGHT WIRING (28905) Instructions for Club Car DS …
1 This LIGHT Kit includes: (1) Main Wire Harness with Dual In-Line Fuses (1) Headlight Switch (1) Left hand headlight (1) Right hand headlight (1) Brake LIGHT Wire Harness (for use with optional brake LIGHT switch)(16)Mounting screws (includes extras) (6)Tie Straps (1) WIRING Instructions with TemplatesWEAR SAFETY GLASSES OR APPROPRIATE EYE PROTECTION Begin by removing the seat and disconnect the battery and or battery pack. If your car has a Run/Tow Switch, place the switch in the Tow position before disconnecting the battery pack. 1) Cut out the headlight templates included (part A & B) and assemble the halves. Place the template onto the right ( passenger ) side of the front body and align the top edge of the template with the raised body line on the front of your car.
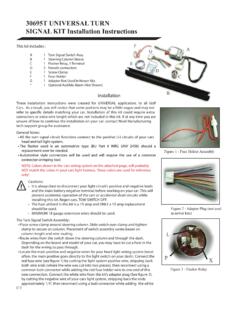
2 Take your time and ensure the template is lined up correctly, then mark the headlight area (to be cut out of the front body) using a marker. For the left (driver) side of the car, ip the right headlight template over and reuse it on the opposite side. Again, take your time and ensure the template is lined up correctly, then mark the headlight area to be cut out using a marker. ) Now you can use a Dremel or similar rotary type tool with a spiral saw blade or the headlight/taillight Cutter Tool (28553 sold separately) for cutting out the headlight openings in the front ) After the holes are cut, mount the head LIGHT assemblies and double check they are square and even with one another BEFORE drilling the mounting screw holes in the body.
3 Use 1/8 drill bit, then secure the assemblies using the Phillips head screws : 48-volt DS Model golf cars require a 16 to 12-volt reducer(10905) or a 48 to 12 volt converter (28949).WIRE & HARNESS INSTALLATION:1) Remove the seat assembly. Inside the battery compartment or engine compartment, locate the cars main WIRING harness. Route the new LIGHT kit harness along the side of the cars main wire harness to the front and rear of the car. While installing the harness, make sure it does not catch or chafe on sharp edges or rest too closely to moving ) After the routing is complete, use the cable ties included in this kit to secure the LIGHT harness to the frame or existing main harness.
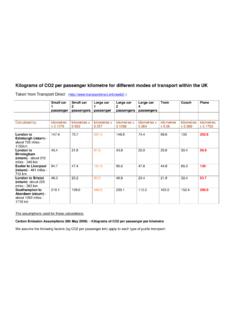
4 Mount the LIGHT switch in the dash (Figure 1 & 2) using a drill bit. For a tighter t a 31/64 bit will work for the LIGHT switch ) Make sure when connecting the harness to the lights the correct WIRING colors correspond to each other. Notice the left hand (driver s side) headlight will have a yellow wire; this should match up with the harness yellow wire. The right hand ( passenger s side) will match up to the green wire. Taillight, turn signal and brake LIGHT circuit wires are included with the harness should you choose at a later date to install them. HEAD LIGHT WIRING Instructions for Club Car DS ModelsFigure 2 Figure 1(28905)!2 Use part number 6439 turn signal head, that will have a corresponding nine pin connector and horn button for a plug and play installation.
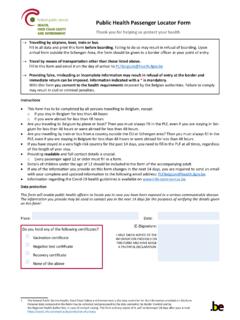
5 Use the supplied brake lead harness for switch connection. On some cars you may need to extend the purple and black horn wire depending on desired PinConnectorBrake Switch ConnectorHorn Wires12 VoltNegativeLightSwitch . (# 3'0!&#/ 1.+ '%+ ) # " ) /&#. ,.+ 1/# '%&0 3'0!& '))'%&0 '))'%&0 1/# # ")'%&0 # ")'%&0 1/# )1# )1# )1# )1# )1# )1# )1# ) !( ) !( ) !( ) !( ) !( ) !( ) !( ) !( ) !( ) !( ) !( ) !( )# . +%# #" .,3+ .##+ #)),3 #" #" #" )# #" #" #" #" #" #" ,)0 !( ,)0 !( ,)0 00#.4 ,)0 ,/'0'2# ,)0 #% 0'2# ,0# 1/# 00#.4+1* #. +" $,. 2,)0 !,++#!0',+/ .,+0 .,+0 1.+ '%+ ) .,+0 '%&0 .,+0 #$0 '%&0 # . #$0 # . P2 HEADLIGHT TEMPLATESCut our headlight templates part A and B , then cut along dotted line, then match up the two halves.
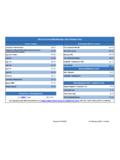
6 Tape them together securely, then cut out the center portion for use in marking your front body. Once you have used this template to mark the location of your right ( passenger side) headlight, it can be turned over and the back side used to mark the left (driver side)Cut out and align with bodyCut out and align with bodyTemplate AP3 Template BP4P6