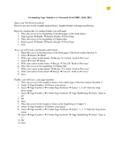
Transcription of HOW TO PAGE A DOCUMENT IN MICROSOFT WORD
1 1 HOW TO PAGE A DOCUMENT IN MICROSOFT WORD 1 PAGING A WHOLE DOCUMENT FROM 1 TO ..Z (Including the first page) Arabic Numbers (a) Click the Insert tab. (b) Go to the Header & Footer Section and click on Page Number drop down menu (c) Choose the location on the page where you want the page to appear ( top page, bottom page, etc.) (d) Once you have clicked on the box of your preference, the pages will be inserted automatically on each page, starting from page 1 on. Other Formats (Romans, letters, etc) (a) Repeat steps (a) to (c) from above (b) At the Header & Footer Section, click on Page Number drop down menu. (C) Format Page Numbers (d) At the top of the box, Number format , click the drop down menu and choose your preference (i, ii, iii; OR a, b, c, OR A, B, C.)
2 And etc.) an click OK. (e) You can also set it to start with any of the intermediate numbers if you want at the Page Numbering , Start at option within that box. 2 TITLE PAGE WITHOUT A PAGE Option A ..And second page being page number 2 (a) Click the Insert tab. (b) Go to the Header & Footer Section and click on Page Number drop down menu (c) Choose the location on the page where you want the page to appear ( top page, bottom page, etc.) (d) Once you have clicked on the box of your preference, the pages will be inserted automatically on each page, starting from page 1 on. 2 (e) At the Options Section, under the Design Tab , click on Different First Page.
3 This will eliminate the page number (number 1) on the cover/title page but will allow the second page to be the number 2 page, and so on. Option B ..and Second page being page number 1 Option B - ..and Second page being page number 1 After you are done typing: (a) Click on Insert Tab. (b) At the Header & Footer Section, click on the Page Number drop down window (arrow). (c) Click on the Format Page Numbers option. (d) Mark the Start at and choose zero (0) (e) At the Header & Footer Section, click on the Page Number drop down window again (arrow). (f) Choose where you want the page numbers to appear on the pages of your DOCUMENT ( Top of Page; Bottom of page, etc.)
4 (g) At the Options Section, click on the first option, Different First Page . The Title page should have no page numbers and the next page will be page number 1. Option C Title page without a page number and Second page, and/or Table of Contents, and /or Other pages being paged with Roman numbers. (a) Click on Insert Tab. (b) At the Header & Footer Section, click on the Page Number drop down window (arrow) (c) Choose where you would like to place the page number in the DOCUMENT ( top page, bottom page, etc. (d) Click on the example given (The page numbers will appear on the DOCUMENT ) (e) Click on the Insert Tab. (f) At the Header & Footer Section, click on the Page Number drop down window (arrow) (g) Click on the Format Page Numbers option 3 (g) Inside the box, choose the i, ii, iii option at Number Format (drop down arrow).)
5 (h) Also at the bottom of the box, at Start at , choose i . (i) Set the cursor at the end of the first page (cover page) (j) Go the Tab Page Layout (k) At the Page Set UP Section, click on the Breaks drop down window (arrow) (l) Choose the Next Page option (m) Place the cursor on the first page of the DOCUMENT (cover page) (n) Click on the Insert Tab (o) In the Header & Footer Section, click on the Header or Footer whichever you choose drop down window (arrow) (p) At the bottom of the page, click on the Edit Header or Edit Footer Section, whichever you choose option. (q) Mark the option Different First Page . All of the pages , from here on (starting at the second page) will be paged, in this case, with roman numbers.
6 The second page of the DOCUMENT will be page number i , the third page will be page number ii , the fourth page of the DOCUMENT will be page number iii and so forth. 3 THE INTRODUCTION PAGE .. (AFTER PREVIOUS PAGE(S) BEING IN ROMAN NUMBERS) Option A ..Being Number 1 in Arabic and so on Attention: In order to follow these instructions, the previous pages need to be already set as you desire. (a) Place the cursor at the bottom of the page before the page you d like to number in Arabic. (b) Click on the tab Page Layout (c) At the Page Setup Section, click on Breaks drop down menu (d) Click on Next Page A new Section will be created (e) Click the cursor on the INTRODUCTION page (The cursor will be blinking there already) (f) Click on the Insert Tab (g) Click on the Page Number drop down arrow at the Header & Footer Section 4 (h) Click on the Format Page Numbers option (i) Choose, at the Number Format at the top of the box, the Arabic numbers style (1,2, ) (k) Click the Start at option at the bottom and choose the number 1 from the drop down blue arrow.
7 (l) Click Okay. Option B ..Being Number 1 in Arabic but NOT displaying it. Display page number 2 in the following page and so on. (a) Follow Steps (a) to (k) from Option A (b) Click on the Insert Tab (c) At the Header & Footer Section, click on the Header drop down window (arrow) (d) At the bottom, click on the Edit Header or Footer whichever is your choice. (e) At the Options Section, click on the Different First Page option. This procedure will remove the number 1 from the first page of the Introduction and it will display the number 2 on the second page of the Introduction, and so forth. 4 Creating a Cover Page After the DOCUMENT is Ready and Paged (a) Move the DOCUMENT one page below leaving the first page totally blank.
8 In this way, a new first page was added to the DOCUMENT . Note that this page is page number 1 now. (b) Type the Cover Page (c) Place the cursor at the end of the Cover Page (d) Click on the Page Layout Tab (e) At the Page Set Up Section, click on the Breaks drop down window (arrow) (f) Click on the Next Page option At this point, a new Section of the DOCUMENT was created (g) Place the cursor on the second page, that is, the page after the cover page. You want to turn that page into page number 1. (h) Click on the Insert Tab. 5 (i) At the Header & Footer Section, click on the Page Number drop down window/arrow (j) Click on the Format Page Numbers option (k) At the Format Number box, choose the option 1, 2, 3 (or I, ii, iii).
9 (l) Click the Start at button and choose the number 1 (or i) (m) Place the cursor at the first page (Cover page) (n) Click the Insert Tab (o) At the Header & Footer Section, click on the Header drop down window/arrow (p) At the bottom of the page, click on the Edit Header option (q) At the Options Section, check the Different First Page option. 6 TABLE OF CONTENTS IN WORD In order to include or insert automatically a Table of Contents into your paper or DOCUMENT , simply start writing your paper as you would normally do. It is important, however, to make a couple of decisions before hand: (1) Decide before hand the type and size of the font for each level of the headings.
10 You might want each level to be different or you might want all of the headings to look the same. Example: Heading Level 1 = EVERY WORD CAPITALIZED and BOLDED Heading Level 2 = First Letters of Each Word Capitalized Heading Level 3 = Only first letter of first word capitalized Heading Level 4 = Only first letter of first word capitalized in italics (2) Decide how you want to number the Headings (Titles and sub-titles). Example: 1, , and so on. Or 1, 1a, and so on; Or I, , ; Or A, and son on; Or A, , , and so on or any other numbering style. Once the decision about the font style, font size and Heading level style is made, you are ready to begin.