Transcription of HSR Carburetor Total Kits - Mikuni
1 HSR CarburetorTotal KitsInstallation Instructions HSR42 kits : #42-8 84 - 99 Evo Big twin #42-19 99 - present twin Cam HSR45 kits : #45-2 84 - 99 Evo Big twin #45-3 84 - 99 Evo Big twin #45-4 99 - present twin Cam Revised 01/22/02TK-1 Notes, Cautions and Warnings: Statements in this manual preceded by these words are very important: Gives helpful information that can make a job easier. Indicates a possibility of damage to vehicle if instructions are not followed. Indicates a possibility of personal injury or vehicle damage if instructions are not followed. Read these instructions carefully before you begin instal-lation of your HSR kit.
2 All procedures in this manual should be followed, paying particular attention to the following:1. Mikuni HSR series carburetors require the use of a push/pull throttle assembly to assure closing of the throttle valve. 2. The throttle cables should be routed freely (without sharp bends) between the throttle twist grip and the Carburetor and must not be pinched. 3. Gasoline is extremely flammable and is explosive under cer-tain conditions. Do not install your Mikuni near open Never look directly into the bore of the Carburetor while the engine is running as injury may result from possible backfire. The Mikuni intake manifold, included in these kits , requires the flanges and seals from a 90 and later Big twin .
3 If you do not have these parts, you will need to get them from a Harley-Davidson dealer. The required part numbers are: 1. 27009-86A Flange 1 27010-86A Flange 1 26995-86B Seal 2 :1. Disconnect the battery ground wire from the Turn the fuel petcock to the OFF Elevate the rear of the tank for better access. 4. Remove the coil, horn or other devices on the left side of the engine to gain access to the manifold Remove the complete air cleaner Disconnect any vacuum hoses and the fuel hose from the stock Disconnect the choke cable from the Remove the stock Evo: remove the stock twin Cam: unplug MAP sensor, remove manifold and then remove the MAP sensor from the : Lubricate the manifold seals (liquid soap, oil or grease).
4 Intake Manifold:1. Install MAP sensor in Mikuni manifold ( twin Cam only).2. Attach the Mikuni manifold to the engine. Align the manifold before tightening the bolts. The flange surface of the Mikuni manifold should be parallel with the front of the engine s cam cover. Use a level or angle meter to check this. Tighten the manifold Attach the rubber flange to the Mikuni manifold with the furnished 5/16 x3/4 bolts and Cables: Mikuni & Harley-Davidson Route the cable with largest radius bends possible. Check the cable for free-play after installation. If there is no free-play, the engine may run rich and deliver poor performance or low fuel Cable ( twin Cam kits : 42-19, 45-4):1. Remove the Harley choke cable from the stock Remove the spring and plunger from the Remove the spring and plunger from the Install the Mikuni spring and plunger onto the Harley choke cable.
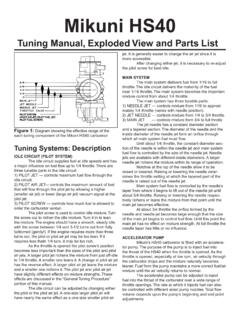
5 Change nothing else; be sure to use the Harley plastic nut, not the Mikuni nut (See Figure 1). Total Kit Installation Instructions The HSR series carburetors are precise yet durable instruments; however, like any other piece of fine equipment, they require correct installation and reasonable care to assure optimum performance and long life. Extra time spent during installation will pay off in both short and long term performance and reliability. This Mikuni HSR Carburetor kit is designed to be a bolt-on application, and as such, is set-up and jetted properly for most applications. However, since Harley-Davidson motors are often highly modified, alternate tuning settings may be required. The Mikuni Tuning Manual helps make jetting alterations and adjustments an easy : Carburetor kits not designated as exempt, are not legal for motor vehicles operated on public highways in the state of California, or in any other states and countries where similar laws apply.
6 WARNINGNOTE:NOTE: WARNINGCAUTIONNOTE:NOTE:TK-26. Install the new assembly into the Mikuni Carburetor . Be careful to only gently tighten the plastic Loosen the knurled plastic friction nut behind the choke knob and check for free-play (see Figure 2). Figure 1: Harley nut with Mikuni spring & plunger Figure 2: Choke cable adjustmentsMikuni Cable (Evo kits : 42-8, 45-2 & 45-3):1. Remove nut, spring and plunger from the Install the nut, spring and plunger onto the Install the assembly into the Mikuni HSR Carburetor . Be careful to only gently tighten the plastic Check for free-play. Adjust the cable as necessary. An optional choke cable mounting bracket is included in the Evo kits for custom Installation:1.
7 Insert the carb fully into the rubber flange, align with engine and tighten the Slip the fuel hose onto the Carburetor s fuel fitting and secure with the enclosed hose : Some twin Cam installations may require removal of a small amount of fin material from the cylinders to clear the float Cables The HSR Carburetor uses stock 1990 and later Harley-Davidson cables. However, if your Harley is fitted with some other Carburetor , you may need to purchase a set of cables. See your dealer for the correct cable Route the throttle cables with large radius curves and so they do not interfere with other Screw the cable adjusters together to make them as short as Connect the close cable first (see Figure 3).
8 4. Install the open cable next (see Figure 3).5. Adjust the opening cable until the slide can be opened fully. Snug the adjuster lock Turn the handlebar to the right and adjust the throttle free-play with the closing cable adjuster to approxi-mately 1/8 (see Figure 4). The control cables must not pull tight when the handlebar is turned fully left and right. Also, be sure that the cables clear the fork stops at the steering head so they are not pinched when the handlebar is turned. There must be some free-play at all handlebar positions to avoid binding in the throttle cables. Binding causes excessive wear and interferes with precise throttle 3: Cable installation guideFigure 4: Throttle free-playCable Lube:Remove upper throttle housing and lube each 5: Cable lube procedure Cable lubrication is important.
9 Dry cables can result in sticky throttle action, slow return to idle and excessive cable : WARNINGCAUTIONTK-3 Air Cleaner and Breather: Use the supplied brackets, breather kit parts, O-rings, bolts & washers as required. See illustrations Engines: KHS-020 breather kit 84- 91: Use 2 ea. 5/16 x3/4 bolts, washers and O-rings. 92: Use 2 ea. 1/2 x3/4 bolts and flat washers. 93- 99: Add the included breather kit (KHS-020).TwinCam: KHS-030 breather Loosely attach the brackets and/or breather parts to the cylinder heads with the appropriate hardware. 2. Remove the rubber stud protectors from the Mikuni air filter and place the two backing plates on the studs. Position the air filter up to the Carburetor while aligning the brackets with the filter studs.
10 Once the filter is in place, tighten the filter clamp. Then, secure the filter to the brackets with the enclosed 5/16 nuts and flat washers (see Figure 9).3. Cut out the thin membranes in the back of the filter and insert the plastic elbows. Use the 5/16 hose to connect the elbows to the breather Use the stock cover screw to attach the Mikuni air cleaner cover to the air Routing:1. Use the kit s hose clamps to secure the fuel hose to the petcock and Carburetor . Fit the screw clamp to the petcock end and the spring clamp to the Evo: Fit the or petcock hose to the carbu-retor. A piece of vacuum hose is included in the kit 3. twin Cam: Attach the petcock vacuum hose to the Carburetor . 4. Route the float bowl overflow hose below the engine.