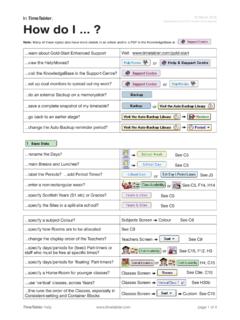
Transcription of Importing your data into SIMS - TimeTabler
1 export -Doc-3 export to SIMS .netpage 1 of your data into Date of this version: 6 December 2017 export Document 3 Always check for a later versionImporting your data into SIMS .netBefore doing the import into SIMS .net it is always advisable to do a full SIMS backup, for safety. Ensure that you consult your SIMS documentation and any local guidelines that are note that the information given here is correct to the best of our knowledge, and it may change at any time, so you should always download the latest version of this document, viawww. TimeTabler . com You should refer to any relevant SIMS documents and any guidelines provided by your local/county SIMS Support import described in this document is directly from TimeTabler to SIMS .net.(There is also an older alternative transfer from TimeTabler to Nova-T4, no longer recommended.)For questions about Registration (and Breaks, Lunches) see the PDF about 5 different Styles, found in the KnowledgeBase by using the Search Box:Contentspage2 3 Importing into SIMS.
2 Net; Checking Staff timetables4 Assigning Students to Teaching Groups5 Printing Class Lists from SIMS .net; Printing Student timetables; Making Room changes6 2-stage (double) importing7 Re- Importing a timetable from TimeTabler8 Levels10 11 Trouble-shooting : Logs & Reports12 21 Trouble-shooting : Questions & AnswersExport-Doc-3 export to SIMS .netpage 2 of into SIMS .netThe fi nal step in the previous document, export Document 2 , was: You need to make sure you are on a PC withaccess to SIMS .net and the SIMS TransferWizard .Complete the details correctly for your system. It is possible that the SIMS import wizard(called ) may not be at: C:\Program Files\Sims\Sims .net\ but on some other click on Send Timetable. This connectsyou to the SIMS import wizard , which takes you through the import may need to set up the cycle information for SIMS fi rst, by a fi rst pass as explained in items 4 9 on pages 12-13. More details in item 4 on page 12.
3 Warning: only use Send Cycle once in an academic year, otherwise it can erase your attendance, cover data , etc in : If you are using a Hosted version of SIMS, see also the Questions & Answers SIMS .netThe following screen shots give you an idea of the sequence which follows, within SIMS .net, but for more details please consult your SIMS Help fi les, or the SIMS HelpDesk, or your local/county SIMS Support Welcome ScreenThis summarises what you are Importing and lists any unknown teacher codes. These won t stop the import, but these teachers will be ignored, and all their lessons will have no teacher in Submission Summary Screen This lists any changes to a re-imported timetable structure and shows you which items are not export to SIMS .netpage 3 of Merge Curriculum ScreenThe TimeTabler structure (being submitted) is shown at the left, and any current structure in SIMSis shown at the right :If you are Importing this timetable for the fi rst time, then the right-hand side will be you are re- Importing a time- table then see the Re-import section on page allow you to modify the display (eg.)
4 To show Unlinked , Changes only , or All items ).Right-clicking on a part of the structure allows you to expand or collapse parts of the on Help for more Verify Changes ScreenThis shows you any modifi cations. E. The data is then submitted to the SQL database:Staff timetablesYou can now view the Staff Timetables, to check that they have imported OK, via Focus Person Manage Classroom Staff on a Teacher, then click on Staff Timetable (under Links, at the right-hand side).The next step is to allocate Students to Teaching Groups (called classes in SIMS) for which they are eligible. This is outlined on the next export to SIMS .netpage 4 of Students to Teaching GroupsYou should then allocate Students to Teaching Groups (called classes in SIMS) for which they are at: Focus School Academic Structure Curriculum Assignment by Scheme will be shown a list of schemes , similar to:Name (of scheme) TypeSourced byDestination GroupsBasic Groups in Year 7 BandYear 77A, 7B, 7C, 7D7AB (w)Band7A, 7B7AB (w)7 ABCD (z)Band7A, 7B, 7C, 7D7 ABCD (z)7 ABCD MaBlock7 ABCD7zMa1, 7zMa2, 7zMa3, 7zMa47 ABCD Block KBlock7A, 7B, 7C, 7D7zArK1, 7zMuK1, 7zDrK17A En 1 Cluster7A7A En 1To assign students to the Teaching Groups (classes), follow these steps (using the examples above):a) Assign the Basic Groups in Year 7 Double-click on Basic Groups in Year 7 and assign each student in Year 7 to his/her group.
5 In Lower School these groups will typically be the tutor-groups / registration-groups (7A, 7B, etc). (In Upper School these groups could be half-year-bands, etc).It just depends how you entered your scheduling names in TimeTabler . They are the simplest class scheduling names you entered for this year, from which all other scheduling names can be built ) Assign the Bands in Year 7 Double-click on 7AB (w) (in the example above) and assign each student in 7A and 7B to band 7AB. Since this is all the students on the screen, to the only destination group, you can do this quickly (rather than tick every student) by:Action Select All Students, and then: Action Tick Selected Cells. Do similarly for all the other ) Assign the Blocks in Year 7 Double-click on 7 ABCD Ma and assign each student in 7A, 7B, 7C, 7D to one of the 4 Maths groups. And similarly for other ) Do the same for other of students being assigned to their Basic Groups in Year 8 : export -Doc-3 export to SIMS.
6 Netpage 5 of Class Lists in SIMS .netYou can use : Reports Student list Class lists and then a wizard to select what you re looking for. Viewing Student TimetablesGo to Focus Student Student Details, and then click on Search to list the students. Double-click on the student you on Timetable (under the Links section at the right-hand side).Printing timetablesTo print (or print preview) a timetable, go to Reports Print Timetables and then select from the choice of : Staff Timetables, or Student Timetables, or Room the on-screen instructions thereafter (it takes you through several more screens asking you to select the specifi c teacher/student/room, whether you want individual or spreadsheet style, confi rm your date ranges, etc).Making Room Changes etcGo to Focus School Academic Structure Edit Lesson Staff and export to SIMS .netpage 6 of exportingSIMS .net (and some other MIS) allow you to do a 2-stage export ..and this can be very helpful for your admin staff, and for you in ensuring a smooth 2-stage export consists of : a 1st export after the Batches have been entered, eg.
7 In April, but before the activities have been scheduled. This allows your admin colleagues to begin allocating students to Maths Sets or to groups in Option blocks (i) using the correct Teaching Group Names and (ii) without having to wait until you have fi nished scheduling. The 2nd stage of the export takes place after you have a complete timetable solution, and it exports the correct timetable data for each Teaching Group ..providing the Teaching Group Name has not changed !There are 2 advantages of the double- export method:1. Your offi ce staff can get busy allocating students to groups without waiting for you to fi nish the complete timetable, and2. If the offi ce staff start using Teaching Group Names which are not the same as the ones that you will export from TimeTabler then SIMS will not be able to match the two sets of names during the import, and this will cause you a lot of problems. However, if you export the Teaching Group Names to SIMS before your admin staff start assigning students, it means that they will use the correct Teaching Group Names and so the names will be recognised by SIMS during the import of the completed timetable (on the Merge Curriculum Screen, page 3).
8 This will make life easier for :If you are doing a 2-stage export to SIMS .net, it is vital that the Teaching Group Names do not change between the 1st and 2nd exports, or else SIMS will probably not recognise the Group Names and you will have to correct them in SIMS manually ! This is very your Teaching Group Names:Before the export :To see what your Teaching Group Names (TGNs) will look like, go to the Curriculum Diagram Screen (section D21 in the TimeTabler Manual) and select : Customize TGNs Show TGNs in BatchesAfter the export :To see what Teaching Group Names have actually been exported, see the report fi le called which is available at File export your Timetable View Logs. More details are given in the Trouble-shooting export to SIMS .netpage 7 of your TimetableDuring the school year, you may wish to make a change to your timetable (in TimeTabler ) and then export this new timetable to export has a feature that allows you to do this re- export .
9 To avoid having to then re-assign all your students, the export will attempt to match (where possible) classes in the timetable with those in the existing timetable in you are only making small changes to your timetable (eg. room changes) then it is better to make these changes in SIMS . to re- export :The way you instruct TimeTabler to attempt the matching is to perform an export in the usual way, but at Step 6 of the export , tick the box that says: Important note:The re- export relies on matching IDs passed back from SIMS to TimeTabler during the original export ..so you must be on the same PC as you performed your previous export to , and you must not have uninstalled TimeTabler in the meantime, nor have deleted any of the fi les in its export folder (usually at C:\TT4 Win\ export ).Warning !Please, as always, make a full backup of your SIMS data before attempting a re- export !Merge Curriculum Screen (see also page 3 above) When you imported the timetablefor the fi rst time, the right-hand side of this screen was you are re- Importing a timetable then this screen can be used to manually link the new curriculum structure with the old one, by clicking on the 2 items to be linked and then clicking onthe Link you opted for automatic linking at Step 6 then there may be few or no items to link the re-importThe success of this matching will depend on how radically you have changed your timetable, and whether the curriculum structure has changed signifi re- Importing , you should check your staff and student timetables in SIMS and you may fi nd you need to re-assign some students to some export to SIMS.
10 Netpage 8 of Levels codes in SIMS .netThere are 47 (!) possible codes for the Levels in SIMS .net at the time of writing. A course is defi ned as a Subject + a default TimeTabler inserts KStg3 as the Level for Years 7, 8, 9; GCSE F for Years 10 GCE AS for Year 12; GCE A for Year 13 ..but you can change the Level during the export (eg. ifsome of your courses are for the IB). See step 9 on page the time of writing the Levels seem to be needed only for the Post-16 Return .After the import you can view the Level in SIMS .net at Tools Academic Management CourseManager Maintain Course. Unfortunately SIMS .net will not allow you to edit the Level. There are more details in the Capita booklet Managing Courses in SIMS .net .The 47 Levels are:DescriptionCodeAdvanced Extension AwardAEAA sset BreakthroughATBrkAsset PreliminaryATPreAsset IntermediateATIntAsset AdvancedATAdvBTEC Certifi cate Level 1 BTCe1 BTEC Diploma Level 1 BTDi1 BTEC Certifi cate Level 2 BTCe2 BTEC Diploma Level 2 BTDi2 BTEC Award Level 3 BTAw3 BTEC Certifi cate Level 3 BTCe3 BTEC Diploma Level 3 BTDi3 DiDA AwardDAAwDiDA Certifi cateDACeDiDA DiplomaDADiEntry LevelELFSMQ FoundationFSMQFFSMQ IntermediateFSMQIFSMQ AdvancedFSMQAGCE AdvancedGCE AGCE Advanced SubsidiaryGCE ASGCE A Double AwardGCEDAGCE ASB Double AwardGCEDSGCSE Double AwardGCSEDD escriptionCodeGCSE Full CourseGCSE FGCSE Short CourseGCSESG eneralGenGNVQ FoundationGNVQFGNVQ IntermediateGNVQII nternational BaccalaureateIBKey Stage 1 KStg1 Key Stage 2 KStg2 Key Stage 3 KStg 3 Key Skills Level 1 KSkl1 Key Skills Level 2 KSkl2 Key Skills Level 3 KSkl3 NQF EntryNQF0 NQF FoundationNQF1 NQF IntermediateNQF2 NQF AdvancedNQF3 OtherOtherVCE AdvancedVCEAVCE Advanced