Transcription of INCUBATOR & ACCESSORY INSTRUCTION MANUAL
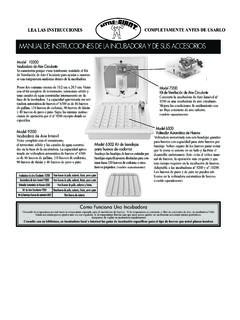
1 INCUBATOR & ACCESSORY INSTRUCTION MANUALHow An INCUBATOR WorksThe function of an INCUBATOR is to bring normal room temperature up to a desired temperature for hatching eggs. If your room temperature is constant and free of drafts, yourLittle Giant INCUBATOR will need very few adjustments once regulated. If your room temperature fluctuates more than a few degrees your INCUBATOR will needperiodic adjustments. Be sure to monitor your INCUBATOR with yourlibrary, local hatchery, orthe internet forhatching guidelines specific to the type of eggs you plan to 6300 Automatic Egg TurnerFeatures motorized egg turner with six large eggracks holding up to seven eggs each.
2 Safely turnseggs to prevent the yoke from settling to one sideand to exercise the embryo. This eliminates turningthe eggs by hand which is the most demanding andtime consuming part of egg incubation. Fits models9200 and 10200 incubators . Turkey and duck eggswill not fit in the Automatic Egg Turner. (sold separately)Model 7200 Circulated Air Fan KitConverts the Model 9200 Still Air Incubatorto a circulated air INCUBATOR . Helps improvehatch conditions by circulating a constantflow of warm air.(sold separately)Model 9200 Still Air IncubatorFeatures two 4 x 8 viewing windows. Comescomplete with thermometer, solid state thermostat,and built-in moisture rings in the base of the INCUBATOR .
3 Approximate capacity without automaticegg turner is 46 chicken eggs, 118 quail eggs, 90pheasant eggs, 40 turkey or duck eggs. Model 10200 Circulated Air IncubatorFeatures fully-installed Circulated Air Fan Kit to helpkeep temperature uniform inside the two 4 x 8 viewing windows. Comescomplete with thermometer, solid state thermostat,and built-in moisture rings in the base of the incuba-tor. Approximate capacity without automatic eggturner is 46 chicken eggs, 118 quail eggs, 90 pheas-ant eggs, 40 turkey or duck eggs. Follow the sameoperating instructions as the Model 9200 exceptwhere Circulated Air IncubatorFor chicken, quail, pheasant, turkey, and duck eggs9200 Still Air Incubator6300 Automatic Egg Turner7200 Circulated Air Fan KitFor chicken, quail and pheasant eggsREAD INSTRUCTIONSTHOROUGHLYBEFORE USE6302 Quail Rails KitFor chicken, quail, pheasant, turkey, and duck eggsFor chicken, quail, pheasant, turkey, and duck eggsFor quail and and other small eggsModel 6302 Quail Egg Trays KitReplaces standard egg rails with rails specif-ically designed to hold up to 120 quail orother small eggs.
4 (sold separately)Step 1:Choosing The Proper Location For Your IncubatorInstall your INCUBATOR in a room that has a stable temperature. Avoid setting your INCUBATOR in drafty areas like near a window or on a direct sunlight. The ideal room temperature is 70 F. The model 10200 Circulated Air INCUBATOR and the model 9200 StillAir INCUBATOR outfitted with a Circulated Air Fan Kit (sold separately)can operate in room temperatures between 60 F- 80 F. The Still AirIncubator without a Circulated Air Fan Kit can operate in a room tem-peratures between 65 F and 72 2:Installation and Set UpUnpack your INCUBATOR . The top half should becomplete with windows, element, thermostat, indicator light, and power cord.
5 Place the wirescreen in the INCUBATOR bottom. Line up the cordexit slot in the top half with the slot in thebottom half. This notch is used for thepower cord when using the AutomaticEgg :If you have a model 9200 or10200 INCUBATOR without a model 6300 powercord exit slot (see Figure A) you must add one. Use a screw driver orsimilar shaped object, lay it across the edge of the INCUBATOR and pressdown to form a slot in the location Circulated Air Fan Kit if purchased separately(see separate instructions included with Fan Kit).The Circulated Air Fan Kit converts the model 9200 Still Air Incubatorto a Circulated Air INCUBATOR .
6 The fan kit helps keep the temperatureuniform throughout the INCUBATOR . The fan circulates the air. It does notregulate the model 6300 Automatic Egg Turner is sold separately and fits eitherincubator. Six Large Egg Trays are included with the Automatic EggTurner. The Automatic Egg Turner makes one complete cycle (30degrees side to side) every 4 : DO NOTMOVE THE EGG TRAYS BYHAND. Theegg turner moves very slowly. It takes (4 hours to complete a 30 degreeside to side cycle. This movement may not be detected by the naked the Automatic Egg Turner from the box; holding it over theincubator, line up the power cord exiting the motor with the side of theincubator bottom that has a notch molded in it.)
7 Place the automatic eggturner in the INCUBATOR so it fits flat on all four corners over the wiremesh floor. Plug the cord into a surge protector. Plug the surge protec-tor into a 110 volt GFCI protected outlet. On 240/400 volt model,attach plug required by country calibrate the thermometer with one known to be 3: INCUBATOR Regulation Before beginning a hatch, you need to regulate the INCUBATOR tempera-ture. Turn the control knob fully clockwise. The red indicator light willcome on and the element will begin to heat. Watch the thermometer asthe INCUBATOR heats up. As soon as it registers to the temperature recom-mended for the species you are hatching, turn the control knob the control knob counter clockwise to decrease heat and clock-wise to increase heat until you have it regulated to hold at the desiredtemperature.
8 The red indicator light may flicker off and on during thisprocess. This is normal and indicates that the INCUBATOR is adjusting tochanges in both internal and external air temperatures. Run the INCUBATOR for 6-8 hours. At the end of this time, make sure thedesired temperature was maintained. If so, you are ready to incubate!How to Use Your Little Giant INCUBATOR & AccessoriesFigure ANote:Due to different hatching requirements, it is recommended that you hatch only one species of egg perhatch. Forexample, it isnot recommended that you attempt to hatch chicken and quail eggs at the same time in the same referto yourlocal library orthe World Wide Web foradditional hatching This product must be used with a Ground Fault Circuit Interrupter(GFCI) protected outlet.
9 DO NOTconnect the product to an outlet with extension cords. DO NOTexpose the product s electrical parts to Exit Slot6300 Cord Exit SlotStep 4:Humidity Control and VentilationFill the moisture rings in the bottom of the INCUBATOR with water . Waterwill help keep eggs naturally moist. Check moisture rings daily, addinglukewarm water as needed. If the room where your INCUBATOR is placedhas good natural moisture content, add water less frequently than if yourclimate or room conditions are dry. Good ventilation is important in the hatching process. Air exchange isneeded during embryo development and should be increased as chicksstart to one of the red plastic vent plugs on the top of the INCUBATOR .
10 One is located between the two windows toward the front of the incuba-tor, closest to the power cord. The second is located at the opposite endof the INCUBATOR , furthest from the power cord. If your INCUBATOR has a fan kit, evaporation may occur at a more rapidrate. If so, you will need to add water more frequently. Step 5:Maintain SanitaryConditionsEmbryos are extremely susceptible to dis-ease from bacteria. Hand perspiration orother foreign materials block the pores ofthe shells and can permeate the egg, resulting in bacterial wash hands with anti-bacterial soap before handling eggs. Avoidexcess handling of eggs.