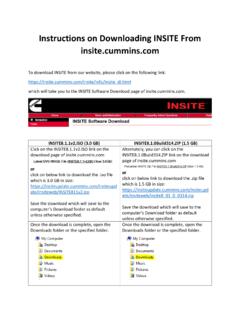
Transcription of INSITE™ Overview
1 INSITE OverviewElectronic Service Tools2018 VersionPublic InformationContents Getting Started Launching & Licensing Configuring Options ECM Multi-Level Security ECM Connections Fault Codes & Fault Information System Data Monitor Logger ECM Diagnostic Tests & Advanced ECM Data Features & Parameters Calibration Selection & ECM/PDD Code Search Work Orders, ECM Images & Templates Trip Information Audit Trail Inquire Data Extraction OBD Monitors Expert Diagnostic System (EDS) J1939 Datalink Messages Guidanz Web (formerly CSS) Support2 Getting Started Windows-based PC obtained that meets or exceeds system requirements Latest version of INSITE installed Includes License Configuration Tool Latest version of Update Manager installed RP1210 adapter (such as INLINE 7) with connection cables available for use Appropriate licensing purchasedthrough authorized distributor If any of these steps are not done, please contact your local distributor for further Requirements (as of Jan 2018)ComponentRecommendedMinimum Requirements to InstallPlatform:INTEL i5 Processor & AMD K10 Core (32bit or 64bit)INTEL i3 Processor & AMDK10 Core(32bit or 64bit)Operating System:Windows 10 (64bit)Windows (32bit or 64bit)* -Windows Starter or Windows RT are not GHz or greater Quad-Core2 GHz or greater Dual-CoreRAM:8 GB or greater4 GB or greaterHard Drive:6 GB or greater available disk GB availablediskspaceMedia device (needed for installation in most cases and INCAL):Dual Layer -Double Density DVD-ROMDVD-ROM (may be internal or external as needed for installation)Display:**Minimum Resolution 1920 x 1080**Minimum Resolution 1024 x 768 Keyboard.
2 101-Key Enhanced101-Key EnhancedPointing Device:Windows Compatible DeviceWindows Compatible DeviceMultimedia:PCs that will be used for Virtual College training will require multimedia and sound capabilityAny Windows Compatible Sound DeviceOther Software:Adobe Acrobat Reader or higherMicrosoft .NET Framework or laterAcrobat Reader or higherMicrosoft .NET Framework or laterPrinter (optional):Windows Compatible DeviceWindows Compatible DeviceInternet connection:High-Speed BroadbandHigh-Speed BroadbandAvailable Ports:2x USB USB ** Dual Monitor Displays are not supportedAll Software section defines the level of PC Hardware required to run all ofthese installations will limit performance. For optimal performance use the recommended hardware or InformationProduct Based MR/HD Automotive provides access to the EPA 2007 and above on highway engines in North America and the Euro VI engines for Europe which are listed -CM876 ISL9 CM2250 ISX -CM871 ISX12 CM2250 ISB -CM2150 ISX12 G CM2180 EJISC CM2350 B104 ISL CM2350 B101 ISL G -CM218 ISL9 CM2350 CM2250 ISX12/15 CM2350 X102 CM2250 Turbo Actuator ControllerAftertreatment Diesel Exhaust Fluid Controller MR/HD Plusprovides access to all applications and engines except High Horsepower (HHP) engines.
3 Service Plusprovides access to all engines and applications that INSITE supports. Functionality Levels Prois the highest level of functionality that INSITE provides, which includes calibration download. NOTE: Requires certification by Cummins distributor to obtain this type of license. Lite provides all of the functionality of Pro except for calibration download capability. RSGR/Industrial Profunctionality limits the access to Road Speed Governor parameters and Industrial Pro provide calibration download to Industrialproducts only. Basic functionality is read only and does not have adjustment or calibration download capability. 5RP1210 Device Compatibility Supported INLINE 7 NOTE: INLINE 5 & INLINE 6 do work with INSITE, but are no longer supported Any RP1210 Compliant Datalink Adapters Additional information available on & Licensing7 Launching INSITE After INSITE has been installed, you should have a shortcut icon on your desktop that looks like.
4 Double-click INSITE shortcut. An INSITE splash screen should be displayed as shown to the INSITE If no licenses have been activated, a Welcome to INSITE window will appear If licenses have already been activated, INSITE will launchLaunches License Configuration Tool Locate distributor contact informationLaunches INSITE in Simulator ModeNOTE: This window must be closed if Activate Licenses is selected to allow licenses to activate INSITE Title BarMenu BarTool BarView BarMinimize / Maximize / ExitSelected ConnectionCommunication StatusConnection Status10 Launching License Configuration Tool (LCT) Standalone utility to manage licenses and counts forINSITE and can be found several ways Click Manage Licenses from the menu bar in INSITE From the Windows Start Screen or Start Menu Varies by operating system For Windows 7 or 10 users, Type license into search bar of Start menu.
5 For Windows 8 users, type license while Start screen is open. Click on result License Configuration Tool to start launching. Through File Explorer 32-bit OS: C:\Program Files\Cummins Inc\License Configuration Tool 64-bit OS: C:\Program Files (x86)\Cummins Inc\License Configuration Tool11 Tool Instance Once LCT is launched, you should obtain a tool instance in the upper-right corner. Tool instances should be unique to each system. Very important to document the tool instance in the event of a system crash or sudden replacement. If a tool instance is not obtained (N/A), it is recommended to contact your or network administrator to ensure there are no issues with communication being blocked. If a tool instance is obtained, you should have communication and ability to activate licenses Licenses Click on Activate Licenses/Counts tab at left of LCT. There are 2 different methods Enter activation keys manually Activate available licenses using QSOL Log In13 Activating Licenses using Activation Keys Enter license activation keys manually, one at a time After activation key has been entered, click Activate button A window will appear showing Activating Once license is activated successfully, you will see a prompt.
6 Repeat this process as needed to activate all licenses issued. A Basic & Functional license key is required for full functionality14 Activating Licenses using QSOL Log In If you have a Quickserve (QSOL) account and the licenses have been registered to your QSOL ID, you can click on Log In button to start activation. Once logged in, any licenses available for activation, will be displayed. Any licenses already activated will not appear when logged in. Select the desired licenses, then click Activate to continue. You will then be prompted to confirm activation of selected items. Once selection is confirmed, licenses will begin to activate and prompt to review after activation is Active Licenses & Counts Once licenses are activated, you can click on View Active Licenses/Counts tab and licenses should display as shown. After licenses are initially activated, INSITE can be launched ResourcesHow to Activate Licenses and CountsHow to Repair and Revalidate your LicensesOffline License OperationsHow to Transfer Licenses and CountsFor additional information on other functions of LCT, please view the tutorial videos using the links provided Options18 How to Configure Options in INSITE In the menu bar, navigate to Tools > Options The Options dialog screen should appear19 Calibration Selection Options Calibration Selection Settings Enable/Disable Auto Detect View Network Calibration Drives Enable/Disable Automated ECM Code Search Modify network proxy settings 20 Connections Options Allows user to add and remove datalink adapters and simulators used for connections.
7 Existing connections can be renamed through Options Allows user to modify location paths for saved items such Calibration Logs Data Monitor/Logger Logs Exported images, templates and logs Imported images, templates and logs Inquire Data Extraction files Work Orders & ECM Images Templates Default settings are recommended22 General Options Start Up Display/Hide Splash Screen at launch Toolbar Set display button size Display/Hide Tool Tips Viewbar Display/Hide feature names Key Switch Timer Enable/Disable Fault Codes Set Auto Refresh rate Reset INSITE to Cummins Default Settings23 Appearance Options Allows user to customize appearance text size, font, and color background colors grid colors Appearance options are available when General category is Data Extraction Options Select options for connection settings Select operations for Inquire Data Extraction resets Modify output file to save as either.
8 Csv or .txt25 Units of Measure Options Allows user to modify units of measure to predefined or custom Manager Options Enables a system administrator to assign specific access rights to individual users and groups When enabled, a login is required to open INSITE Multiple users and groups can be created27 User Manager Groups Options Add, remove or modify group rights Create custom group rights 28 Users Options Add and remove users Modify user accounts Assign new users to group29 Work Orders Options Enable/Disable Work Order Mode Enabled is recommended Predefine Site Location & Cummins Service Provider Code Enable/Disable Cummins Inc. data collection When Work Order Mode is enabled and no compatible Work Orders exist, a New Work Order dialog will be displayed after connection to the ECM is Multi-Level Security31 ECM Passwords Most Cummins ECMs have 5 levels of password capability Master Master password allows all writes, adjustments and resets If Master password is set, but not entered No Changes to ECM allowed Adjustment Master password must also be set Only allows changing ECM adjustments Features and parameters Reset Master password must also be set Only allows ECM resets Fault Codes & Trip Information OEM & OEM 2 Master password does not need to be set Protects OEM specific parameters from adjustment Greenhouse Gas Do not use unless directed by Cummins Passwords Used to protect the ECM from users attempting to make unauthorized adjustments Different levels can be set to allow for.
9 Resets only (Reset Password) Feature Adjustments (Adjustment Password) Full functionality (Master Password) Master password must be set when using ECM security INSITE will operate in read-only mode if appropriate password is not provided during ECM Password Removal (Zap-IT) To remove ECM and OEM passwords: SelectTools> ECM Password the menu bar. TheECM Password Removalwindow will appear. This window is also called theZAP-ITwindow. Select the type of ECM Passwords to be removed. SelectZAP-IT. TheECM Password Removal Confirmationwindow will appear. SelectYesand follow the prompts to remove the ECM passwords. TheECM Password Removalwindow will display the number of counts remaining, if any. SelectCancelto close theECM Password Removalscreen. Zap-ITpasswords are entered using the Cummins License Configuration Tool (LCT) Zap-ITCounts can be obtained from local Distributors34 ECM Connections35 Adding New Connection Click on connection Select Add Dialog box for ECM Connection Wizard should appear as shown.
10 Click Next to New Connection Select appropriate connection. Auto Configure Automatically detects installed datalink adapters RP1210 Adapters Manually configure the datalink adapter connection Simulator Creates simulated ECM environment using virtual port Click Next to Configure Auto Configure will automatically detect and connect to an RP1210A compliant adapter that is installed on the PC Select Auto Configure and click the Next button Ensure that the steps listed in the Instructions have been completed Click the Start button38 Auto Configure Auto Configure will attempt to detect and connect to an RP1210A compliant adapter This can take several minutes to complete To cancel the process, click the Stop button, otherwise let it run until it completes39 Auto Configure Auto Configure process was successful Click on the Next button to continue Select the desired adapter configuration Click on the Next button to continue40RP1210 Adapters Select desired vendor Select desired adapter Ensure correct connection type is selected (such as USB, Bluetooth, Wireless, or COM port)