Transcription of INSTALLATION AND OPERATING INSTRUCTIONS TX1500b …
1 COPYRIGHT 2006 LUX PRODUCTS CORPORATION. ALL RIGHTS RESERVED The TX1500 canbe used withmost 24 volt gas, oil or electricheating and airconditioning systems, single-stageheat pumps or gasmillivolt cannot be usedwith 120 volt heatingsystems or multistageheat pumps. Ask yourdealer for other LUXthermostats to control thosesystems. The TX1500 is programmable. Thereare fourprogramming periodsper day. Each periodcan be programmed separately. Easy to use Lux Speed Dial . You can use the built-in time/temperature programs, or alter them to suit TX1500 provides separate programming for weekdays, Saturday, andSunday for both heating and cooling. You can override the programmed temperaturesfor as little as one programming period or for an entire vacation. In cool weather, when the system switch is set to HEAT, the TX1500 will maintain cooler set back room temperatures to save energy.
2 It will then change to warmer comfort settings all automatically, at specified times during the day. In warm weather,when the system switch is set to COOL, the TX1500 will maintainwarmer set back room temperatures to save energy. It will then change to cooler comfort settings - all automatically, at specified times during the day. A large liquid crystal displayshows time, day of the week, and room and set temperatures. It will remind you when the filter should be changed in your blower. Temperature swing adjustment lets you fine-tune your system for maximum comfort and economy. 5/2 Minute Selectable Minimum Run/Off Timefor Short Cycle/Compressor Protection Two Energizer or DURACELL AA alkaline batteries(not included) are used to retain yourtime and temperature program and to light the !
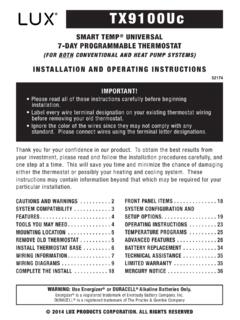
3 Thank you for your confidence in our product. To obtain the best results fromyour investment, please read these INSTRUCTIONS and acquaint yourself with yourpurchase before installing your new thermostat. Then follow the installationprocedures, one step at a time. This will save you time and minimize the chanceof damaging the thermostat and the systems it controls. These INSTRUCTIONS maycontain information beyond that required for your particular INSTALLATION . Pleasesave for future SERIESSMART TEMP ELECTRONIC THERMOSTATC omplete, Easy To Read Programming And INSTALLATION INSTRUCTIONS InsideThe Active Program PeriodLiquid Crystal DisplayFan SwitchSystemSwitchEasy to follow instructionsLux Speed Dial ThermostatBodyThe Set TemperatureThermostat CoverButton to Light DisplayHEATOFFCOOLAUTOONFANRESETHOLDNEXT RUNFILTERSETSUNDAYPROGRAMSETSATURDAYPROG RAMSETWEEKDAYPROGRAMSETDAY/TIMEDOWNUP150 0 Patents PendingMODAYHEATPMSIMPLIFIED INSTRUCTIONS Press UP/DOWN to set SET PROGRAMS Rotate Dial to SETWEEKDAYTEMPORARY TEMPERATURE OVERRIDE Press UP/DOWN to adjust set temperature.
4 To clear OVERRIDE press UP/DOWN untiloriginal set temperature appears or wait forthe start tf the next periodTO SET TIME & DAY Rotate Dial to SETDAY/TIME. Press UP to changetdHEATOFFCOOLAUTOONFANRESETHOLDNEX TRUNFILTERSETSUNDAYPROGRAMSETSATURDAYPRO GRAMSETWEEKDAYPROGRAMSETDAY/TIMEDOWNUP15 00 Patents PendingMODAYHEATPMSIMPLIFIED INSTRUCTIONS Press UP/DOWN to set SET PROGRAMS Rotate Dial to SETTEMPORARY TEMPERATURE OVERRIDE Press UP/DOWN to adjust set temperature. To clear OVERRIDE press UP/DOWN untiloriginal set temperature appears or wait forTO SET TIME & DAY Rotate Dial to SETDAY/TIME. Press UP to changeDOWNUPMODAYHEATPMC hoose Heat or CoolSet Day & TimeInstalls EasilyEasy as1 2 3 INSTALLATION AND OPERATING INSTRUCTIONSLUX PRODUCTS CORPORATION Philadelphia, PA 19112 WARNING: Use Energizer or DURACELL Alkaline Batteries OnlyEnergizer is a registered trademark of Eveready Battery Company, Inc.
5 DURACELL is a registered trademark of The Gillette Company, read all INSTRUCTIONS carefullybefore beginning REQUIRED#1 Phillips screwdriver (small)Drill with 3/16-in. ( ) bitTHERMOSTAT LOCATIONOn replacement installations, mountthe new thermostat in place of the oldone unless the conditions listed below suggest otherwise. On new installations, followthe guidelines listed Locate the thermostat on an inside wall, about 5 ft. ( ) above the floor, and in aroom that is used often. 2. Do not install it where there are unusual heating conditions, such as: in direct sunlight; near a lamp, radio, television, radiator, register, or fireplace; near hot waterpipes in a wall; near a stove on the other side of a wall. 3. Do not locate in unusual cooling conditions, such as: on a wall separating anunheated room; or in a draft from a stairwell, door, or window.
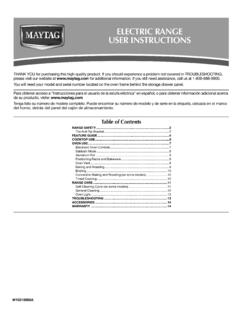
6 4. Do not locate in a damp area. This can lead to corrosion that will shorten thermostat Do not locate where air circulation is poor, such as: in a corner or an alcove; orbehind an open door. 6. Do not install the unit until all construction work and painting has been completed. 7. This thermostat does not require avoid electrical shock and to prevent damage to thefurnace, air conditioner, and thermostat, disconnect the powersupply before beginning work. Thiscan be done at the fuse box, at thecircuit breaker, or at the THE OLD THERMOSTATS witch electricity to the furnace and air conditioner OFF;then proceed with the following Note the letters printed near the terminals. Attach labels(enclosed) to each wire for identification. Remove and labelwires one at a time.
7 Make sure the wires do not fall back inside the Loosen all screws on the old thermostat and remove it from the THE TX1500 ON THE WALL3. Press up on the button on bottom of thermostatand swing the body away from the base and upto remove the body from the INSTRUCTIONS carefullybefore removing anywiring from existing thermostat. Wires must belabeled before they areremoved. When removingwires from their terminals,ignore the color of thewires since these may notcomply with the standard. YW1. Remove cover from oldthermostat. Most are snap-ontypes and simply pull off. Somehave locking screws on theside. These must be careful not to drop the body or disturb electronic parts. Leave the cover closed while the body is being removed from the Fill wall opening withnon-combustible insulation to preventdrafts from affectingthe Strip insulation3/8 in.
8 ( )from wire endsand clean offany Your thermostat is a precision instrument. Please handle it with care. Turn off electricity to the appliance before installing or servicing thermostat or anypart of the system. Do not turn electricity back on until work is completed. Do not short (jumper) across electric terminals at control on furnace or airconditioner to test the system. This will damage the thermostat and void yourwarranty. All wiring must conform to local codes and ordinances. This thermostat is designed for use with 24 volt and millivolt systems. Thethermostat should be limited to a maximum of amps; higher amperage maycause damage to the thermostat. If you are in doubt, call your utility company. ATTACHING WIRESCAUTIONDo not allow wires to touch each other or parts on thermostat.
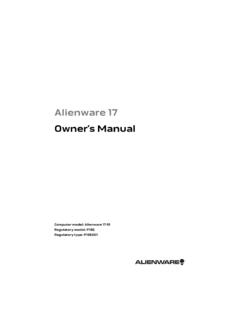
9 Wires must betrapped between black spacer and brass terminal. Also, be sure to tighten securelyall 7 electrical terminal you are mounting the baseto a soft material likeplasterboard or if you are usingthe old mounting holes, thescrews may not hold. Drill a3/16-in. ( ) hole at eachscrew location, and insert theplastic anchors provided. Thenmount the base as SystemsGYWRHBORCTape Off * * If replacing a Honeywell TM-11, tape off wire R ; connect wire B to terminal RH. ** If replacing a Honeywell thermostat with a clock wire C, tape off wire C G54 BRCVR*HWFRHTape Off **CTape OffTCFAN RELAY COOLING COMPRESSORHEATING CONTROLHEATING TRANSFORMERDAMPER OR CHANGEOVER VALVE(POWERED IN HEAT)DAMPER OR CHANGEOVER VALVE(POWERED IN COOL)COOL TRANSFORMERC ooling SystemsGYWRHBORCYVRCRCGFTCTape OffFAN RELAY COOLING COMPRESSORHEATING CONTROLHEATING TRANSFORMERDAMPER OR CHANGEOVER VALVE(POWERED IN HEAT)DAMPER OR CHANGEOVER VALVE(POWERED IN COOL)COOL TRANSFORMER* If both Y and C wire are present, tape off C wire.
10 *Heating/Cooling Systems4- or 5-Wire with One TransformerGYWRHBORCCYGFWVRRCBO(Optional )(Optional)Tape OffTCFAN RELAY COOLING COMPRESSORHEATING CONTROLHEATING TRANSFORMERDAMPER OR CHANGEOVER VALVE(POWERED IN HEAT)DAMPER OR CHANGEOVER VALVE(POWERED IN COOL)COOL TRANSFORMER* If both Y and C wire are present, tape off C wire.*FAN RELAY COOLING COMPRESSORHEATING CONTROLHEATING TRANSFORMERDAMPER OR CHANGEOVER VALVE(POWERED IN HEAT)DAMPER OR CHANGEOVER VALVE(POWERED IN COOL)COOL TRANSFORMERH eating/Cooling Systems5- or 6-Wire with Two TransformersGYWRHBORCYCGFW4 ARHBO(Optional)(Optional)VRRCTa p e O f fTC** If both Y and C wire are present, tape off C wire.* If you have a B wire in your system whichis used as a common wire, connecting it tothe B terminal on this thermostat maydamage your system and/or the DIAGRAMSGRWGYWRH BO RCLatch ButtonBaseTerminals4.