Transcription of INSTALLATION AND SERVICE MANUAL - …
1 INSTALLATION ANDSERVICE MANUALW aterBoss 4343 S. Hamilton Road, Groveport, Ohio 43125 Model 550, 700 and 900 Water SoftenersVersion 4 QUESTIONS? .. 1 GETTING MAXIMUM EFFICIENCY FROM YOUR APPLIANCE .. 2 CHECKLIST BEFORE 3DO'S AND DON TS .. 4 REFERENCE ILLUSTRATIONS .. 5 CYCLES .. 10 INSTALLATION AND START-UP PROCEDURES .. 11 SETTING THE 4 BUTTON CONTROLLER .. 13 ADVANCED SETTINGS FOR THE 4 BUTTON CONTROLLER .. 14 CARE, MAINTENANCE AND PARTS .. 16 SPECIFICATIONS/CAPACITY CHART .. 25 TROUBLESHOOTING .. 26 LIMITED WARRANTY .. 28 NOTES .. 29 Table of ContentsWhen calling the HelpLine, please have this guide and the serial number available. From 8 am to 5 pm EST, call serial number may be found on top of your valve 8 am to 5 pm EST, use the 800 HelpLine: 1-800-437-8993 The HelpLine is available to help answer questions about specific water problems, applianceinstallation and operation. When calling the HelpLine, please have this guide and the serialnumber of your appliance available.
2 Your serial number may be found on top of your valveassembly (See figures 2-3.)Date of INSTALLATION : _____Model Number: _____Serial Number: _____Returned Limited warranty Card Date: _____1 QuestionsWhen calling the HelpLine, please have this guide and the serial number available. From 8 am to 5 pm EST, call serial number may be found on top of your valve To Get The Maximum Efficiency From Your Appliance 1. Fill salt cabinet when water level is above salt NOT MIX DIFFERENT TYPES OF iron is present in your water, use a salt with an iron-cleaning additive to help keep resinclean. You may also use a resin cleaner on a monthly basis in place of salt with cleaningadditives. If iron is not present in your water, a clean pellet, solar or cube type salt is recom-mended. The use of rock salt is not recommended because it contains impurities that canplug up the injector You may use a salt substitute (such as potassium chloride) in place of water conditionersalt.
3 If you start with water conditioner salt, you can switch to a salt substitute at any time -or vice versa. If potassium chloride is used in place of nugget or pellet salt, increase yourhardness setting by 12% (multiply by ). Do not use Potassium Chloride if there is iron inyour Should your electricity be turned off for any reason you must reset the time of day if youprogrammed your appliance for delayed regeneration.* (see page 14)4. Protect your appliance from freezing, including drain By-pass the appliance when servicing the well, plumbing, or pump. When work is complet-ed, turn on the nearest cold water tap until water runs clear before putting appliance back inservice. See figures 4 - 5 - Install after the pressure calling the HelpLine, please have this guide and the serial number available. From 8 am to 5 pm EST, call serial number may be found on top of your valve Before Pressure- Not less than 20 psi constant for check hardness- of water with test strips provided to verify that your appliance is right for the 550 FOR MUNICIPALLY-SUPPLIED WATERis for water without iron and upto 25 grains of hardness per 700for up to 70 grains hardness per 900for up to 90 grains hardness per gallon.
4 (See specifications, page 30.) Supply Flow Rate- 5 gallons per minute is recommended as Drain appliance to floor drain or washer drain. To prevent back-siphoning, the installer must provide an adequate air gap or a siphon break. See figure The transformer supplied is a standard 120 volt, 60 cycle for USA or220 volt, 50 cycle for outside the USA. See figure Quality- If the water supply contains sulfur, bacteria, iron bacteria, tannins,algae, oil, acid or other unusual substances, then unless the appliance is represented asbeing capable of treating these contaminants in the specifications, other special treatment of the water supply must be used to remove these contaminants before theyenter this you have any questions call our HelpLine!When calling the HelpLine, please have this guide and the serial number available. From 8 am to 5 pm EST, call serial number may be found on top of your valve DO'S1. Do comply with all local plumbing and electrical Do install pressure-reducing valve if inlet pressure exceeds 90 Do install gravity drain on salt storage cabinet.
5 See figure Do secure drain line on appliance and at drain outlet. See figure Do allow a minimum of 8 to 10 feet of 3/4 pipe from the outlet of the water conditionerto the inlet of the water heater. See figure DON TS1. Do not install if checklist items are not Do not install if incoming or outlet piping water temperature exceeds 120 degrees Fahrenheit. Please see specification on page Do not allow soldering torch heat to be transferred to valve components or plastic INSTALLATION Tip, page Do not overtighten plastic Do not place appliance right up against a wall which would deny access toplumbing. See figure Do not install the appliance backwards. Follow arrows on figure Do not plug the transformer into an outlet that is activated by an on/off figure Do not connect the drain and the overflow (gravity drain) figure s And Don tsWhen calling the HelpLine, please have this guide and the serial number available.
6 From 8 am to 5 pm EST, call serial number may be found on top of your valve this diagram as a location and INSTALLATION guide for your Model 550,Model 700,andModel 900,water conditioners. This diagram applies to all types of installations ( basement, slab, crawl space, outside).Bypass Valves. To simplify INSTALLATION and servicing, a one-piece or a three way bypassvalve appliance is recommended when installing your appliance. A bypass appliance also pro-videsaccess to untreated water when required ( for lawn and gardening purposes.) Also, see figures 4 through : If less than 10 feet of pipe connect the water treatment appliance(s), to the water heater,then a Check Valve must be installed between the water treatment appliance and the water the Check Valve as close to the water heater as IllustrationsFigure 1 - INSTALLATION GuideWhen calling the HelpLine, please have this guide and the serial number available. From 8 am to 5 pm EST, call serial number may be found on top of your valve IllustrationsCAUTION!
7 The drain line must not bekinked, crimped or restricted in any drain line should be a minimum 1/2" insidediameter and cannot be reduced in 2 PLUMBING CONNECTIONSF igure 3 CONNECTING DRAIN LINEINSTALLATION TIPWhen preparing the male threaded fittings of the I/O adapter, follow the guidelines to avoiddamage to the plastic pipe best results, use 1/2 wide Teflon tape and wrap the threads three times with eachconsecutive wrap on top of the previous wrap. To prevent tearing of the the tape, use Teflon paste on the first two threads only. This lubricates the tape and fills the small void areas thatmay exist between the threads. When the joint is complete, there will be a small bead ofsealant at the fitting interface indicating a properly joined preparing copper fittings, it is always advisable to use a union where there is athreaded connection to facilitate repairing a potential leak in one of your soldered prevent heat damage to the plastic pipe threads of the adapter, prepare the copper tailassemblies ahead of time so they can cool down before final assembly.
8 The copper tubelength should be a minimum of 3-1/2 long. To prevent cross threading, turn the fitting coun-terclockwise until you feel the threads engage, then tighten. Do not overtighten the NOTE:To avoid damage, do not allow heat from the torch to be transferred to theplastic valve Tape7 Reference IllustrationsFigure 4 - Bypass ValveFigure 5 - In Bypass Position<push/pull> for SERVICE or Bypass Valve Part #93884 may beavailable through your local hardware store,plumber or call our HelpLine 1-800-437-8993 From 8 am to 5 pm 6 - In SERVICE PositionFigure 88 Reference IllustrationsPLUGGING IN TRANSFORMERDo not plug transformer into an outletthat is controlled by on/off 7 OVERFLOW CONNECTION(1/2 )When calling the HelpLine, please have this guide and the serial number available. From 8 am to 5 pm EST, call serial number may be found on top of your valve IllustrationsFigure 10 ADDING SALT TO THE BRINE CABINET2 GALLONSF igure 910 CyclesWater by-passes your appliance during regeneration to allow iron, sediment, hardness, be washed down the drain.
9 After regeneration, the appliance returns to SERVICE , providing your home with treated cycles:1. First up-flow backwash. A rapid up-flow of water flushes out the resin bed and cleans thesediment Brine. Brine is drawn out of the brine cabinet and up through the media tank, cleaning theresin bed and releasing accumulated hardness and Slow rinse. A slow up-flow rinse process then flushes out the brine, hardness and Second up-flow backwash. This up-flow backwash flushes out any remaining brine solutionand sediment from cycle Downflow soft water brine refill. Soft water is directed to the brine cabinet to prepare thebrine for the next regeneration Return to SERVICE . Regeneration is complete and the appliance is returned to normal calling the HelpLine, please have this guide and the serial number available. From 8 am to 5 pm EST, call serial number may be found on top of your valve And Start-Up ProceduresEach water conditioning appliance includes water test strips and 8' of drain :Be sure the controller is firmly locked onto the drive end cap assembly.
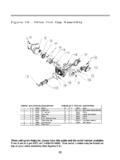
10 The four tabson top of the drive end cap will allow the clips on the bottom of the controller case to lock onto theend cap tabs. (See detail diagram on page 16. Fig. 11.) 1. Placement: Place your appliance in desired location. Turn off electricity and water supply towater heater. Make sure inlet/outlet and drain connections meet the applicable local codes. Checkarrows on valve to be sure water flows in proper figures 1, 2, & : DO NOT PLUMB APPLIANCE IN page 62. Drain Line: must be a minimum of 1/2"-5/8 tubing and should make the shortest run to asuitable drain. The drain line may be elevated up to 8 feet from the discharge on the appliance aslong as the water pressure in your appliance is 40 psi or more. If drain line is 25' or longer, increasedrain line to 5/8" Also, the end of the drain line must be equal in height or lower than the controlvalve. See figure Flushing: Before placing your appliance in SERVICE , it is very important to flush the cold waterlines of any debris.
