Transcription of Installation Dryers Instructions 05
1 BEFORE YOU BEGINRead these Instructions completely and carefully. IMPORTANT Save these Instructions for local electrical inspector s use. IMPORTANT Observe all governing codes and ordinances. Install the clothes dryer according to the manufacturer s Instructions and local codes. Note to Installer Be sure to leave these Instructions with the Consumer. Note to Consumer Keep these Instructions for future reference. Clothes dryer Installation must be performed by a qualified installer. This dryer must be exhausted to the outdoors. Before the old dryer is removed from service or discarded, remove the dryer door. Service information and the wiring diagram are located in the control console. Do not allow children on or in the appliance.
2 Close supervision of children is necessary when the appliance is used near children. proper Installation is the responsibility of the installer. Product failure due to improper Installation is not covered under the Warranty. Install the dryer where the temperature is above 50 F for satisfactory operation of the dryer control system. Remove and discard existing plastic or metal foil duct and replace with UL-listed Call ( ) or visit our Web site at: Fire HazardWARNING Clothes dryer Installation must be performed by a qualified installer. Install the clothes dryer according to these Instructions and local codes. DO NOT install a clothes dryer with flexible plastic venting materials. If flexible metal (semi-rigid or foil-type) duct is installed, it must be UL-listed and installed in accordance with the Instructions found in Connecting the Dryer to House Vent later in this manual.
3 Flexible vent materials are known to collapse, be easily crushed and trap lint. These conditions will obstruct dryer airflow and increase the risk of fire. DO NOT install or store this appliance in any location where it could be exposed to water or weather. To reduce the risk of severe injury or death, follow all Installation Instructions . Save these Instructions . (Installers: Be sure to leave these Instructions with the customer.) Installation Dryers Instructions 05 This is the safety alert symbol. This symbol alerts you to potential hazards that can kill you or hurt you and others. All safety messages will follow the safety alert symbol and the word DANGER , WARNING , or CAUTION.
4 These words are defined as: Indicates a hazardous situation which, if not avoided, will result in death or serious injury. Indicates a hazardous situation which, if not avoided, could result in death or serious injury. Indicates a hazardous situation which, if not avoided, could result in minor or moderate 10-15 GEPrinted in Mexico234D2318P005 Installation InstructionsTilt the dryer sideways and remove the foam shipping pads by pulling at the sides and breaking them away from the dryer legs. Be sure to remove all of the foam pieces around the literature and bag containing YOUR DRYERSTEAM WATER HOSES:GE strongly recommends the use of factory specified parts. These hoses are manufactured and tested to meet GE strongly recommends the use of new water supply hoses.
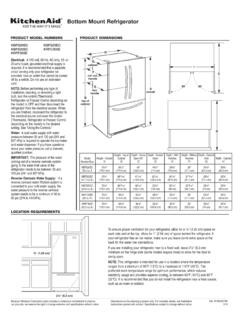
5 Hoses degrade over time and need to be replaced every 5 years to reduce the risk of hose failures and water damage. Parts and AccessoriesOrder on-line at , 24 hours a day or by phone at during normal business hours. Part Number AccessoryWE25X20060 Complete Kit (hoses, Y-adapter washers) (included) ORWE1M847 Long Hose andWE01X22395 Short HosePM14X10056 Dryer door opening vent brush (not included)WX14X10007 LintEater Dryer rotary tube brush (not included)2 ROUGH-IN DIMENSIONSS tate of California Proposition 65 Warnings:The California Safe Drinking Water and Toxic Enforcement Act requires the governor of California to publish a list of substances known to the state to cause cancer, birth defects or other reproductive harm and requires businesses to warn of potential exposure to such substances.
6 WARNINGThis product contains one or more chemicals known to the State of California to cause cancer, birth defects or other reproductive harm. Gas appliances can cause low-level exposure to some of these substances, including benzene, carbon monoxide, formaldehyde and soot, caused primarily by the incomplete combustion of natural gas or LP fuels. Exposure to these substances can be minimized by properly venting the dryer to the 5/8 ( cm)YX27 ( cm)X4 1/4 ( cm)Side ViewFront ViewCubic 3/8 (110 cm)26 3/4 (68 cm) 3/8 (110 cm)29 1/2 (75 cm) 3/4 (111 cm)30 1/2 (78 cm) Installation InstructionsREQUIREMENTS FOR ALCOVE OR CLOSET INSTALLATIONMOBILE OR MANUFACTURED HOME INSTALLATION3- Explosion HazardWARNINGKeep flammable materials and vapors, such as gasoline, away from dryer at least 18 (46 cm) above the floor for a garage to do so can result in death, explosion, or fire.
7 If the dryer is approved for Installation in an alcove or closet, it will be stated on a label on the dryer back. The dryer MUST be vented to the outdoors. See the EXHAUSTING THE DRYER section. Minimum clearance between dryer cabinet and adjacent walls or other surfaces is: 0 either side 3 front 0 rear but a 1 minimum is recommended Minimum vertical space from dryer to overhead shelves, cabinets, ceilings, etc., is 1 on top. Consideration must be given to provide adequate clearance for Installation and service. Closet doors must be louvered or otherwise ventilated and have at least 60 square inches of open area. If the closet contains both a washer and a dryer, doors must contain a minimum of 120 square inches of open : WHEN THE EXHAUST DUCT IS LOCATED IN THE REAR OF THE DRYER, THE CONFIGURATION OF THE DUCTING MAY REQUIRE GREATER THAN 0 OF REAR CLEARANCE.
8 A 1 MINIMUM IS RECOMMENDED. Gas Dryers Only: No other fuel burning appliance shall be installed in the same closet as a gas dryer. The dryer must be disconnected from the gas supply piping during pressure testing at pressures greater than psi ( kPa). A 1/8 inch NPT minimum plugged tapping, accessible for test gauge connection, must be installed immediately upstream of the gas supply connection to the CORDS:GE strongly recommends the use of factory specified parts. Select the power cord to fit your Installation on-line at , 24 hours a day or by phone at during normal business NumberTypeLengthAmperageWX9X23-Prong4 Feet30WX9X33-Prong5 Feet30WX9X43-Prong6 Feet30WX9X184-Prong4 Feet30WX9X194-Prong5 Feet30WX9X204-Prong6 Feet30 MINIMUM CLEARANCE OTHER THAN ALCOVE OR CLOSET Installation Installation must conform to the MANUFACTURED HOME CONSTRUCTION AND SAFETY STANDARD, TITLE 24, PART 32 80 or Standard CAN/CSA-Z240 MH, or, when such standard is not applicable, with AMERICAN NATIONAL STANDARD FOR MOBILE HOME, ANSI/NFPA NO.
9 501B. The dryer MUST be vented to the outdoors. The exhaust vent must be securely fastened to a non-combustible portion of the mobile home. The vent MUST NOT be terminated beneath a mobile or manufactured home. The vent duct material MUST BE METAL. KIT 14-D346-33 MUST be used to attach the dryer securely to the structure. The vent MUST NOT be connected to any other duct, vent or chimney. Do not use sheet metal screws or other fastening devices which extend into the interior of the exhaust vent. Provide an opening with a free area of at least 25 square inches for introduction of outside air into the dryer room. See the sections for electrical connection information. Minimum clearance to combustible surfaces and for air opening are: 0 both sides; 1 front; 0 rear but a 1 minimum is recommended.
10 Consideration must be given to provide adequate clearance for Installation and produce steam, the dryer must connect to the cold water supply. Since the washer must also connect to the cold water, a Y connector is inserted to allow both inlet hoses to make that connection at the same : Use the new inlet hoses provided; never use old Turn the cold water faucet off. Remove the washer inlet hose from the washer fill valve connector (cold).2. Ensure the rubber flat washer is in place and attach one female coupling of the short hose onto the washer fill valve connector. Tighten by hand until firmly Attach one male end of the Y connector to the other female coupling of the short hose.