Transcription of Installation Instructions - Alliance Laundry Systems
1 Installation Instructionsfor Frontload WashersOriginal InstructionsKeep These Instructions for Future Reference.(If this machine changes ownership, this manual must accompany machine.) No. 804650 ENR2 June 2016 Table of ContentsWasher You of Installation Unit Near Installation Shipping Fill Supply Drain Hose to Drain Tub and Level the Out Inside of Wash In the Copyright 2016, Alliance Laundry Systems LLCAll rights reserved. No part of the contents of this book may be reproduced or transmitted in any form or by any means without the expressedwritten consent of the publisher. Copyright, Alliance Laundry Systems LLC - DO NOT COPY or TRANSMIT 3 Part No.
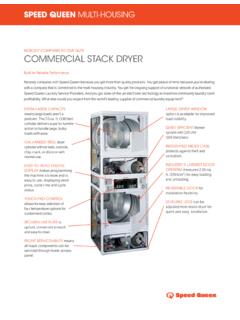
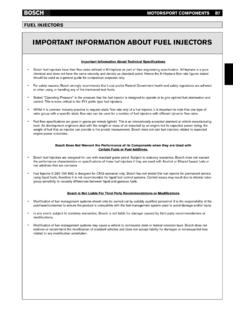
2 804650 ENR2 Washer DimensionsFLW2331N_SVGJIHGFEDCBAF igure in. [611 mm] in. [1027 mm]C32 in. [813 mm] in. [1006 mm]E * in. [371 mm] in. [683 mm] in. [52 mm] in. [704 mm]I (with door closed) in. [40 mm] in. [333 mm]* For ADA compliance turn legs out from base Dimensions Copyright, Alliance Laundry Systems LLC - DO NOT COPY or TRANSMIT 4 Part No. 804650 ENR2 Installation Before You Start ToolsFor most installations, the basic tools you will need are:9/16"FLW2376N_SVG567843211. Safety Glasses2. Wood Block3. Wrench4. Screwdriver5. Pliers6. Socket Wrench7. Gloves8. LevelFigure 2 NOTE: If the washer is delivered on a cold day (belowfreezing), or is stored in an unheated room or area dur-ing the cold months, do not attempt to operate it untilthe washer has had a chance to warm : Install dryer before washer.
3 This allows room forattaching exhaust : Some moisture in the wash drum is normal. Wa-ter is used during testing at the : This appliance is suitable for use in countrieshaving a warm, damp climate. Parts IncludedAn accessories bag has been shipped inside your washer. It in-cludes: Two fill hoses with washers and filter screens Four rubber feet Beaded strap Installation Instructions User s Guide Warranty Bond Order of Installation StepsThe proper order of steps must be followed to ensure correct in-stallation. Refer to the list below when installing your Position washer near the Installation Remove the shipping Connect the fill Connect the drain hose to the drain Position and level the Wipe out inside of the Supply injection models only: Connect external supplies Plug in the Check Installation .
4 Position Unit Near Installation AreaMove unit so that it is within 4 feet [ meters] of the desiredarea of : For best performance and to minimize vibrationor movement, install washer on a solid, sturdy and lev-el floor. Some floors may need to be reinforced, espe-cially on a second floor or over a basement. Do not in-stall the washer on carpeting, soft tile or other weaklysupported structures. Remove Shipping Materials1. Remove two screws at bottom of front access panel. Rotatebottom of panel out and remove Copyright, Alliance Laundry Systems LLC - DO NOT COPY or TRANSMIT 5 Part No. 804650 ENR2 FLW2378N_SVGF igure 32.
5 Remove two 9/16 inch bolts and washers holding shippingbrace to Remove two 9/16 inch bolts and washers holding shippingbrace to washer base and remove 44. Go to rear of washer and pull label from rear shipping Remove two 9/16 inch bolts. Unscrew each bolt while apply-ing forward pressure just until bolt stops unthreading. Workeach bolt and spacer out by hand using a circular : Avoid backing bolts out completely orspacers might fall into 56. Insert two plugs included in accessories bag into rear shippingbolt 67. Replace front access Save all shipping materials. They must be reinstalled any timewasher is moved more than four : Do not lift or transport unit from frontor without shipping materials installed.
6 Refer to theUser s Guide for proper Instructions on reinstallingthe shipping materials. Connect Fill HosesWARNINGU nder certain conditions, hydrogen gas may be pro-duced in a hot water system that has not been usedfor two weeks or more. HYDROGEN GAS IS EXPLO-SIVE. If the hot water system has not been used forsuch a period and before using the washer, turn onall hot water faucets and let the water flow from eachfor several minutes. This will release any accumulat-ed hydrogen gas. The gas is flammable. Do notsmoke or use an open flame during this Copyright, Alliance Laundry Systems LLC - DO NOT COPY or TRANSMIT 6 Part No.
7 804650 ENR2 Water Supply RequirementsWater supply faucets must fit standard 3/4 inch [19 mm] femalegarden hose couplings. DO NOT USE SLIP-ON OR CLAMP-ON : Water supply faucets should be readily accessi-ble to permit turning them off when washer is not cold water temperature is 50 to 75 Fahrenheit[10 to 24 Celsius]. Recommended maximum hot water temper-ature is 125 Fahrenheit [51 Celsius]. Warm water is a mixtureof hot and cold water. Warm water temperature is dependent uponthe water temperature and the pressure of both the hot and coldwater supply prevent personal injury, avoid contact with inletwater temperatures higher than 125 Fahrenheit [51 Celsius] and hot flow rate for all water temperatures is gallons perminute [ liters per minute] 15%.
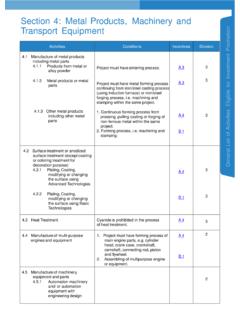
8 Water pressure must be a minimum of 20 to a maximum of 120pounds per square inch [minimum of 138 to a maximum of 827kPa] static pressure measured at the : Water pressure under 20 pounds per squareinch [138 kPa] will cause an extended fill time in thewasher and may not properly flush out the on the water supply faucets and flush the lines for approxi-mately two minutes to remove any foreign materials that couldclog the screens in the water mixing valve. This is especially im-portant when installing your washer in a newly constructed orrenovated building. Build-up may have occurred during construc-tion. Connecting Hoses1. Remove the two plain rubber washers and two filter screensfrom the accessories Install them into each end of the fill hoses as shown in Figure7.
9 The screen must be facing Screw hose couplings with the filter screens onto the waterfaucets until they are finger-tight. Use the red color-codedhose for the hot water connection and the blue color-codedhose for the cold water Then, using a pliers, screw approximately 1/4 Screw hose couplings from other end of hoses onto the watermixing valve until they are finger-tight. Make sure the redcolor-coded hose from the hot water faucet goes to the watermixing valve marked H and the blue color-coded hose fromthe cold faucet goes to the valve marked C . Refer to Figure Figure 7 .6. Then, using a pliers, screw approximately 1/4 : DO NOT cross thread or overtightencouplings.
10 This will cause them to Turn water on and check for If leaks are found, turn off the water, unscrew hoses and rein-stall them until there are no : Turn off water supply whenever therewill be an extended period of Filter Screen (Screen must be facing outward)2. Fill Hose3. Rubber Washer (Plain)4. Cold Water Connection5. Hot Water Connection6. Install this end of hose to valve connections at rear Install this end of hose to water supply FaucetFigure 7 IMPORTANT:Hoses and other natural rubber parts deteriorate afterextended use. Hoses may develop cracks, blisters ormaterial wear from the temperature and constant highpressure they are subjected hoses should be checked on a monthly basis forany visible signs of deterioration.