Transcription of INSTALLATION INSTRUCTIONS - Flooring from Carpet to ...
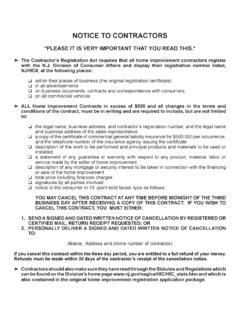
1 INSTALLATION INSTRUCTIONSS imple, easy-to-follow INSTRUCTIONS for the handy to fininsh, everything you need to know to install your SMARTCORE floor like a AT LOWE S MORE SMARTCORE QUESTIONS? Call 1-800-355-7429 and select option 2 twice (Se habla espa ol)Follow these simple steps for an easy DIY INSTALLATION with quick, professional 101 Gather your toolsTape Measure " SpacersPencilTa p p in g B l o ckRubber MalletPull BarUtility KnifeT-SquareMake sure your space is: clean, flat, dry and structurally your starting wallMeasure your spaceAn easy way to distinguish the tongue from the groove is that the tongue comes off the top of the plank. groovetonguePlace tongue side in the starting corner (work from left to right).Use several spacers to maintain 1/4" expansion gap along the AT LOWE S LEARN MORE AT steps to finish the roomEnjoy your new floor!
2 Use your spacers to maintain expansion gap along the long end into the groove end of the plank in the previous row at a low angle and drop into place. Slide the plank toward the previously installed plank on the left until both short ends touch. You should feel the planks lock the short ends together to complete your first row. Cut the planks as needed to fit the your second row. With a cut-off that is more than 8" long or start with a new : Use the cut-off end from the previous row to begin the next row. If the cut-off end is less than 8", cut a new plank to be 8" or more to start the next row. Tiles: Always begin a row with either a full tile or a half tile so the joints are consistently staggered in a brick work type to stagger end joints from row to row 8+" for planks and 12+" for Info rmationRESILIENT INSTALLATI ON G UIDELINES F OR SPC PRODUCTSI.
3 GENERAL INFORMATIONAll INSTRUCTIONS and recommendations should be followed for a satisfactory of material prior to INSTALLATION is not required however the floor covering should be installed in a climate controlledenvironment with a temperature between 55 - 85 F (13 -29 C) or average temp. of 70 degrees ( ).Post INSTALLATION temperature range is between -25 and 155 degrees F ( - C).Avoid exposure to direct sunlight for prolonged periods, doing so may result in discoloration. During peak sunlight hours, the useof the drapes or blinds is recommended. Excess temperature due to direct sunlight can result in thermal expansion and UVfading. Install product after all other trades have completed work that could damage the cabinets are to be installed on top of the Flooring (including islands), that area of material must be fully adhered to thesubfloor (including an additional 2 ft beyond the cabinets and islands).
4 To minimize shade variation, mix and install planks from several all planks for damage before installing. If you have any concerns about the product fit or finish, call Shaw InformationServices at 1-800-441-7429. Claims will not be accepted for Flooring that has been cut to size and/or cementitious patching and leveling compounds that meet or exceed maximum moisture level and pH requirements. Use ofgypsum-based patching and/or leveling compounds which contain Portland or high alumina cement and meet or exceed thecompressive strength of 3,000 psi are Methods: Floating (on, above or below grade) / Glue Down (on, above or below grade)For INSTALLATION in areas larger than 50 x 50 , 2500 sq. ft. provide a minimum expansion space of 1/2 ( mm) around Flooring is waterproof and reliably secures the Flooring panels on all four sides.
5 However, excessive moisture in the subfloorcould promote mold, mildew, and other moisture related issues like the trapping of moisture emissions under the Flooring , whichmay contribute to an unhealthy indoor layer of 6 mil poly film or equal vapor retarder with a perm rating of 1 or less may be used as an additional layer second underlayment is allowed under any currently sold WPC/SPC Product with attached underlayment in a residentialapplication. If installed over a second underlayment, this underlayment cannot be greater than 3 mm thick. IIC (ASTM E492-09) and STC (ASTM E90-09) lab testing on certain WPC/SPC products tested with and without a second layer of underlayment,to date, does not indicate that a second underlayment will provide additional acoustic SUBFLOOR INFORMATIONAll subfloors must be clean, flat, dry and structurally sound.
6 The correct preparation of the subfloor is a major part of a successfulinstallation. Subfloor must be flat 3/16" in 10' or 1/8" in 6'.A. WOOD SUBFLOORSDo not install material over wood subfloors that lay directly on concrete or over dimensional lumber or plywood used over to ASTM F1482 for panel underlayment Do not apply sheet plastic over wood Basements and crawl spaces must be dry. Use of a 6 mil black polyethylene is required to cover 100% of the crawl spaceearth. Crawl space clearance from ground to underside of joist is to be no less than 18 and perimeter vent spacing should beequal to of the total square footage of the crawl space area to provide cross ventilation. Where necessary, localregulations All other subfloors - Plywood, OSB, particleboard, chipboard, wafer board, etc. must be structurally sound and must be installedfollowing their manufacturer s recommendations.
7 Local building codes may only establish minimum requirements of the flooringsystem and may not provide adequate rigidity and support for proper INSTALLATION and performance. If needed add an additionallayer of APA rated underlayment, fasten and secure according to the underlayment manufacturer s Resilient Flooring is not recommended directly over fire-retardant treated plywood or preservative treated plywood. An additionallayer of APA rated 1/4" thick underlayment should be installed. 1 For reference purposes only if printed or Info rmationB. CONCRETE SUBFLOORSNEW AND EXISTING CONCRETE SUBFLOORS SHOULD MEET THE GUIDELINES OF THE LATEST EDITION OF ACI 302 AND ASTM F 710, STANDARD PRACTICE FOR PREPARING CONCRETE FLOORS TO RECEIVE RESILIENT Flooring AVAILABLE FROM THE AMERICAN SOCIETY FOR TESTING AND MATERIALS, 100 BARR HARBOR DRIVE, WESTCONSHOHOCKEN, PA 19428; 610-832-9585; Floors shall be smooth, permanently dry, clean, and free all foreign material such as dust, wax, solvents, paint, grease, oils, andold adhesive residue.
8 The surface must be hard and dense, and free from powder or New concrete slabs must be dry. Maximum moisture level per CaCl test method is 8 lbs. per 1000 in 24 hr. Maximum level forASTM 2170 In-situ Relative humidity test method - 90%.3. Do not install over concrete with a history of high moisture or hydrostatic conditions. Excessive moisture in the subfloor couldpromote mold, mildew, and other moisture related issues like the trapping of moisture emissions under the Flooring , which maycontribute to an unhealthy indoor environment. Shaw Industries does not warrant nor is responsible for damage to floor coveringdue to moisture related pH level of concrete should be between The final responsibility for determining if the concrete is dry enough for INSTALLATION of the Flooring lies with the floor : IT MAY NOT BE THE FLOOR COVERING INSTALLER'S RESPONSIBILITY TO CONDUCT THESE TESTS.
9 IT IS,HOWEVER, THE FLOOR COVERING INSTALLER'S RESPONSIBILITY TO MAKE SURE THESE TESTS HAVE BEENCONDUCTED, AND THAT THE RESULTS ARE ACCEPTABLE PRIOR TO INSTALLING THE FLOOR COVERING. WHENMOISTURE TESTS ARE CONDUCTED, IT INDICATES THE CONDITIONS ONLY AT THE TIME OF THE CONCRETEAll recommendations and guarantees as to the suitability and performance of lightweight concrete under resilient Flooring are theresponsibility of the lightweight concrete manufacturer. The installer of the lightweight product may be required to be authorized orcertified by the manufacturer. Correct on-site mixing ratios and properly functioning pumping equipment are critical. To ensure propermixture, slump testing is aggregate concretes having dry densities greater than 90 lbs. per cubic foot may be acceptable under slabs with heavy static and/or dynamic loads should be designed with higher strengths and densities to support must be permanently dry, clean, smooth, free of all dust, and structurally Bond testing to determine compatibility of adhesive to the substrate.
10 Shaw 9050 primer can be utilized to internal relative humidity tests should be conducted for areas up to 1000 SF. One additional test, for each additional Heat: Hydronic only - Radiant heat components must have a minimum of 1/2" separation from the product. This is the onlytype of radiant heat system that is approved. Radiant heat system must be on and operational for at least 2 weeks prior to installationto reduce residual moisture within the concrete. Three days prior to INSTALLATION lower the temperature to 65 degrees, after installationgradually increase the temperature in increments of 5 F to avoid overheating. Maximum operating temperature should never exceed85 F. Use of an in-floor temperature sensor is recommended to avoid EXI STING FLOOR COVERINGSF looring can be installed over most existing hard-surface floor coverings, provided that the existing floor surface is fully adhered, clean,flat dry structurally sound and free of sheet vinyl floors should not be heavily cushioned and not exceed more than one layer in thickness.