Transcription of INSTALLATION INSTRUCTIONS FOR ELECTRONIC …
1 INSTALLATION INSTRUCTIONS FOR ELECTRONIC dual FIRE IGNITIONPART NO. 53-49 INSTALLATION INSTRUCTIONS for street application using 1970 & later coils with 5 ohms of primary resistance. If installing in a race application, you may use 3 ohm coils. dual plug heads for race or street can use two ohm coils wired in series for a total of 3 ohms resistance. Don t use the OEM ELECTRONIC coil for street applications with this Remove old Lubricate the new advance assembly shaft lightly with oil. Put the magnetic rotor over the shaft and push it to connect with the advance assembly weights. Make sure that the rotor rotates easily and the weights cycle back & Check to make sure the pin on the assembly seats in the slot for it on the engine. Install & tighten the bolt. Don t over-tighten, the rotor must rotate Use the standoffs to install the ignition with the plate aligned so the large power module is at either 12 o clock or 3 o clock.
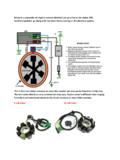
2 (this will depend on the model).5. Avoiding the exhaust pipes, put the ignition assembly cable out through the engine case hole over to the coils. Attach the connection ends to the Again avoiding the exhaust pipes, put the ignition assembly s Blue wire (12V power) out through the engine case hole over to the To complete the wiring, the White wire attaches to the other (trigger) end of the coil. Ensure all the connections are firmly attached. IMPORTANT NOTE: Be absolutely certain that the Blue wire and the White wire are in the correct location! If somehow these two are reversed in location, the new ignition will be destroyed instantly upon powering up. Blue wire is 12V power & the White wire is your coil ADJUSTMENT FOR dual PLUG SET UP1. Consult the OE shop manual for the engine s timing mark and use the flywheel s timing advance indicators.
3 Clockwise rotation of the ignition plate will advance the timing and the reverse will retard the TIMING ADJUSTMENT1. Take out the crank case timing hole plug and substitute a see-thru acrylic timing plug such as our part No. 91-104 which fits all years H-D , including late models. connect strobe timing light to the spark plug of the front While maintaining 2000 rpm on the running engine, aim timing light into the inspection hole. Confirm where the front cylinder timing is set at and rotate ignition plate to to center the front cylinder timing mark in the view hole. Clockwise rotation of the ignition plate will advance the timing and the reverse will retard the Once the mark for the front cylinder is set at center, you can tighten up the ignition plate s standoffs, change out the acryl-ic plug for the case hole plug and reattach the TIMING ADJUSTMENT1.
4 After attaching a 12V test light to the White Trigger wire and grounding it to the engine case, manually rotate the engine until the front cylinder is on the compression stroke. Take out the crank case timing hole Turn on the ignition and hold the ignition rotor counterclockwise into advanced position with the weights against the stops. Then slowly rotate the engine forward until the test light brightens. Check in the timing hole to see that the front cylinder s advance mark is centered. If it is, go on to Number 4 If the front cylinder s advance mark isn t centered in the timing hole, turn off the ignition . Loosen the ignition plate s standoffs and rotate the ignition plate clockwise to advance or counterclockwise to retard the timing. Once you get it to the correct position you should retighten the ignition plate standoffs then perform number Two above again.
5 Repeat Number Two and Number Three until you achieve the proper Once you achieve proper timing, you can replace the crankcase timing hole plug and the side 238 BIGNITION SYSTEM TESTING FOR PART NO. 53-49 VISUAL INSPECTION Check to see that the rotor isn t rubbing on the power modules on the ignition plate. Fully advance the rotor and it should snap back to the original position. Do the two above inspections once when the motor is cold and then later when the engine is hot. After marking the timing on the case and the ignition plate, remove the ignition and make sure that the advance isn t contacting the ignition plate. Check the cable for damage caused by pinching or heat. Make sure areas of splicing & crimping are firmly attached. See if the connections for the coil are clean & tight. You can install split lock washers on the coil screws. Take off the spark plug wires and look for corrosion and cracked or chipped insulation.
6 Using an ohmmeter, connect both ends of the wire and tweak and twist to check if the wiring is broken. Pull out the spark plugs and check for fouling. Clean them & reinstall unless too dirty, then just replace them with new THE VOLTAGE There should be a minimum of 3 ohms primary resistance of the engine coils - don t forget to take the resistance of the meter leads into consideration. If the ohmmeter shows shorting or open primary, you must replace the coils. After pre-forming this test, you can manually rotate the engine until the rotor s magnet is directed away from the power modules. Turn the ignition on and then measure the voltage between the ground and the coil (+) terminal. If you get a reading that is approximately one volt less than the battery voltage this is to be expected because the wiring has its own resistance. If the voltage is noticeably lower, you can try to find voltage drops which may occur at any splicing, connectors, circuit breakers, switches or other devices in the wiring that interrupt the power to the coils.
7 IMPORTANT NOTE: Don t keep the ignition on longer than 4-5 minutes while doing this test because the coils can overheat and be damaged. Using the ohmmeter, find out the voltage between each coil (-) terminal and ground. Expect it to be to volts when the magnet is directed away from the power modules. Manually rotate the engine so the magnet points at the sensor located behind the raised line on the front of the module. The voltage should rise to approximately the battery voltage, indication that the power module is switching and probably working correctly. If the voltage is still low, the gap between the sensor and rotor may be too large. If the gap between the sensor and rotor is greater than , it can be the reason the module doesn t switch. The proper gap between these two components is between and . If the output has a short, this will also keep the voltage low.
8 If the voltage is consistently high, make sure the mounting plate is firmly grounded and that the power modules are receiving power. If this checks out, it could mean that the module is not WITH OHMMETER Disconnect the unit wires from the coils then connect the negative ohmmeter lead to the mounting plate and positive lead to one of the coil (-) wires. this should give an open reading (infinite ohms) on all ranges. Any other reading than this indicated you have a damaged output. If the ohmmeter has a diode test, reverse the leads and a diode drop of t0 will be the NOTE: Many inexpensive ohmmeters reverse the polarity of the leads inside the meter. This causes a false bad reading due to the resistance of the reverse diode as described. Don t attempt to meter the ohms between any other points, or with power applied to the module because these readings may not be reliable due to differences in the meter or component THE COILS Remove all wiring from the coils and measure the primary resistance between the screw terminals.
9 Next, measure the secondary resistance between the high voltage outputs. If you are using single output coils, you can measure the resis-tance between the high voltage output and either of the screw ON OHMMETERS If possible, use a good quality ohmmeter that has a low ohms range to measure the primary resistance accurately. Depending on the quality of the ohmmeter and the leads resistance, the readings will vary somewhat. If the coil is dam-aged, it will usually show up with open or shorted leads on the primary or YOUR COIL MANUFACTURER FOR RESISTANCE SPECIFICATIONS