Transcription of INSTALLATION INSTRUCTIONS for Wood Pocket …
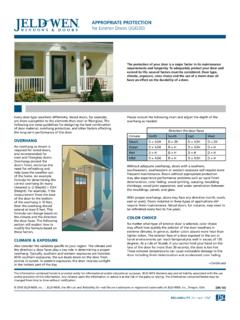
1 INSTALLATION INSTRUCTIONSfor Wood Pocket Door Frames (JII102)Note to Installer: Provide a copy of these INSTRUCTIONS to the building owner. By installing this product, you acknowledge the terms and conditions of the limited warranty as part of the terms of the you for selecting JELD-WEN products. Attached are JELD-WEN s recommended INSTALLATION INSTRUCTIONS for Wood Pocket Door Frames. Read these INSTRUCTIONS thoroughly before beginning. They are designed to work in most existing applications, however; existing conditions may require changes to these INSTRUCTIONS . If changes are needed, they are made at the installer s risk. For installations other than indicated in these INSTRUCTIONS , contact a building Install Time for New Construction First Time: 3 hrs Experienced: 2 hrs Professional: 1 hr 1 2 3 4 5 6 7 8 9 10 11 12 SaFety & haNDlINgSAFETYRead and fully understand all manufacturers INSTRUCTIONS before not work alone. two or more people are required.
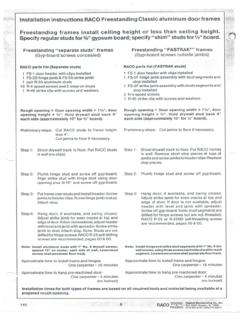
2 Use safe lifting protective gear ( safety glasses, gloves, ear protection, etc.). Operate hand/power tools safely and follow manufacturer s operating cautious of plumbing and electrical lines when cutting into walls. MATERIALS & HANDLINGI nspect product for cosmetic damage and verify correct size. heed material manufacturers handling and application INSTRUCTIONS . handle in vertical position; do not carry flat or drag on floor. Do not put stress on joints, corners or frames. Store in dry, well-ventilated area in vertical, leaning position to allow air circulation; do not stack from exposure to direct sunlight during storage. IF INJURY OCCURS, IMMEDIATELY SEEK MEDICAL ATTENTION!INCLUDED PARTSINclUDeD PaRtS & NeeDeD tOOlSa - Face jambB - top trackc - Pre-assembled Pocket frameD - Wheel hangere - adjusting boltF - lock nutg - hanger bracketh - (4) 1 1/2" pan head screwsI - Nylon guideJ - adjusting wrenchNEEDED TOOLS tape measure Utility knife level (4' minimum recommended)hammer Screw gun 3 pound maul NEEDED MATERIALS#10 x 2" screws Finishing supplies aBDceFgIhJINSTALLATION INSTRUCTIONS for Wood Pocket Door Frames (JII102)21.
3 Remove the old door frame from the wall. cut back the drywall to match the new Remove the floor plate and non load-bearing wall frame the new rough opening with a new header and jambs as Finish the top track and face jamb as desired. attach the top track to the pre-assembled Pocket frame . the vertical split jamb aligns with top track. attach with Set Pocket frame and face jamb into the rough opening. Shim 4" from the corners and at 24" maximum intervals until square, level, and Drive a #10 x 2" screw through the Pocket frame and each shim. Remove the shipping attach the nylon guide to the split jamb with Install the hanger brackets on top of the door centered at 2 1/2" from each Slide the rollers into the top hang the door in the track. lift and slide the hanger bracket onto the adjusting bolt head. to align door, turn the adjusting bolt head with a wrench. When finished adjusting, tighten lock nut down onto visit for warranty, finishing INSTRUCTIONS and care and maintenance you for choosing 2009 JelD-WeN, inc.
4 | JelD-WeN, Reliability for real life and the JW icon are registered trademarks of JelD-WeN, inc., Oregon USa. all other trademarks are the property of their respective owners.(06/09) INStall FRameNew opening sizeexisting trimRemove drywallFastening screwNylon guideNailShipping blockScrewDoor2 1/2"center on doorhanger brackethanger bracketRollerlock nutadjusting bolt headtop trackexisting door frameFloor plateWall studtop trackPocket frameFace jambRotated 180oVertical split jambShimShimShimShipping blockPocket fram