Transcription of Installation, Maintenance and Operating Instructions
1 1 D 71 EN Issue 9/2020 Ball valveSeries DInstallation, Maintenance andOperating Instructions21 D 71 EN - Issue 9/2020 READ THESE Instructions FIRST!These Instructions provide information about safe handling and operation of the you require additional assistance, please contact the manufacturer or manufacturer's THESE Instructions !Addresses and phone numbers are printed on the back to change without trademarks are property of their respective OF CONTENTSGENERAL 3 Scope of the manual 3 Valve description 3 Valve markings 3 Technical specifications 3CE marking 4 Recycling and disposal 4 Safety precautions 4 TRANSPORT.
2 RECEPTION AND STORAGE 5 MOUNTING AND COMMISSIONING 5 General 5 Mounting the valve in the pipeline 5 Actuator 6 Commissioning 6 Maintenance 6 Maintenance general 6 Maintenance of a mounted valve 7 Removing the actuator from the valve 7 Removing the valve from the pipeline 7 Dismantling the valve 7 Removing and inspecting the valve parts 7 Reassembling the valve 8 TESTING THE VALVE 12 MOUNTING THE ACTUATOR 12 General 12M actuator 12B1C actuator 12B1J actuator 12 Mounting actuators of other manufacturers 13 TROUBLE SHOOTING TABLE 13 TOOLS 13 ORDERING SPARE PARTS 13 EXPLODED VIEWS AND LISTS OF PARTS 14D2 valves 14D1F valves 15 DIMENSIONS AND WEIGHTS 16 TYPE CODE 21 This product meets the requirements set by the Customs Union of the Republic of Belarus.
3 The Republic of Kazakhstan and the Russian D 71 EN - Issue 9/202031 Scope of the manualThis manual provides the essential information about the use of series D ball valves. For more information on actuators and other equipment, which are covered only briefly, please refer to the separate manuals on their installation, use and Maintenance . Valve descriptionSeries D valves are flanged ball valves. The body consists of two symmetrical parts which are attached to each other with screws. The ball and stem are of one piece. Large low-friction bearings ensure reliability and long Maintenance intervals. The valves have spring-loaded seats which are either soft or made of metal.
4 The valves can be used for shut-off and control applications. Valve markingsThe body markings are cast or stamped on the body side. The identification plate (Figure 2) is attached to the valve identification plate has the following material material Operating Operating shut-off pressure of the list of valve manufacturing Technical specificationsFace-to-face length:ASME B , API 6 DBody ratings:ASME Class 150, 300 and 600 Maximum pressure differential:see Figures 3 and 4 Temperature range:see Figures 3 and 4 Flow direction: single-seated:upstreamdouble-seated:flow direction freeLeakage rate:metal-seatedASME Class VISO 5208 leakage rate D, C,or Bsoft-seatedAPI-598 (1970)Dimensions.
5 See Section 11 Weight:see Section 11 NOTE:Selection and use of the valve in a specific application requires close consideration of detailed aspects. Q2G-trim is for relatively clean gas applications, note possibility of clogging. Due to the nature of the product, this manual cannot cover all the individual situations that may occur when installing, using or servicing the you are uncertain about use of the valve or its suitability for your intended purpose, please contact Neles for more valves in oxygen service, please see also the separate installation, Maintenance and Operating Instructions for oxygen service (see Neles document ).
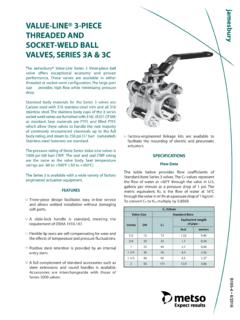
6 Puc. 1 Construction of the D series valvePuc. 2 Identification plate(1)(3)(5)(6)(8)(9)(2)(4)(7)(10)(5)( 6)(7)(8)(9)(10)(1)(2)(3)(4)41 D 71 EN - Issue 9 CE markingThe valve meets the requirements of the European Directive 2014/68/EU relating to pressure equipment, and has been marked according to the Recycling and disposalMost valve parts can be recycled if sorted according to parts have material marking. A material list is supplied with the valve. In addition, separate recycling and disposal Instructions are available from the manufacturer. A valve can also be returned to the manufacturer for recycling and disposal against a Safety precautions Puc.
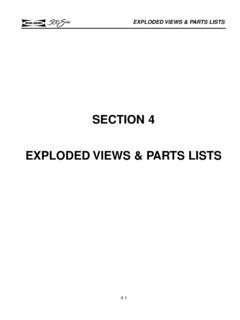
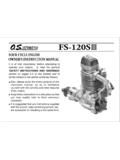
7 3 Pressure/temperature curves of the valve body, material ASTM A216 gr. WCBPuc. 4 Pressure/temperature curves of the valve body, material ASTM A351 gr. CF8 MTemperature ( C)Temperature ( F)p(bar)p(psi)3850 100 150 200 250 300 350 375 400 4250204060801001200200400600800100012001 4001600#600#300#150100 122 212 302 392482572 662707752797 Temperature ( C)Temperature ( F)p(bar)p(psi)38 5015025035040045050055060002040608010012 002004006008001000120014001600#600#300#1 50100122302 482662752842 932 1022 1112 CAUTION:Do not exceed the performance limitations!Exceeding the performance limitations marked on the valve may result in valve damage or even in uncontrolled pressure release.
8 Damage or personal injury may :Do not remove or dismantle a pressurized valve!Removing or dismantling a pressurized valve will cause an uncontrolled pressure release. Always shut off the pipeline, release the pressure and remove the medium before removing or dismantling the valve. Identify the medium, protect yourself and the environment against any harmful or poisonous substances. Prevent the medium from entering the pipes during to do this may result in damage or personal :Beware of the cutting movement of the ball!Keep hands, other parts of your body, tools and other objects out of the open flow port. Also make sure that no foreign objects enter the pipeline.
9 Close and detach the actuator pressure supply for to do this may result in damage or personal injury. CAUTION:Protect yourself against noise!The valve may produce noise in the pipeline. Its level depends on the application and can measured or calculated using the Neles Nelprof computer program. Occupational safety regulations on noise levels should be observed. CAUTION:Beware of extreme temperatures!The valve body may be very hot or very cold. Protect people against frostbites and :When handling the valve or the valve package, remember its weight!Do not lift the valve or the valve package from the actuator, positioner, limit switch or their pipes.
10 When lifting the valve, place the lifting ropes around the valve body. See Figure or personal injury may result from falling weights are listed in Section :Follow the proper procedures when handling and servicing oxygen D 71 EN - Issue 9/202052 TRANSPORT, RECEPTION AND STORAGEC heck the valve and the associated equipment for any transport mounting the valve, store it indoors in a suitable not take the valve to the intended location or remove the flow port protectors until just before the valve is supplied in an open not lift the valve or the valve package from the actuator, positioner, limit switch or their lifting the valve, place the lifting ropes around the valve body.